Sunday, July 26, 2020

6 x 6 MDF Artist's Board - He Watches Me


Hello!!!  It's been Hot and Humid here in southern Iowa the past few days but it's supposed to storm tonight and cool off by about 10 degrees for this next week.  I'll take it!!!

I had a lot of fun creating this piece.  It's done on a 6" x 6" mdf artist's board.


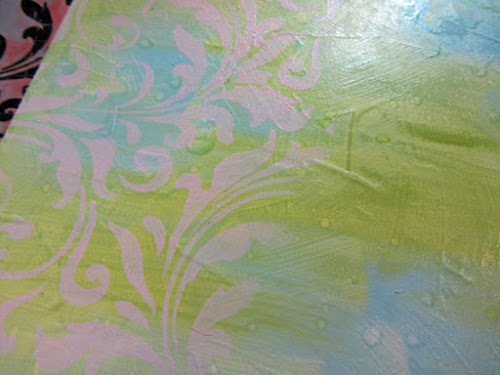
I began with a coat of gesso brushing it on roughly and allowing the brush strokes to stay.  After the gesso was dry, it was painted with Distress Paint, splattered with water, and allowed to dry.


In this picture you can see all the wonderful texture from the brush strokes and the extra illusion of texture with the water splatters.


Stenciling was added with Distress Paint using a Distress Blending brush.  


Subtle but, oh, so nice!!!


I love this Tim Holtz Idea-ology Collage Paper.  To tear out what you want to use just make a wet line using a paint brush or water brush and it will tear right apart.  I glued it down with Distress Collage Medium and also added it over the collage paper sealing it in.


More paint was added here and there with my finger to further blend in the paper and also did more stenciling.


Birds, branches, and a nest need leaves.  I put both colors of Distress Paint on my Glass mat, spread them thin with my finger allowing the 2 colors to intertwine but not blend so much that you lose each color, pressed in the stamp and stamped onto the board.  I did not use a stamping block so I could bend the stamp and choose where the image went.


The bird was die cut from Distress Water Color Cardstock and colored with Distress Paint.  Later I added some more detail with a Posca paint pen. 


Leafy branches were die cut from Mixed Media Paper, sprayed with Distress Spray Stain and allowed to air dry.


I took the leaves out of my spray box, set them aside to dry, and there was lots of stain puddled so I grabbed a tag to mop it up.  I dried a layer and went back for a second mopping.


Twine was sprayed a bit with Antique Linen Spray Stain and dried.  The leaves were glued to a stick from my yard and wrapped with the twine to be sure they couldn't come lose.  The bird was attached with two layers of foam tape.  The words were computer generated, printed onto cardstock, cut out, Distress paint sponged on, and they were glued to the board with Distress Collage Medium.


I Love how this turned out!!!!!  I hope you like it too!!

Hugs, Wanda


Friday, July 17, 2020

3D Poinsettia Christmas Card - Joy to the World


Hello!!  This card is completely inspired by Paula Cheney and her blog post found HERE.

I followed along with her basic directions -- Oxide inks inside the folder, painting the image with Resist Spray, foiling, and re-embossing.  However, I own a Royal Sovereign Laminating Machine and that is what I used instead of a Minc.  I used Deco Foil (again what I have) and she used Minc Foil.  I was careful to get the Resist Spray painted on the whole image tipping the card as Paula suggested.  But I have a lot more white spots after embossing then Paula got.  Since there is more than one variable I can't be sure why but I'm inclined to think that perhaps the laminating machine does not have as much pressure as the Minc.  I just might have to invest in a Mini Minc to test that theory.   


After the all the basic steps I splattered the whole panel with Distress Paint Picket Fence (I forgot to include the paint in the picture at the bottom) and embossed around the edges with Liquid Platinum.  For the next layer I stamped with the large Baroque stamp using Dusty Concord Archival Ink.  Around the edges of this panel I used a little glue stick and pressed on the same foil I used for the image.  For the sentiment I inked white card DTP with regular Distress Ink, sprayed the paper, and dried.  The sentiment was stamped with Embossing Ink, embossed with White, trimmed out, glued to white card, and cut as shown and a brad added.  Distress Vintage Platinum Glitter Dust was added to the centers of the poinsettias gluing it on with Collage Medium.


Wednesday, July 15, 2020

Most Wonderful Time 3D Poinsettia Christmas Card


Hello from rainy Southern Iowa.  We are happy for the rain and I'm sure the farmers are even happier.  Much of Iowa has been in a drought and our grass was turning brown.  Of course, this means the lawn is going to need to be mowed.

I'm sharing another card made with the new Sizzix, Tim Holtz Poinsettia 3D Texture Fade.  This is such a wonderful embossing folder!!!  There are so many looks that can be done.  I've been seeing some gorgeous cards on Instagram and in the FB group, Tim Holtz Addicts.

For this card I began with Metallic Kraft Stock paper and embossed the image.


I cover the whole panel with Distress Black Soot paint, let it sit a bit and then wiped back the paint.  It's even more gorgeous in person.


I wanted more texture and used an old Tim Holtz hammer tool.  One of the heads that can be put on has metal bumps.  I set the paper on a thin slightly cushy material that was in the Susan's Garden line at Elizabeth Craft Designs and was used with tool on leaves to give them detail.   A piece of mat board or chip board might work well.  You don't want anything too cushy or you will make holes in your paper.


Next I used largest Stacked Label die.  I was somewhat hesitant as I wasn't sure what it would do to the 3D embossing but it worked just pressing some of the 3D down a bit.  I did later put it back in the folder and run it through my Vagabond just once to pop up the high spots that were pushed down.


For the next layer I cut a piece of paper from this seasonal paper stack.


The paper was dipped in some Fired Brick ink sprayed with water to give it a bit of color.


Archival Ink was sponged around the embossed piece and Distress Ink around the pattern paper.  Later I also added some Festive Berries Distress Ink on the edge of the patterned paper.


I thought the poinsettias needed more then just ink and also added Distress Embossing Glaze.


Alcohol ink was dripped onto the Idea-ology Christmas Quote Token, dried, and then Picket Fence Distress Crayon rubbed into the words.  Eventually the white crayon took on some of the alcohol ink color but still looked good.


Some ribbon to tie on the quote token and a green folded card to finish things up.


I think I make some more cards similar to this using other colors of Metallic Kraft Stock.  Hmmm, maybe a darker metallic color and then white paint.  I might just have to go do that right now :-))

Thanks so much for following along!!!!

Hugs, Wanda


Sunday, July 12, 2020

Merry Christmas 3D Poinsettia Card


Happy Sunday!!!  I hope you are having a good weekend!!!

I ordered a few of the new Chapter 3 Tim Holtz releases from Sizzix from my favorite store, Memory Bound in Ankeny Iowa.  One of the items I got was the Poinsettia 3D Texture Fade.  It's such a beautiful folder!!!  I made this card yesterday with it.  There will be more cards coming :-)  I don't have step-out pictures today but will tell you what I did.


I used Distress Water Color paper for my image.  When you open the texture fade one side is bumped up with the image and the other side is flat with the image debossed.  I inked this flat side, just on the flat part, with Distress Oxide ink Speckled Egg.  I did get some ink on inside areas that were very close to the same height as the flat part but that was just fine.  I actually helped give some shadows to the image.  After inking the folder, I lightly sprayed water on both sides of the paper, put it carefully in the folder, and ran it through my Vagabond 3 times.  

I then used a water brush along with Distress Inks to add color to the image.  I used Festive Berries ink for the flowers and Mowed Lawn for the leaves and stems.  I painted some areas twice giving deeper color and allowing more ink to sit in the low areas.  This worked well but I did have some spots where the color bled out more than I wanted it to.  I then decided to use the water brush and Speckled Egg Oxide to watercolor around the edges of the image.  I'd paint a line of the Oxide right at the edge of the image, blot the brush to remove of the color and then blend out my line a bit.  It blended in to the background really well and really helped to shadow, define, and help the image pop more. I went back and painted Mowed Lawn Oxide Ink just on the stems.  There were still some small spots of white around the image, especially at the tips of the flower petals.  I used the Festive Berries Distress Marker to lightly color these spots and also used it here and there to create some deeper shadows on the edges of some flower petals.  Distress Paint was used to color the centers of the flowers.  Finally to give some highlight to the image I used my finger to lightly brush/dab Picket Fence Distress Ink over the high spots of the flowers and leaves.  It really came out beautiful and I'm glad because coloring is not really my comfort zone :-)
I used the mini Merry Christmas stencil and Speckled Egg Oxide Ink on the background placing the stencil so you could definitely tell that is what it was saying.  Using a splatter brush I added Distress Paint Picket Fence over the whole panel, dried it, and then added just 2 spritzes of Tarnished Brass Mica Spray.  The mica is very subtle but definitely catches the light as the card moves. So pretty!!
Around the edges of the panel is Grit Paste sprinkled with Distress Rock Candy Dry Glitter and allowed to dry.
The next layer is metallic kraft card.  I distressed the edges and then crumpled the paper a bit.
The Merry Christmas token is from the Tidings Tokens pack.  I had started to use Festive Berries Distress Crayon to fill in the letters and decided white would be better.  I wiped much of the red away but didn't scrub it all out.  Then I used the Picket Fence Crayon and I really like how it looks like the red is marbled in the white.


I'm entering this card in the current challenge over on The Funkie Junkie Boutique Blog which is Christmas Cards in July.


I appreciate YOU so very much and the time it takes for you to visit my blog (or read the email).  Thank you!!!!!!!!!

Hugs, Wanda


Saturday, July 11, 2020

Scripture Journal - James 1:22


Happy Saturday to you!!!!  I hope you've had a good week.

The mottled color that you see in the circle on this page is bleed-thru from the other side of the page.  A lesson to remember to use gesso if I'm using a lot of spray or wet paint.  I knew it would be easy to cover up but decided to keep some of it.  I used clear gesso over the whole page and let it dry.  I die cut a circle to use a mask before putting texture paste through a PaperArtsy stencil. I had thought about spraying over the texture paste but when I found out this weeks challenge over at Simon Says Stamp's Monday Challenge is "Play With Paint", I decided to do just that.


I painted everywhere but inside the circle with Twisted Citron.  Next I sponged on Mowed Lawn trying to hit mostly just the texture paste leaves.  Then I used Peeled Paint through a Tim Holtz stencil.  I like how it seems we are in a forest surrounded by trees and leaves. There are paint splatters with Spun Sugar.


The is pen work with both a white gel pen and a black pen.  The die cut leafy stems are from the Sizzix / Tim Holtz set Garden Greens.  They are inked and sprayed including some Mica Spray (Tim Holtz Tarnished Brass) to give some shimmer.  The bird is from the Tim Holtz Idea-ology pack, Botanicals.  The butterfly is from the Idea-ology Snippets pack, Field Notes. 


I missed a few things in this picture of supplies (like the Mica Spray) but it shows most of what I used. 


Tuesday, July 7, 2020

The World Needs Who You Were Made To Be


Hello!!!  I hope you are doing well!!  I have a card to share with you today. I love these words because the world really does need who you were Made to be.


Let's get going with the how I did it for this card.  I'll work from the bottom up.

The folded card is just white cardstock.  

The next layer is done on Distress Watercolor Cardstock working on the smoother side.  I sprayed Spun Sugar Spray Stain on my craft mat, sprayed it with water and dipped the paper into it. Dried it and dipped again.  Do this until you are happy with it.  The alpha image (Faded Type CMS397 set) was inked with Spun Sugar Distress Ink, sprayed with water and stamped onto the paper repeating a few times.  The paper was then dried.


Picked Raspberry Spray Stain was splattered onto the paper using the Distress Splatter Brush.  The edges were inked with Picked Raspberry and then distressed with the Tonic paper distresser.


Alcohol Lift-Ink was stamped (Floral background from set CMS220) onto a Yupo Alcohol Ink background from my stash that I didn't particularly like and the lift (which I love) stamped onto Alcohol Ink Glossy Paper (this is the piece used on this project).  The lift ink was dabbed from the Yupo background using a paper towel - dab ink, move to clean spot on the paper towel and dab again, continue until all the wet ink is dabbed up and then buff your Yupo to remove any left over residue.  Set this piece aside to use on a later project.  I stitched around the stamped piece with white thread and distressed the edges. 

I cut a piece of white cardstock just a little larger than the floral background, inked around the edges with Picked Raspberry and Carved Pumpkin Distress Inks and attached the floral background to it.


The ephemera and mushroom images are from the Idea-ology Field Notes Ephemera pack.  Some of the top and bottom of the script piece was torn off.  It was then sprayed lightly with Tattered Rose Spray Stain and Picket Fence Spray Stain, and dried.  I added more layers of Picket Fence Spray Stain drying between layers until it was as muted as I wanted.  The long edges were distressed with paper distresser and Picked Raspberry ink lightly sponged around all edges. 


The mushroom tops were water colored with Distress Ink and a water brush to brighten them up.  I used Picked Raspberry on 2 groups and Carved Pumpkin on the 3rd group.  The tallest mushrooms were a lighter color then the medium sized mushrooms and therefore the Picked Raspberry ink looked more pink on the tall group and the other mushrooms looked more red.  Later I sponged Squeezed Lemonade Distress Ink around the edges of the mushrooms to brighten them even more.


Color was added to the Idea-ology paper doll girl with Distress Markers.  The Idea-ology bouquet flowers were colored by using a water brush to added some Distress Ink (not fully coloring them) and then spraying the flower with water to bleed the ink out.  The round No. 7859 ephemera piece was inked on the edge with Squeezed Lemonade and tucked in as shown.  You could even cut the circle in half and save the rest for another project but I didn't think of that at the time. 


The words are stamped (Tiny Text CMS394 set) with Black Soot Archival Ink, and cut out.  The edges of "Hello Friend" are distressed.  The edges of the other piece are inked with Picked Raspberry.  


I really like this card and I hope you do to!!!

Hugs, Wanda