This past Saturday I took one of Tammy's classes being offered at Memory Bound Scrapbook Store in Ankeny, Iowa. We worked on burlap panels and used lots of layers and textures. It was a wonderful class!!!!
Here is a pic of Tammy and I.
This was her opening screen before we got to the step-by-steps for the class.
More pictures of the my Hinged Burlap Panels.
When I left the house in the morning, as I was driving down the gravel, I looked in my rear-view mirror and had to stop and take a picture of this gorgeous sunrise.
Hi There!!!! I'm squeezing in an entry to the September Make Art Challenge... it ends tonight. The challenge was to make something inspired by either something on Wendy's blog or her new products coming out soon. I've filled this tag with Wendy products and techniques.
I started with a Ranger #8 manila tag and did Wendy's Archival reinker and alcohol technique using her colors leaf green and potting soil. I did quite a large puddle of color and actually colored two tags and 3 atc sized pieces. After drying the background ink I stamped the broken hole image from her Textures For Art set of stamps with potting soil ink stamping more than once with each inking. I then stamped her script image (Live and Make Art set or also available as an individual background) also with potting soil but stamped once on scrap paper first. Next up is her brick stencil and custom mix of powders to create a brick color. I inked through the stencil with red geranium and quickly added the powder and heated it. The edges of the tag are inked with Distress Ink walnut stain. I then used my most favorite flower from my most favorite stencil of hers, 3 Fresh Flowers (one of her first stencils). I mixed buttercup reinker with some white embossing paste for the flower and leaf green with white paste for the stem and leaves. (I actually had mixed the green some time ago and used one of her storage jars to keep the excess - I still have more to use). Once the paste was dry - I did carefully help it along some with the heat tool, I put the stencil back on and added some tiger lily to the flower brushing with a mini ink blending tool from the center outward. I used the stripes dots and stripes stencil to stencil lines along the bottom and top (mostly hidden behind bow) with jet black ink. Drew a line across with a Posca paint marker - single straight line at the top and 2 lines roughing them up a little at the bottom. Used a white gel pen to highlight the stem and leaves. Used a black Glaze pen for the black dots. One one of the atc sized pieces I had colored I stenciled with the dots stencil and Ranger's white pigment ink, dried it, stamped the broken hole image with leaf green, stamped the quote (Textures For Art set) with jet black, tore it out, rolled the torn edges, and stapled it on with Tim's tiny attacher tool. Glued a gumdrop colored with one drop of sunshine yellow alcohol ink to the center of the flower. Colored a piece of ribbon with leaf green reinker and alcohol and tied it to the top.
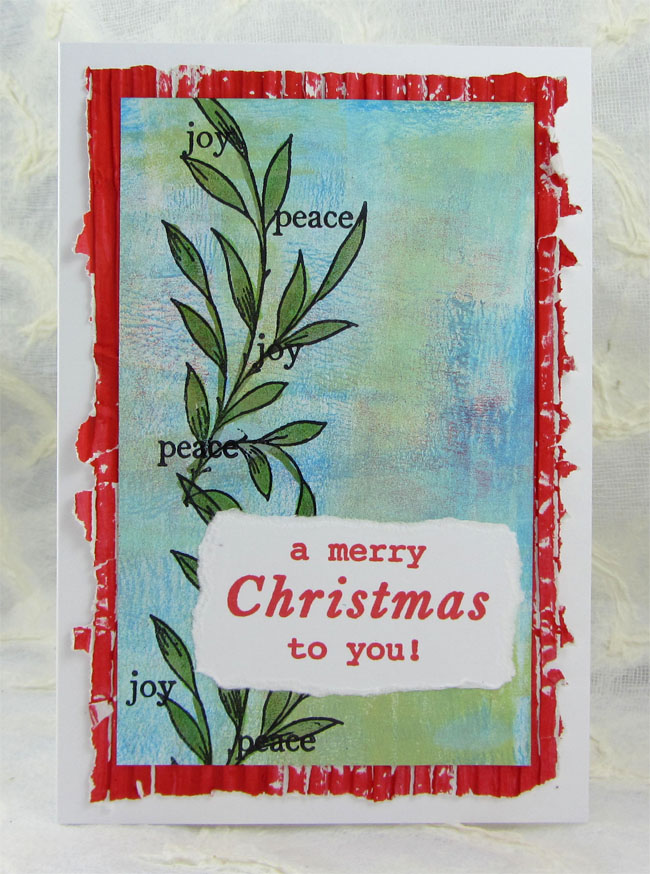
Happy Autumn!!! The corn and beans are drying up in the fields, a sure sign of fall out here in the country. Here is a card I made a couple weeks ago. I started with white cardstock, laid a plastic fern leaf on it, sprayed with Dylusions Spray Inks, blotted the ink, dried it with a heat tool, stamped the scripture (Our Daily Bread Designs) with Archival Ink jet black, sponged red Dylusions paint through the tiny circles stencil (The Crafter's Workshop) across the top and bottom, splattered on some gold paint, inked the edges, tied some twine around the panel, and attached it to a folded white card.
God's love and faithfulness are immeasurable. We think we can understand how much there is but we really can't and even those times we might think it doesn't even exist, it's still there!! I'm so thankful that God's love and faithfulness don't quit.... Ever.... For Any Reason!!!!
The background for this card is inspired by Pauline Butcher... specifically THIS post on her blog. She mentions in her post that the background used shaving foam and Dylusions ink sprays. You could just about see my ears perk up and the smoke coming from my head. LOL I hadn't played with shaving cream in a long time and I had never thought about using the sprays with it. I HAD to play!!!! And I LOVE the results!!! I used one of the pieces I did to make this birthday card for our granddaughter. Over the inky background I've used a TCW stencil (mini butterfly collage) and Wendy Vecchi's black embossing paste. Around the outside of that I've sponged some white paint through a stencil. Happy Birthday (Quietfire Design - Happy Birthday Plain & Simple Set of 7) is stamped on another of the shaving cream background I made, cut out, doodled, wrapped onto the background and stapled in place. Over the butterfly itself I've used the clear Wink of Stella pen. This panel is attached to a black panel and then to the folded white card.
Wednesday, September 16, 2015
I'm on the Quietfire Blog today being thankful!! I hope you'll pop on over and check it out.
These are my last two samples using the new PaperArtsy Sara Naumann stamps.
I painted the background panel with London bus, scraped on crackle glaze, let that dry, and then painted over it with guacamole and let it dry and crackle. The lines are stenciled (PS018) with mermaid... stamped the music image with Archival Ink leaf green.... stamped the foam leaves and open leaves with glass blue paint... stamped the words with Archival Ink jet black... splattered on watered down snowflake paint.... the edges are sponged with glass blue. For the bird panel, I cut a piece of the brayered paper mentioned yesterday, stamped the bird with Archival Ink jet black and embossed it with clear powder, stamped the script image with Archival Ink french ultramarine, stamped the words with Archival Ink jet black, inked the edges with jet black and then sponged glass blue paint... added red and then white paint dots to the edge.
The last card... onto a folded white cad I added a piece of recycled packaging painted with London bus and tore the edges. The background is another piece of the brayered paper, stamped the leaf image with Archival Ink jet black and added color with a marker, stamped the words with jet black. On a scrap of smoothy I stamped the sentiment with Archival Ink carnation red, tore it out and attached it to the background.
I hope you've been following along over on the PaperArtsy Blog this week as they've been sharing all the new fall releases. Today focuses on two new sets by designer Sara Naumann (ESN17 & ESN18) and I got to work play with them. I had a lot of fun creating with these stamps!!!! So much so that I made more samples then was required. I'm sharing four cards today and will share two more tomorrow. Sara's chosen color palette for these release samples is London bus, mermaid, guacamole and glass blue.
Before the stamps even arrived in my mailbox I had those colors out and took them for spin by brayering some smoothy card with them. It's a piece of that sheet that I've used to start this first card. I had also printed a picture of the stamp sets so I could be looking and thinking about what I might want to do when the stamps arrived. I needed to be quick when they arrived and get the samples back into the mail to PA headquarters to arrive in time for this week. I had been pondering the leafy stem image (and coloring it in) when the thought popped in to make a solid stamp from fun foam to coordinate with it. I thought that might be very cool and did just that when I got the stamps. I took a piece of fun foam that already had adhesive on one side, stamped the leaf image onto it, carefully cut it out, peeled off the backing from the adhesive side and stuck it to a piece of heavy plastic packaging. Wah-Lah... a coordinating stamp... almost.... when stamped and then trying to stamp the line image over the solid image, they didn't line up exactly. I should have had a print lying under the plastic to use as a guide for the fun foam piece as I stuck it down but I didn't think of it soon enough. I could have made another one but decided it was just fine, they didn't have to line up!!!
So for this first card I started with a piece of the brayered background, stamped the quote with Archival Ink jet black, stenciled the stars (PS018) with glass blue paint, stamped guacamole paint with the foam stamp, stamped the outline leaves with Archival Ink fern green, added some shading on the leaves with a marker, stamped the flower with London bus paint, added white dots to the centers using snowflake paint and the end of a paint brush, and distressed the edges. This is layered to a piece of smoothy painted with old gold, tied with red twine and then attached to the folded white card.
This second card is very simple and totally doable if you need a lot of Christmas cards. Onto smoothy card the quote is stamped with Archival, stamped the foam leaves with guacamole paint, stamped the outline leaves with Archival Ink jet black, stamped the flowers with London bus paint, added the white dots using snowflake paint and the end of a paintbrush, distressed the edges and layered to a panel painted with mermaid.
This background is a print using a round Gelli plate. I brayered guacamole and mermaid onto the gelli plate and stamped into the paint with the leaves stamp which removed paint from the plate. I quickly wiped off the stamp and restamped to remove paint until I had enough leaves and pulled my print. Next I was sure to get all the paint cleaned off my stamp. Onto this print I randomly stamped the music image with Archival Ink viridian and the text image with Archival Ink sky blue. I stamped the bird with Archival Ink jet black and embossed it with clear powder. The quote and words are stamped with jet black. The little circles image is stamped with Archival Ink cornflower blue stamping off once onto scrap paper before onto my project. I cut out the print with a circle cutter, distressed the edges and added added red ribbon using a tiny attacher. This is attached to a circle of heavy smoothy and the edges distressed.
Another simple card. I stamped the bird with Versamark ink and embossed it with clear powder onto heavy smoothy. Next I used watered down London bus paint to add color spraying the piece with water and blotting as needed. The quote is stamped with Archival Ink jet black and the panel attached to a white base.
Hello and Happy Tuesday!!! For those in the US, I hope you had a great holiday weekend!!! Ours was wonderful but really busy. My husband's younger brother and his wife were down from MN and visited all day Saturday and then we had a wedding to go to Saturday evening. After church Sunday morning we had kids and grandkids over for dinner and to celebrate a birthday and Monday we worked on the house and spent time with our youngest son. Whew!!!
Today I've been catching up and having a play with PaperArtsy's brand new limited edition paint set.
Over on the PaperArtsy Blog this week they are sharing all the new fall releases!!! Be sure to check it out each day. Yesterday the focus was on new Hot Picks stamps and new paints. Today the focus is new Clare Lloyd stamps.
I'm not sharing any new stamps today (that'll be on Thursday) but I do have a project using the new paints. I started with a 4 3/8" x 6 1/8" piece of heavy smoothy card and gave it two coats of gesso, drying in-between. One coat is brushed horizontal and the other vertical giving great texture to the paper. I then scraped some Teresa Green over the piece using a junk mail card and dried it completely. Next I scraped on Granny Smith and Captain Peacock and while they were still wet, I put the PA Lin Brown stencil PS006 over the piece and used a baby wipe to wipe away paint. I picked up the stencil and replaced it not lining up with the first time and rubbed just a bit more here and there to give it even more depth in the background. I love this background!!! Must do more of this!!! I dried that completely and then used a stencil brush with Professor Plum through the PA Jofy stencil PS011. I picked up extra paint with the junk card and added some lines at the bottom. The quote is from the PA Sara Naumann set ESN12, stamped with Archival ink jet black and embossed with clear powder. I doodled the edges with a Posca marker and added some shimmery highlights with a Wink of Stella marker.
It's a rainy, wet morning her in southern Iowa and the hubby is not happy about it, lol. The rain was supposed to miss us, but they were wrong. We're hoping it's done soon and we have time to get some things done on the house today. We are working at putting on an addition and new siding on the whole house.
After finishing up the jounaling bible page I shared yesterday I wanted to use that TCW daisy stencil again as I'm quite liking it (you just might see it a few more times before I move on to something else :)... it's TCW552s Mini Daisy Splash. I started with Dylusion paint on white cardstock blending the blue and teal, stenciled (TCW mini butterfly collage) with the Dylusions yellow paint, and splashed some white paint marker over the panel. Once dry I stamped the quote (Quietfire Design - Always Be My Friend set) with Archival jet black and embossed it with clear powder. I positioned the daisy stencil and added Wendy Vecchi Studio 490 white embossing paste. Once the paste was dry I put the stencil back on and dabbed a little of the yellow paint in the center areas, removed the stencil and used a Wink of Stella pen on the white part of the flowers and around the edge of the card. I decided it should have a few butterflies, punched them from white card, glued them on allowing the wings to be free, used Wink of Stella on the wings and put pearls in the body area. Attached this panel to a folded white card.
Hi There!!!! I do hope your week is going well!!! So I've been thinking about and pinning bible journaling for awhile and have finally taken the plunge. A wonderful lady that fell in love with the idea and pursued it has started a local group that is meeting together and sharing pages and scriptures to encourage and help each other to go deeper with God and His word. I wasn't sure I could fit it in my schedule but have started and will see how it goes. I missed the first meeting but attended the second meeting last night and had a wonderful time. I didn't have a page done in my bible as I was just able to get one yesterday afternoon but got a page done today for the first scripture.
When I decided I'd be able to go, since I didn't have a journaling bible yet, I thought I'd do a page in my scripture art journal. I'm thinking I might continue to work in both allowing more time to concentrate on each scripture or passage. The background in my journal was already there from a past mop-up of ink and I just worked on top of it... although as I was working on the right side, I got to a point that I just totally didn't like the page and ended up covering it up and reworking.
Left side - Ink sprays in the background, black embossing paste through a TCW stencil for the girl, and writing with a Pitt Pen. Right side - it started with the same sprayed background but then I covered it all up with Dylusion paints, Dylusions border stamp, writing with a Sharpie paint markers.
In the Bible - Dylusions paint, an old leaf stamp, TCW daisy stencil, writing with a Pitt pen, daisy die cuts just in a box of misc cut and punched items, a Wink of Stella pen to add the sparkle to the daisy.
I realized as I was editing the pictures that I forgot to include the scripture reference on the journal pages and will be adding that - Philippians 4:8.