Welcome to the Quietfire
Design Garden Delights Blog Buzz!
Quietfire Design would like to
introduce you to their new Spring selection of rubber stamps! Each day
designers will be posting brand new artwork they have created using the new
rubber stamps. Visit each of their blogs on the day of their featured project,
post a comment on their Blog Hop post and you will be eligible to win a
grab bag of Quietfire Design rubber stamps valued at $50! Each Designer will
randomly choose a winner from the comments on their own Blog Hop post, so make
sure you’ve commented by midnight Friday, May 18th. Tell your
friends!
All winners will be posted on
the Quietfire Style blog on
Sunday May 20th. If you are one of our lucky winners, please contact Suzanne
privately with your snail mail address. (Her email address is in the sidebar of
the Quietfire Style
blog)
Here is our schedule:
The complete set of
new
rubber stamps will remain on special at 20% off throughout the Blog
Buzz!
Happy Buzzing and good
luck!!
*********************************************************************************
Now for my project!!!!
Supply List --
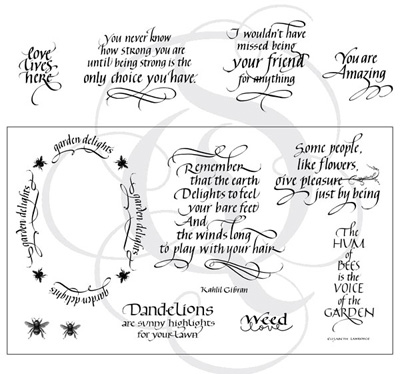
- New Quietfire Design Rubber - love lives here, largest bee from Garden Delights
- Quietfire Design Rubber - flourish from Flourishes 1 set, love from Words of Love set
- #8 Manila tag
- Manila cardstock (or you could use a manila tag)
- Natural cardstock
- Grungepaper
- Book cloth - maroon, hunter green
- Distress Ink - victorian velvet, dusty concord, antique linen, walnut stain, broken china, faded jeans, peeled paint
- Ink blending tool
- Color Wash Spray - sailboat blue, meadow
- Mister bottle with water in it
- Archival Ink - jet black, saffron
- Distress embossing powder - tea dye
- Acrylic paint - white
- Tim Holtz dies - artful dwellings, movers and shapers heart, on the fence, tattered florals, tattered leaves
- Tim Holtz embossing folder - bricked
- Ideology - memo pin, bird from adornments pack
- Pens - white, black
- 13mm White silk ribbon
- Tim Holtz paper distresser
- Craft sheet
- Scissors
- Heat tool
- Sponge
I'll start by explaining the flowers first. If you search on YouTube you will find many videos on making your own roses so I won't explain all the details here. I will show you pics of how the flowers were cut before making the roses. The larger roses were each made from three 6-petal flowers. The smaller rose was made from one 6-petal flower. I used the smaller 6-petal flower from the tattered floral die and cut them from maroon book cloth. I wasn't sure how the book cloth would work but it's fabulous for this - looks AND feels great!!!! After cutting the flowers I lightly brushed white paint on the edges of the petals starting off the flower and brushing in over the edge.


The leaves were also die cut from book cloth using the tattered leaves die. After cutting I folded down the center of the leaf, front out, and rubbed peeled paint on the fold... repeated folding and rubbing on ink to get all the lines on the leaf. I then pinched and twisted the end of the leaf and trimmed off the stem.

For the background of the tag I lightly sponged white paint on the tag and dried it. Then working on a craft sheet I sprayed the tag well with water and then with both colors of Color Wash spray and dried the tag. Next I rubbed the edges in the left over color on the craft sheet and if needed sprayed a little water along the edge of the tag for blending and dried the tag again. (The white paint resists the color wash and peeks through adding wonderful texture to the background). Stamped the flourish a few times with broken china and the word love with faded jeans. Added squiggles around the edges first with a black pen and then with white. The flourishes were pretty light and so I decided to add highlights with the white pen.
The house with the heart die stuck inside was cut from manila cardstock and then embossed with the bricked folder. Covered the front completely with victorian velvet using a blending tool... lightly went over it with dusty concord to pick up the pattern of the embossing and finally added a bit of walnut stain around the edges. Stamped love lives here with jet black on a scrap of natural cardstock, attached it behind the house and used a black pen to add dots. Cut the roof from the left over piece of manila cardstock that I cut the house from... just followed the roof line of the house on the left over piece. Painted it white. After it was dry I added a bit of walnut stain, dried it with a heat tool and added doodling with the black pen.
The fence was cut from grungepaper. I inked it with distress ink and embossed it with the tea dye powder. After it was cool I rubbed it to remove all the release crystals and then painted it white. This gave the fence great texture!!! After it was dry (or use your heat tool) I very lightly rubbed the walnut stain over it (I used the blending foam without adding more ink), stamped a few flourishes along the bottom with peeled paint and dried it.
For the "sign" I stamped love on a scrap of natural cardstock, cut it to size trimming the corners diagonal, inked the edges with victorian velvet, distressed the edges with the paper distresser, and inked them with dusty concord. Put the sign in a memo pin and cut off the end so it wouldn't stick down past the bottom of the fence.
The bee was stamped on a scrap of natural cardstock with saffron, dried, details added with the black pen, and then cut out.
The silk ribbon was sprayed with water and then both colors of Color Wash spray, partly dried, and then scrunched as I finished drying it. If you scrunch it up while it is very wet the colors blend together more and I wanted to be able to see both colors.
Everything was assembled as shown. The bird has two layers of foam tape behind it for added dimension.
Here are some close up pics.