Saturday, January 27, 2018

Created and Loved


Happy Saturday to you!!!  So last year my daughter, Krista, and I decided we would try to participate in a challenge blog throughout the year.  No pressure, just as we could.  We chose the Simon Says Stamp Monday Challenge and had a good time playing along but also missed a lot of weeks.  This year we've gone with a monthly challenge.  I sent her the links to some options and she chose the More Than Words Challenge for a couple of reasons.  She has really gotten into art journaling and usually either creates in her journal or does a canvas so this fit really well for her.  She also said that this forces me to do more journaling (or canvases) and she's looking forward to seeing what I do.  I do really like art journaling and it's usually time (and maybe procratinating, lol) that has me making cards more.  Overall I think this is going to be fun.  


January's word inspiration is "birthday".  This had me thinking about not just celebrating birthdays but actually being born and even more our Creator who knew us even before we were born.  I chose to do a spread in my Scripture Art Journal using some verses from Psalm 139.  The little girl is a collage image I got years ago from a company called Paper Imagery Designs.

January's element is tags and the requirement is a minimum of two tags in our project.  The book I'm working in is a Dylusions small journal.  I glued some small tags onto the pages with Distress Collage Medium Matte also covering the entire pages with the medium.  Over this I've stenciled using the Tim Holtz flourish stencil and Ranger's Texture Paste.  


Once that was dry I sprinkled on some PaperArtsy Infusions (Violetta, Sleight Blue, A Bit Jaded), sprayed them with plenty of water and mostly dried them with a heat tool doing some blotting as they dried.  I then softened all that by painting PaperArtsy Fresco Finish Paint Nougat over the pages keeping my strokes horizontal and letting the colors blend just a little by not overworking the brush strokes.  


There is some light stamping with Ranger's Archival Ink.. a text image and a leafy image.  Nuvo Embellishment Mousse was added over the textured areas and around the edges.  That's that shine you can see with the book tipped just so in the light.


I printed out the scriptures and attached the paper to a tag adding a bit of color with Distress Inks and distressing the edges of the tag.  I forgot to include the scripture reference so took a small metal rimmed tag, added color and wrote the reference.  


A bunch of paper flowers were glued on.  Nuvo Glitter Drops in Honey Gold was added to the centers.  Splattering was done with Fresco Finish Paint, in both Plum and Pansy colors.  


This was fun to do and I hope you like it!!

Hugs, Wanda


Sunday, January 21, 2018

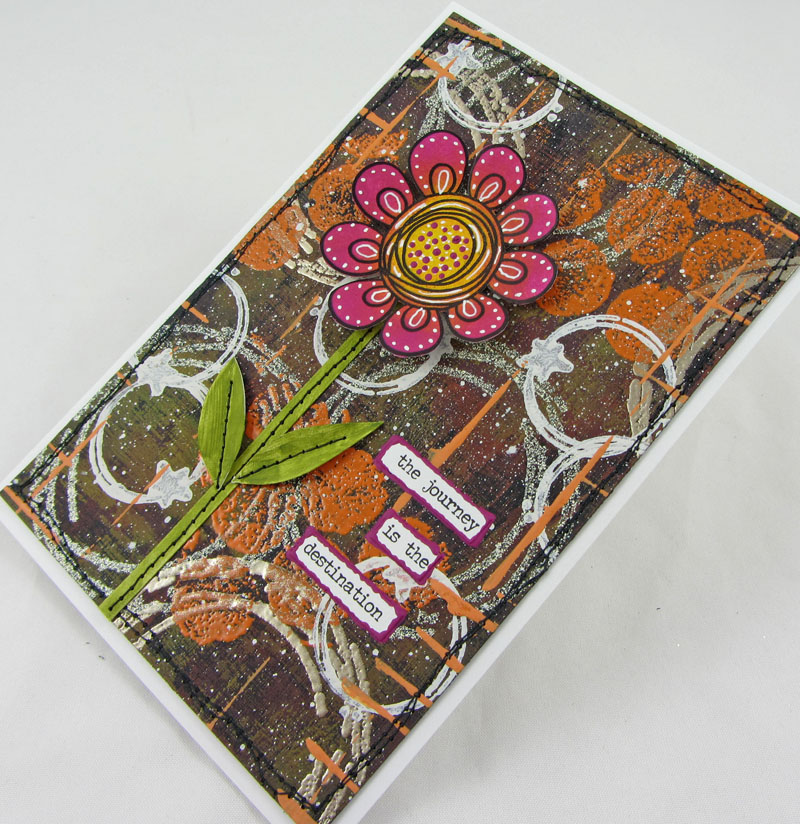
The Destination

Hello!!!  Overall I'm feeling better and stronger but I can't seem to shake the cough which makes my throat sore and greatly interferes with my sleep.  If I don't talk much or do much it's not too bad until I lie down and then it rears it's ugly head.  I do Praise God, though, that the fever and aches are gone.  I'm sure the rest will improve soon.


In my last post I mentioned getting painty.  I've finished that project and am sharing it today.  I even took a bunch of pictures and you can follow most everything just by looking at them therefore I won't state the obvious but will make notes where they are needed.

I started with black cardstock and I apply Fresco Finish Paints using Seth Apters monoprinting technique where you brush the paint onto a piece of cardstock and then press it onto your substrate.  I had seen this shown a long time ago but wasn't sure I was remembering exactly how it was done but then yesterday Leandra of PaperArtsy shared a Facebook Live showing Seth demoing in their booth at Creativation and that technique was part of it.  I've shared it to my timeline on Facebook and if possible you should check it out.  


I used all Seth Apter stamps from his first PaperArtsy set when creating my background.

I have lots of old embossing powders and I pulled out one called Celedon
from the Powder Keg.


I took some Tango, which is a translucent, and mixed one drop of Chalk with it so it would be more opaque and used a junk card to add marks.


I decided to top that grungy background with a bright, Tracy Scott flower (set #9).


I cut the stem and leaves from a scrap of white cardstock.  As you can see, I've been using the sewing machine again.  I seem to go through streaks using it all the time or not at all, lol. 


I was fun to play!!!  I didn't allow myself to overthink and second guess my choices (yes, I do that A LOT) but to just go with them as they happened. 

Thanks for following along!!!

Hugs, Wanda 

Friday, January 19, 2018

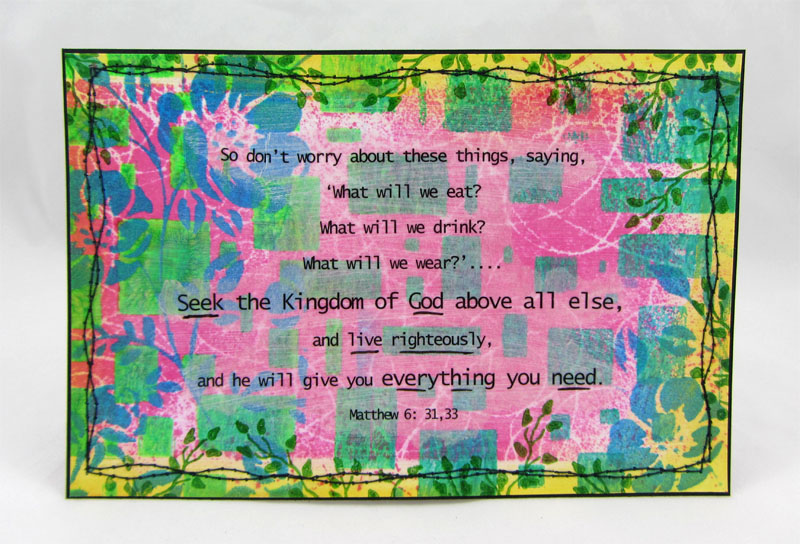
Seek


Hello!!!  Yep, it's gotten quieter on the blog... for two reasons.... as of last week I'm back out welding in the shop most days except that wasn't actually the case this week because I've been sick.  How sad is it to be in the house and not even have enough energy to do something fun, lol.  I'm feeling a bit better today and even got a little painty (not too much and then I was exhausted).  

I made this scripture card a couple of weeks ago.  It is 4" x 6".  I started by cutting a panel from a gel print.  That would be the rectangle blocks you see in the background.  I laid a mask on top and sprayed Distress Spray Stain over it.  Dried it.  Added stenciling along the left and right - the blue flowery images.  The blue is a metallic acrylic paint.  Yellow ink was added around the edges and then stamping with a small leafy image.  I printed the scripture onto plain Tissue Wrap (Tim Holtz Idea-ology) and tore it out carefully.  I thought the background might be too dark so added some white paint lightly in the center area.  I attached the scripture with Distress Collage Medium Matte under and over the tissue wrap.  I actually got it on slightly crooked, which completely bugged me so I trimmed the panel a little to straighten it, attached it to black cardstock and sewed it.  Finally I underlined some words I thought were important with a black permanent pen.  Over time I'm going to be doing more of these cards.  I'm thinking I'll maybe bind them into a book but not sure about that yet.


Monday, January 15, 2018

Mixed Media Valentine's Card


Hello to you on this cold, windy Monday morning!!  The actual temperature here in Southern Iowa is currently above zero but it will be falling all day to below zero by this evening.  However, the wind chills are already in the double digits below zero and will also be getting colder.  Brrrr!!!

On to more pleasant things :-)  I have a tutorial over on the Quietfire Creations Blog today for this card.  Pictures don't pick up the bits of glitter that are part of the embossing powder mix.  Every time I sit at my desk, I pick up this card and tip it side-to-side to see those bits catch the light.  It is so pretty!!!  I hope you have time to pop on over there and see the step-by-step pictures.


Sunday, January 7, 2018

Sympathy Card


Hello.  We are one week into 2018... only 51 weeks left :-)  

I'm sharing a sympathy card today.  I started with a copy of hymn.  Color was added using paint, the center area is just a wash and then heavier color on the edges.  The "rays" are done with paint and a stencil.  The flower and oval shape are die cut with Tim Holtz dies.  The sentiment is a stamp from Our Daily Bread Designs.  


This is a wonderful hymn!!!  Truly.. what a day that will be!!!  

The words to the hymn are:

There is coming a day,
When no heart aches shall come,
No more clouds in the sky,
No more tears to dim the eye,
All is peace forever more,
On that happy golden shore,
What a day, glorious day that will be.

What a day that will be,
When my Jesus I shall see,
And I look upon His face,
The One who saved me by His grace;
When He takes me by the hand,
And leads me through the Promised Land,
What a day, glorious day that will be.

There'll be no sorrow there,
No more burdens to bear,
No more sickness, no pain,
No more parting over there;
And forever I will be,
With the One who died for me,
What a day, glorious day that will be.

What a day that will be,
When my Jesus I shall see,
And I look upon His face,
The One who saved me by His grace;
When He takes me by the hand,
And leads me through the Promised Land,
What a day, glorious day that will be


Saturday, January 6, 2018

He is Good


Hello Again!!!

I really like this card!!!  The background starts with Distress Oxide Inks, dipped and dried and not worked too much.  Over this is some stenciling with the Tim Holtz Layering Stencil, Dot Fade.... stamping done with the dotty circle image, PaperArtsy Lin Brown 29... and pen stitches around the edges.  The large leafy image is a PaperArtsy Kay Carley Stencil, PS061. I put Deco Foil Transfer Gel through the stencil scraping the gel pretty smooth, removed the stencil and wash it, allowed the gel to dry completely.  I then added Deco Foil Green Foil to the gel using a Laminator.  The scripture is a Taylored Expressions stamp, Shade Tree Scripture Set.  It's stamped with Embossing Ink and embossed with white powder.  Tim Holtz Craft Thread is wrapped around the panel.  The bird is a Wendy Vecchi Mat Mini stamped with the matching stamp and inked with Distress Ink.  


Friday, January 5, 2018

Gears and Flowers


Good Day to You!!!  This was a fun card to make and I've been told that the birthday girl that received it really like it.  

In the background is cardstock embossed using the Sizzix Tim Holtz Alterations Steampunk texture fade.  The piece was then colored with Nuvo Embellishment Mousse using a Nuvo brush and a few metal type colors.  Next I brushed a glaze over the whole panel, let it sit a bit and then wiped it back using a baby wipe.  Isn't it great!!!!  The words "Enjoy the Journey" (Idea-ology metal piece) was colored using a Distress Crayon.  It is set upon some strips of Washi tape.  The thread is Tim Holtz Craft Thread.  I really like the weight of his craft thread for things like this.  Now for the flowers (Sizzix Tim Holtz Wildflowers).  These were die cut from Mixed Media Card and then used as a mask while making prints doing the shaving cream, marbling technique.  Under the main layer of the card is a white cardstock layer (edges distressed), then Tim's Gold Metallic Kraft-Core (edges distressed), then a folded purple card. 


Thursday, January 4, 2018

Life - Today is a Good Day


Happy Thursday to you!!!  I hope your week is going well!! I have a tag to share with you today.  

I used a Ranger #8 Manila tag.  Our son and daughter-in-law were over on New Years Day and while the guys did there thing (sorting trading cards), us girls did ours (art play).  I've had some Gelatos for a long time and barely touched them so we had a play.  That's when this tag started.  The first couple layers are gelatos, rubbed with my finger, sprayed with water, dripped, and put on through a stencil.  I think next I put on a stencil and spray Distress Spray Stain.  Then I have ink through stencils.  Then some stamping.  I really just kept putting stuff on because it didn't look too good to begin with... but it got better... much better.  When I like it, I stopped adding layers and did some simple things to finish it off.  Around the edges is Frantage embossing enamel.  I know I've had it quite some time but hadn't used it yet.  I'm sure of that because I had to cut open the package to use it.  They are gorgeous!!!  I also used it around the edges of the Typed Token I added at the top.  Before doing the edge, some color was added to the token with Archival Ink Red Geranium and the word highlighted with Distress Crayon.  Some Washi Tape wrapped towards the bottom.  A handsome boy and a dog from Tim's Paper Dolls.  Small Talk stickers, color added with Distress Marker and sketched lines with a black pen.  


I'm linking this to the Mixed Media Monthly Challenge Ring in the New - the Frantage embossing enamel was new for me to use. 


Wednesday, January 3, 2018

Leafy Birthday


Hi!!!  It was still fall outside when I made this instead of the snowy, very cold weather it is now.

Base - folded kraft card.  Next - torn edge, black cardstock brushed a bit with Distress Paint Tarnished Brass.  Main layer - stamped with Tim Holtz background image, Distress Ink around edges, Wendy Vecchi white embossing paste through Tim Holtz leaf stencil, let dry, put stencil back on and add Distress Inks, spritz with Distress Ink using Tim's spritzer and Distress Marker.  On top - Tim Holtz craft thread, Tim Holtz/Sizzix leaf - cut and embossed, Happy Birthday die cut - Elizabeth Craft Designs A Way With Words designed by Suzanne Cannon.  Finishing touch - some dots of Enamel Accents.  


Tuesday, January 2, 2018

Love and Hearts Always


I'm sharing the details of this Valentine's card on the Quietfire Creations Blog today.  You can find it HERE.

Monday, January 1, 2018

Live Every Day to the Fullest


HAPPY NEW YEAR!!!!  I hope 2018 is a wonderful year for you!!!  

I'm excited as I look forward to whatever God has in store for me this year as I work at growing my relationship with him.  His plans are the best and I pray I hear His voice and follow the leading of His Holy Spirit every moment of every day.

I'm still playing catch as I have some things made this past year but not blogged yet.  This is a perfect one for the start of a new year.

In the background I'm using a piece torn from a  print from a Gel Press plate.  The print was made with Lumiere paints on black cardstock and a stencil.  Onto this I've stamped a Tim Holtz background image and embossed it with Ranger's Liquid Platinum powder.  In the center of each star design I've added a drop of Enamel Accents.  The gems are a piece cut from a Prima Lets Say it in Crystals pack.  There is a purple canvas paper layer edged with white paint.  Then another layer of gel print, edges embossed with Liquid Platinum.  The quote is rubber stamp from Our Daily Bread Designs, Each Minute.  The metal flowers are Finnabair.  The bottom flower is painted.  A fabric brad from my stash (probably from Hobby Lobby) is in the center.