Sunday, May 22, 2016

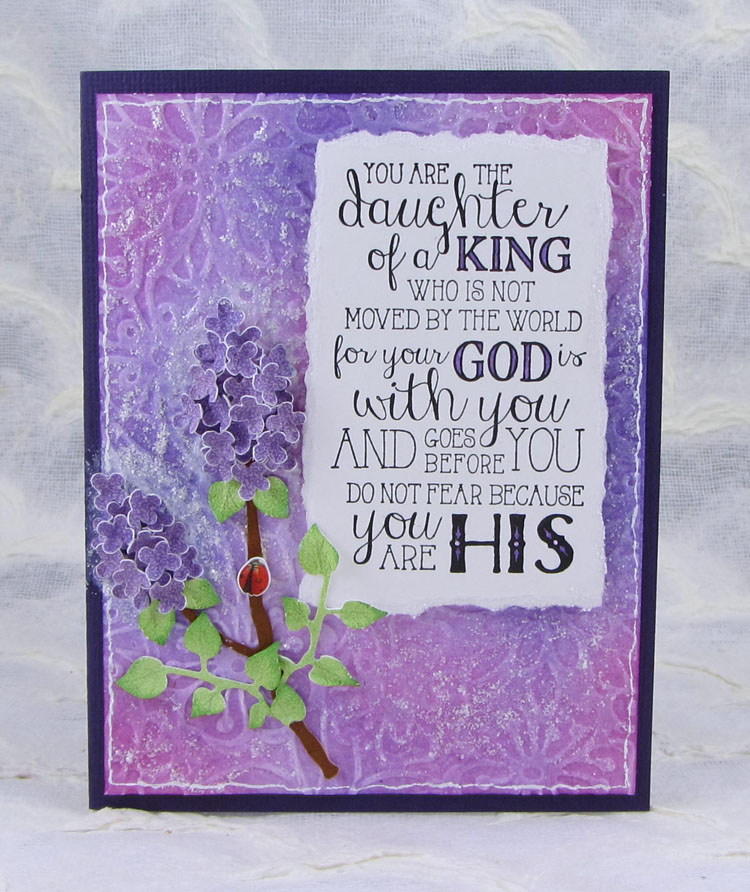
You Are The Daughter


Hello!!  I made this card last month for a friend!!  For the background I colored White Soft finish Cardstock (Elizabeth Craft Designs) with PanPastels and embossed the piece with the Bouquet Embossing Folder (Elizabeth Craft Designs).  This was attached to the folded card.   I stamped the Daughter of the King Rubber Image (Taylored Expressions) with Jet Black Archival Ink (Ranger) onto white cardstock, tore it out, colored the open letters, and attached it to the card.  I cut the pieces for Susan's Garden Notes Lilac (Elizabeth Craft Designs) and assembled the flower on the card.  The flowers blended into the background more than I thought they would so to help them pop I added Stickles (Ranger) to the background, brushing it over the background with a paint brush and giving a heavy coat around the flowers.  It's finished with a white doodle around the edge and a ladybug sticker.  


Wednesday, May 18, 2016

Autumn Card


There is a whole week of posts happening on the Quietfire Creations Blog using dies from the brand new release.  I'm sharing a card today using the Autumn die.  You can find it HERE.  If you've missed the other posts this week, I hope you'll scroll back and check them out!!!


Monday, May 16, 2016

Friends and Cosmos


Hello!!!!!!  I have a card to share with you today!!!

I used Ranger's Mixed Media Cardstock for the background.  I inked an acrylic block with Distress Inks (Abandoned Coral, Fossilized Amber, Worn Lipstick), sprayed it with water and stamped it onto the paper.  I dried it some and then pressed on the block again as it still had dots of color on it and then dried it completely.  I stamped the quote (Quietfire Design - Always Be My Friend set) with Archival Ink Jet Black (Ranger) and embossed it with black powder.  I placed a square of release paper left after using a rub on over the quote and then used a Christine Adolph Adhesive Rub On (Prima) on the paper.  The square stopped the rub on from sticking over the quote.  I put a coppery colored foil over the adhesive.  The flowers are Cosmos and I used the Elizabeth Craft Designs Garden Notes die set.  The petals were cut from white cardstock and Abandoned Coral used to add color.  The center were cut from yellow cardstock and dipped in pollen powder.  The stems were cut from green cardstock. 


Saturday, May 14, 2016

Summer - Distressed and Foiled


Happy Saturday to you!!!!!!!  I hope your weekend is going well!!  We have our first Graduation Open House of the season to attend this evening.  

There are EXCITING things happening at Quietfire Design and Elizabeth Craft Designs... New Releases!!!!  There are brand new A Way With Word dies - a set with all four seasons and two singles, remember and memories.  Quietfire Design also has 11 new stamps/stamp sets.  The dies are wonderful and I can hardly wait to get the stamps, they are gorgeous!!!  See all the new QF items HERE. 

Elizabeth Craft Designs' has new releases across all their lines.  They have a blog post HERE. 

I'm sharing a card today using summer from the 4 Seasons die set.  I began with Ranger's Mixed Media paper and Distress Inks (Peacock Feathers, Salty Ocean, Shaded Lilac).  I did the wrinkle free distress technique to color the paper... dipping, drying, blotting, etc. until I liked the background.  I used a Prima Christine Adolf Adhesive Rub-On and purple foil for the collage flower image.  I LOVE these rub-ons!!!  They work great!!  I didn't use the whole image but let it run off the bottom of the background.  I trimmed the background paper so I had a strip to the right and stamped an old Inkadinkado image with Archival Ink Violet only using part of the image and stamping it at the top and bottom of the strip.  These are attached to white cardstock and then ECD's True Blue Soft Finish Cardstock (edges distressed) and then a folded white card.  Summer is die cut from Soft Finish Cardstock (White and True Blue), layered together and attached to the card.  


Friday, May 13, 2016

Spring Memories


Hi There!!!  I'm sharing a beautiful card on the Elizabeth Craft Designs' Blog today using a couple of the brand new A Way With Words cutting dies.  I hope you can pop on over HERE and have a look.

Tuesday, May 3, 2016

A Circle Journal


Well, I started this post a few weeks ago but today I'm finally finishing it.  I'm very excited to be part of a year long Circle Journal adventure.  There are 12 of us participating.  We each chose a shape for our journals and got them ready to send on their journey.  It will be about a year before I get mine back and it will be filled with artwork by each of the other 12 ladies!!  Sooooo Exciting!!!!  The only rule for this journey besides any individual things for each book is to use at least one PaperArtsy product on each page or tag as we are all part of a PA group. I did use all PaperArtsy stamps and there is Fresco Finish paint on the covers and the pages inside the back cover.
These are pictures of my journal before it was sent on.  I die cut scalloped circles a little over 5" across from 140# watercolor paper.  For the covers I glued two circles together and then cut it in half.  I bound the book, decorated the covers and the inside front and inside back pages. Above you can see the front and back covers.  Below is the spread just inside the front cover.  In that tied paper is any particulars regarding my journal .


This is the spread inside the back cover saying thank you to everyone contributing to my book.


And a few more pictures...


Stay tuned for more posts related to this journey as I'll be sharing the pages I create in each book I receive!!!  Soooooooooo Exciting!!!!!

Saturday, April 30, 2016

Flowers and White Space


I'm happy to have a post on the PaperArtsy Blog again.  The current theme is White Space... definitely not my usual way of creating even although I really like it when others do.  Doing this post gave me a chance to play with the idea.  I do hope you'll zip on over to there blog and check it out.   

Wednesday, April 27, 2016

A Mother's Love


Hello and thank you for stopping by (or taking time to look at the email if that's how you get this)!!!  I truly appreciate each and every one of you and hope that your today is good!!!!

This card along with information can be found on the Quietfire Creations Blog HERE.  

Tuesday, April 26, 2016

A Way With Words eBook

 
This project has been in the works for some time and it's thrilling to see it finished!!!  

Elizabeth Craft Designs and Suzanne Cannon have a new, totally free, ebook featuring projects created with A Way With Words die!!

To go see it for yourself (and download it if you'd like) click  HERE. 


Monday, April 25, 2016

3D Flower Cards


Hi There!!!  I'm sorry for the lack of posts this month.  I guess that's a good indication that things have been busy!!!  
We've still got this big remodel project going on.  One part, a new addition, is getting close to finished.  Part of that addition is a new kitchen that has been done (except for a small amount of trim that will be done a little later) for a week and I've been slowly working on moving in there.  I love it!!!  I'll have to take a couple of pics and share them but not today.  
Our son hurt his arm and couldn't weld for a bit which put me back out in the shop as there were still things that needed to get done.  He's doing much better, Praise God!!!  I'm still out part time helping with some things but that is better than full time. 
I have done some creating.  There are a couple of design team projects coming up this week to share plus a couple of other things I'll try to get posted this week.

One very exciting happening going on is I've been designing some classes to teach up at Memory Bound in Ankeny, Iowa.  When I lead those make n' takes a couple of months ago some of the extra samples I took with included 3D flowers made using dies and tools from Elizabeth Craft Designs.  They were very interested in having these flowers taught, we talked and I worked up a first class for May.  The three cards in this post are what we are making.  The focus is the flowers (and they do take time to manipulate all the parts and put them together) so the backgrounds are simple.  
The first class is May 2nd just in time to make a beautiful Mother's Day card although there will be other options for a sentiment.  I'm teaching the class twice that day, once in the afternoon and then in the evening.  There are openings in the classes so if you're in the area and you'd like to learn to make the flowers here's your chance!!!  I'd love for you to come!!

Thanks for following along today!!  I'll be back soon!!  Have a good today!!!


Saturday, April 16, 2016

Shimmer Sheetz and Happy Birthday


Happy Saturday!!!!!!!  I have a card on the Elizabeth Craft Designs' Blog today using the A Way With Words Happy Birthday die and Shimmer Sheetz!!  I hope you have time to pop on over and check it out!!!

Wednesday, April 13, 2016

Friendship


Hi There!!!!!!!  I'm sharing this card over on the Quietfire Creations Blog today. I've combined a wonderful Quietfire Design friendship quote stamp with a
background done on watercolor paper, some 7 gypsies printed papers, and Elizabeth Craft Designs' die cuts.  I hope you have time to go take a look!!!!

Monday, March 28, 2016

Lilacs and You


HiYa!!!  I have a project on the Quietfire Design Blog today.  I hope you'll check it out!!!

Saturday, March 26, 2016

You Are My Sunshine


Hello!!!  Life has been busy as you tell by my space between blog posts.  I did manage to make this card (along with working on some things that can't be shared yet) this week.  I mentioned going to a stamp convention a few weeks ago and while there I had picked up some faux string art stamps from Anthony's Paper Crafts.  Those stamps have been calling my name and I used one here.  I stamped it with Archival Ink jet black and then shaded it with a Tombow marker just like he was doing in the demo at the stamp convention.  I then decided to add color to the image, also using Tombow markers.  I've stamped a wonderful Quietfire Design sentiment in the center, You Are My Sunshine.  Next I used the Tim Holtz Rays embossing folder and the Oval Diffuser plate to emboss the sunshine coming down and then inked over it with Squeezed Lemonade Distress Ink.  The panel is matter to white, the orange and finally onto the white folded card.  Finally I used a silver gel pen to add dots where the string art lines crossed.  Lots of fun!!!!


Saturday, March 19, 2016


I'm over on the Elizabeth Craft Designs' Blog today sharing how I made this background and the card I used it for.  I hope you'll pop on over to check it out!!!

Monday, March 14, 2016

Dream With Your Eyes Wide Open


Hello!!!  You can find this card over on the Quietfire Creations Blog.  I hope you have time to go take a look and I hope you have a wonderful week!!!!

Wednesday, March 9, 2016

Joy is not in Things


Good Day to You!!!  This past weekend was the stamp convention in Rockford, IL.  We decided to drive over to Bolingbrook, to our daughters, on Friday... stay in Bolingbrook, and then we all went to the convention on Saturday.  We were there when it opened and spent almost the entire day there.  We had a lot of fun and, of course, I did some shopping.  Stamper's Anonymous had a booth there and I was able to get many of Wendy's CHA releases and that is what I used to make this card.


I started with a Ranger Kraft Tag, #8, stamped the flower image (Blooming Art SCS137) with Distress Picket Fence Ink, dried the ink and then added color to the image using a waterbrush filled with rubbing alcohol and Archival Ink.  I used the new Cactus Flower (LOVE this color) and Leaf Green.  I painted/inked it all and left it.  Then later decided to go back in and darken some areas more to create shading.  It worked really well!!!!  I stamped around the flower with the new background image, Ticking, using Archival Ink Tree Branch.  I stamped some vertical and some horizontal.  Along the bottom I stamped the solid foliage image from Blooming Art (bottom left of the stamp set) with Leaf Green.  There is stenciling in the background using the new Lots Of Dots stencil and Cactus Flower Ink.  The bird is from the Stamp-It Stencil-It set Put A Bird On It and I used the coordinating Mat Mini.. stamped it with Archival Ink Jet Black and added color with Distress Inks, Salty Ocean and Vintage Photo.  I thought I better add some blue into the tag so splattered Salty Ocean using a water brush on the tag.  I colored the center of the flowers with Wink of Stella Gl. Clear and then thought some all over shimmer would be good and used the new Mica Spray Pearl.  I sprayed from a distance, just once, to keep it light.  The hearts are Mat Minis colored and stamped (The Gift Of Art SCS141) with Cactus Flower.  The line around the tag and lines down to the hearts are with a white gel pen.  I also added some dots around the flower image.  I also inked the edge of the tag with Cactus Flower.  The tag is layered to white cardstock, edges distressed, wrapped with twine and then it's attached to a folded card.  

I tried to show the shimmer with this picture. 


Tuesday, March 8, 2016

Laugh Quite A Lot!!!!


Hi There!!!!  I hope this post finds you well!!  I have a project on the Quietfire Creations Blog today HERE for you to check out!!!  

Have a great day and Be Creative!!  

~Wanda

Monday, March 7, 2016

Beauty In Simplicity


Hello!!!  This is a large card, about 5 1/2" x 8 1/2".  It all started with a piece of watercolor paper that had scribbles and tests of product and color on it.  I thought I shouldn't let it go to waste and chose to actually do a project with it.  I put on some Golden Glass Bead Gel through a stencil (TCW Balzer Designs Mini Chevron) and let it dry.  Next I put black gesso over the whole piece and let that dry.  I had just gotten the new Tim Holtz Picket Fence (white) ink and crayons so I thought it'd be good to use them.  The circles (PaperArtsy Sara Naumann ESN10) are stamped with the white ink and immediately sprayed with a bit of water which wicked out the ink a bit.  *note... hours later or maybe the next day - can't remember for sure - I sprayed water over this white ink again and it didn't move any more not even part of a circle that didn't get water the first time.  I scribbled some yellow crayon over a few circles and in the bottom right corner and pink crayon over some of the texture, sprayed it with water and moved it with my finger.. any pink down in the texture didn't move as my finger couldn't rub it.  The quote (Tim Holtz) is stamped with the white ink.  In the background is some text (ESN10) stamping and that is stamped with Fresco Finish Paint.  The leaves along the bottom (foam stamp created from Sara Naumann ESN17) are stamped with Fresco Finish Paint.  There is Treasure Gold Silver rubbed over the texture and around the edges.  The flower (PaperArtsy Lin Brown ELB23) I already had stamped and cut out - several of them - either left from another project or for another idea that got set aside.  I gathered some, painted them with Fresco Finish Paint, put them together and onto the card.    


Wednesday, March 2, 2016

Express Yourself


Happy Wednesday!!!  This tag was fun to make!!!!  I pulled out some PaperArtsy Clare Lloyd stamps that I hadn't yet inked up (I want to get to inking stamps that haven't been yet), grabbed a tag (#8 size) and chose 2 colors to start with.  No plan, just play.  I used Fresco Finish Paint for most all of this tag.  I started with Banana and Caribbean Sea.  I put both colors on my craft sheet, sprayed them with water, moved each color a bit with my finger mixing in the water and then dragged the tag through the colors.  Once this was dry I stamped the design element image with Bougainvillea paint and dried it.  I chose the girl I wanted to use, stamped her on smoothy cardstock with Archival Ink jet black and then painted her in.  This was my first time painting in a face and it's ok but I didn't really have patience and take my time with it.  I'm not sure I'm a spend-lots-of-time and get that shading down just so kind of person but she's ok.  I used a white gel pen for the dots on her clothing and to add white to the background stamping on the tag.  She was cut out and across the bottom of the image I used a pair of deckle scissors.  To add more to the tag, I stenciled the dots (Emma Godfrey Stencil PS015) with Archival Ink Aquamarine.  Express Yourself was stamped with Archival Ink jet black but before I did that, I added some extra Banana paint where I would be stamping the words just rubbing it on with my finger.  After the words were stamped I again used a white gel pen.  The flower was left over from THIS project and it was about time I used it on something.  I used my finger to add Old Gold paint around the edge, dried it, and then put a little White Fire Treasure Gold on the very edge.  Some pink twine at the top and it's finished.  


Tuesday, March 1, 2016

Bible Journaling

Hi There!!!!  Today I'm sharing several bible journaling pages that I done over the past few months but hadn't shared yet.  I'm really enjoying digging into scripture and then doing something creative to go with it even if it's just color and lettering!!!  I hope you enjoy these pages and have a blessed day!!!