Wednesday, October 2, 2013

sweet genuine


These are some ATCs made earlier this year.  The girl is a stamp from inkido (a gift from a friend - thank you, Tea!!) The flowers are glittery stickers (Recollections), the bird is die cut (Tim Holtz) from grungepaper and inked with Distress ink.  The words are from Chitchat stickers (Tim Holtz).  Around the edges of the card I rubbed on some Inka Gold.  


Tuesday, October 1, 2013

Blue Flowers on a Journal Page


Just a little play in one of my journals!!  Acrylic paint for the blue and yellow... Sharpie paint marker for the white lines.  The saying is a Quietfire Design stamp, stamped with Ranger jet black Archival ink.  The birds are cut from lightweight watercolor paper using a Tim Holtz die and colored using Distress Inks and a blending tool and I also added a bit of blue Inka Gold along the top of the bird and the wings.  


Saturday, September 28, 2013

I can....


This is one of my favorite scriptures!!  When things seem hard I repeat it over and over... God's word is powerful and God is always faithful!!

Writing with white paint or paint pens... Distress products over that... Dylusion stencils and more paint.  Writing with black pen.


Friday, September 27, 2013

Beautiful Butterfly


I made this card some time ago and don't remember all the details.  The butterfly is from Chocolate Baroque (isn't that a fabulous stamp).  The sentiment is from Art Impressions.  The little flower is from Stamps by Judith.  

Wednesday, September 25, 2013

Sing


A quick tag!!  For the background I picked up extra Distress Paint off my craft sheet left after another project, dried it, used Wendy's 2 Fancy Flowers stencil along with Distress Paint to add the smaller flower several times to the tag.  I used a bit too much pressure with one of the flower and it bled under the stencil but did much better with the rest, dried it, distressed the edges and brushed on Distress Paint.  Stamped and white embossed the saying (Quietfire Design).  Stamped the bird (Quietfire Design) onto a scrap of manila cardstock, circle punched it out, added Distress Ink and Paint around the edges.  Die cut the leaves (Sizzix) from manila card, colored it with Distress Stain, dried it, embossed it in a folder, and added some Distress Ink.  Blued on the leves and bird, tied on some string and decided it needed a bit more something so I used a speckle stamp and Distress Paint  to add the speckles.


Saturday, September 21, 2013

Another ATC in VSN


The new eArticle is out and I also have this atc in it!!!  Both the flower and saying are Wendy Vecchi Studio 490 stamps.  

The article is a free download!! So be sure to pop on over to the website and check it out!!!

Thursday, September 19, 2013

Watercolor Crayons - Vamp Stamp News


I am thrilled that my atc made it onto the Vamp Stamp New's Blog (see the post HERE)!!!!  Nancie's newest eArticle “Watercolor Crayons Techniques for Stampers” will be posted sometime tomorrow.  If you've never checked out her eArticles, you must!!!  They are packed full of great information!!!

The stencils used for the flower are Wendy Vecchi Studio 490 and the word stamp is from Quietfire Design

Monday, September 9, 2013

Mixed Media Canvas - 8" x 10"


I started this canvas back in June and fianlly got it finished up a few weeks ago (it's been an extremely busy summer).  It's for our daughter using her favorite color combination (purple & green) and her favorite quote. I was a lot of fun to make and she Loves it!!!!!!  Stencils and embossing paste to create the texture on the canvas.  Distress paints to paint it.  Stamping with Ranger's Archival Ink.  Viva Inka Gold for highlights. Ranger's sticky back canvas onto cardstock and then die cut for the flowers and butterflies, colored with Distress paint, and stamped with Ranger's Archival Ink.  Manila cardstock for the leaves - larger ones are stamped (Wendy Vecchi image), cut out, painted, embossed with an embossing folder and black and white pens used - the smaller leaves are die cut, sprayed with Dylusions, and sealed with fluid matte medium.  The quote is computer generated.  Viva green pearl pen dots, Ranger's white liquid pearl dots, and old pearl in the center of the rose, Viva purple pearl pen dots on the butterflies. Gold braided cording.


It's My Turn


The day is here when I get to share over on the Quietfire Creations blog my cards for the 9 Days of Christmas Event!!!  

Below are a couple of peeks at what I'm sharing.  I hope you will go take a look and don't forget to leave a comment on the Quietfire Creations blog for your chance at winning a prize.  And if you haven't been following along, be sure and look at all the other fabulous cards that have been shared and leave a comment on each post for more chances to win a prize.


Friday, September 6, 2013

Colors and flowers and fun... oh, my!!


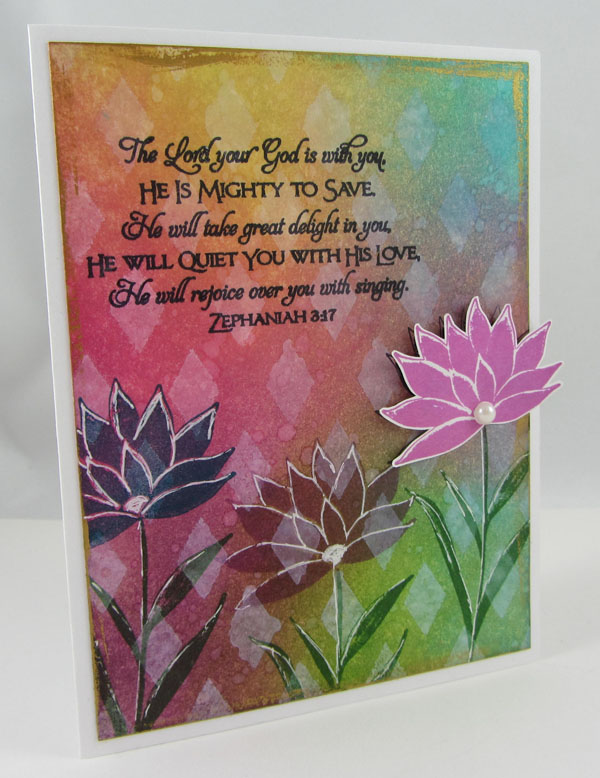
I made this card a few months ago and just hadn't shared it yet.  The scripture stamp is from Our Daily Bread Designs and the flower is a Studio 490 Wendy Vecchi stamp.  Distress Inks in the background (Love the blending of colors!)Col and probably Distress Stain through the Wendy Vecchi stencil, Diamonds Are A Girls Best Friend, for the diamonds.  The flowers are stamped with Archival Ink and highlights added with either a white gel pen or Sharpie paint marker.  I know, you'd think I could remember this stuff!!!!  It's been a crazy year!!!  I have more things that I've made and haven't shared and will hopefully get to those soon.  


*******************************************************************

Another reminder that the 9 Days of Christmas Event is still happening over at the Quietfire Creations Blog.  Be sure and leave a comment on each post for your chance to win prizes.  


Tuesday, September 3, 2013

Published in Paper Creations

I have 2 cards in the Fall 2013 issue of Paper Creations Magazine.  They are part of a 4 page spread for Quietfire Design. Congratulations to Suzanne (owner of QF) and Holly Eastabrook for also having cards published.


The 2 cards shown below are my cards!!!


A Reminder that the 9 days of Christmas event is happening right now on the Quietfire Creations blog.


Sunday, September 1, 2013

It Begins.....

"What" you are asking?  Well let me tell you... it's Quietfire Design's 9 Days of Christmas Event... all taking place on the Quietfire Creations Blog!!!  


So pop on over (Click Here) for a welcome post today and then stop back every day after for 9 days to see all the fabulous cards made with Quietfire's new stamps and don't forget to leave a comment each day for your chance at winning a prize. Oh, and if you are wondering, I'll be posting on Day 8. 

Monday, August 19, 2013

Just a Peek...

...of a project I have posted today on the Quietfire Creations blog!! 


                              I hope you'll go check it out!!!!

Tuesday, August 13, 2013

Be Yourself ATC


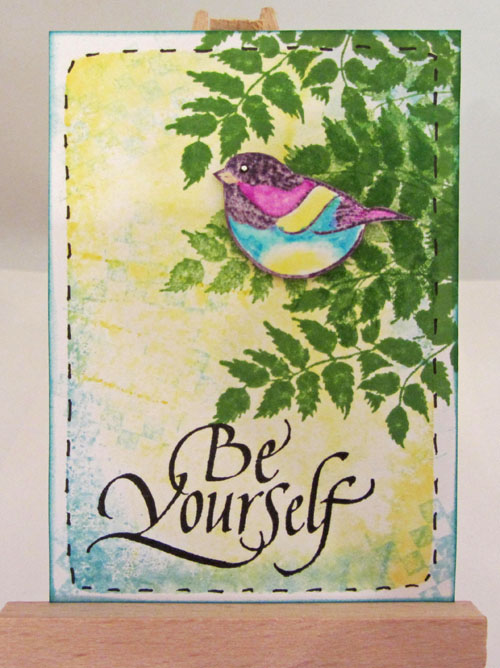
Quietfire Design has a brand new stamp set just released this week called The Woods Would Be Very Silent that I Love!!!! It includes 5 stamps and I've used 2 of them on this atc, the cute little bird and Be Yourself.  The beginning of the background was done some time ago when I was playing a bit with the technique where you ink an acrylic block with dye ink, spritz with a little water and stamp onto your paper.  I had some that I'd cut into atc sizes and this is one of them.  I stamped the leaves (a very old stamp) with Distress Ink mowed lawn.  Be Yourself is stamped with jet black Archival.  The bird was stamped on a scrap with Distress Ink dusty concord, embossed with clear powder and colored with Tombow markers... I went over some of the coloring with a waterbrush and blotted a bit to get a more mottled look.  Quietfire's checkerboard corner image was lightly and partially stamped here and there in the background with Distress Ink tumbled glass. The edges colored with Distress Ink peacock feathers.  Finished with some black pen stitching.  

Monday, August 12, 2013

Welcome Little One


Again I'm using new stamps from Quietfire Design - 2 of the images from the Welcome Little One set.  

I started with a mop up piece that was laying on my counter.  I'm pretty sure I had mopped up Distress Paint.  On this background I stamped the oval Welcome Little One image with jet black Archival Ink, embossed it with detail clear powder, used a white Sharpie paint pen to color the moons and stars white and add dots around the edge, and sponged Distress Ink salty ocean around the edge.  For the center piece I put Distress paint on my craft sheet and then pulled a scrap of cardstock through it, dried it, stamped the sentiment with jet black Archival, embossed it with detail clear, cut it out with a Spellbinders oval die, again used the Sharpie marker to make dots and color in the heart, distressed the edge and sponged it with Distress Ink.  For the border I cut 2 pieces from white cardstock using the Spellbinders Ironwork Motifs set, painted them white which gave their look a bit more oomph, glued one to the center and then pieced in the ends from the other cutout and finished up with some gems.  


The close up below makes me laugh because there is a reflection of my hand and camera in the large gem.  


Friday, August 9, 2013

Simple, Sweet Thank You


This is a very fast card using stamps from one of Quietfire Design's newest sets, Floral Thank You.  I've used Ranger's Specialty Stamping paper for both the folded card and the layered piece.  I love how crisp the stamping is on this paper!!!  On the layered piece I've stamped the images using Archival Ink sepia, sponged Distress Ink picked raspberry, heavier around the edges and lighter as you move in, added color to the flower with a water brush and Distress Ink picked raspberry and mowed lawn and created highlights in the flower with a white gel pen.  Finished off with a piece of bakers twine.  

Sunday, June 30, 2013

The Color Blue and a Little Metal


I like to cut the pockets off of old jeans ready to be thrown away and use them to make hangings.  I did some Christmas ones a couple years ago (and gave them away) and now I've done a summer one.  You could put flowers in it and hang it up or use them to give little gifts to people or.... whatever idea you come up with.  

The Everything Wendy Vecchi Yahoo group has switched to month long challenges giving people more of a chance to enter what with lives being so crazy busy.  The challenge for June is the color blue and metal and, of course, the standing requirement, to use at least one Studio 490 stamp.  The blue pocket made a perfect starting point for the challenge and actually with the metal rivets I've got that cover too, lol.  All the stamps and stencils I've used are Studio 490.  I first put the stripes along the bottom using the Studio 490 embossing paste, let it dry, put the stencil back on and added green Distress Paint.  Next I stenciled the flowers but I remembered how Wendy talked on her blog about coloring the paste using Distress Reinker, so that's what I did and it worked Great!!!!  I added dots on the flowers with a Sharpie paint marker. Stamped some little dots in the background with Distress white paint and then stenciled the circles with Distress Paint salty ocean.  I had a paper towel that was used to soak up extra Dylusions spray, glued some of it to a scrap of cardstock, let it dry, ran a Distress Paint dabber over it lightly to calm the color just a bit as it seemed to bright for the project and then stamped the saying with Archival jet black, cut it out and glued it on.  The butterfly is a Blossom Bucket piece.  Punched two holes with my Crop-a-dile, added the wire hanger, dyed a piece of ribbon and tied it on.  Then I thought I'd make a simple tag to put inside.  Started with a #8 manila, sprayed on some Dylusions, put some Distress Stain on my craft sheet and dipped, sponged Distress Ink around the edges, stenciled on the dots with Distress Paint, and stamped on the distressed stripes with Distress Paint. For the flower I put on the flower stencil, sponged embossing ink just through the flower, removed the stencil, poured on Distress Embossing Powder (mustard seed), heated it, put the stencil back on, inked the flower again with the embossing pad, removed the stencil and did another layer of embossing powder.  For the stem I just stenciled Archival Ink.  Added black lines around the flower.  Stamped the saying with jet black.  Added black and white doodling around the edge.  Doodled around some of the dots to make flowers.  Tied on left over colored ribbon from the pocket with wire and made a wire spiral for the center of the flower.  


Saturday, June 22, 2013

Life the life.............


A birthday card for our Grandson. The panther is from The Stampin' Place.  


Tuesday, June 18, 2013

From Plain to Beautiful


This started as a plain wood $1 frame from Michaels.  Isn't it wonderful how our stamping supplies can be used to transform it into something beautiful!!  It was given to a beautiful young woman as a graduation gift. 

The bird, flowers and scripture are all from Our Daily Bread Designs, the set is called Sing to the Lord.  The line at the bottom is computer generated and part of a song called 10,000 Reasons (Bless the Lord) by Matt Redman.  It's a fabulous song and if you'd like to check it out, HERE it is on YouTube. 

Frame - Gesso whole frame and let dry... Wendy Vecchi's white embossing paste through the Americana stencil Jacobean Floral and let dry (I do this in sections so I don't mess up wet paste trying to move the stencil and adding paste again)... gesso whole frame including embossing paste and let dry... paint with Distress Paints chipped sapphire and seedless preserves adding water as needed to help the colors blend smoothly where they come together and let dry... Inka Gold rose and platinum rubbed on to bring out the texture and design and also added through the Crafter's Workshop stencil Mini Circle Explosion... Music Collage (Stampabilities) stamped onto the sides of the frame with Archival Ink deep purple.  

Center Piece - Ranger's Specialty stamping paper colored using Adirondack pink sherbet (ink rubbed onto craft sheet, spritzed with water and paper pressed in), music image (Me & Carrie Lou) stamped with Distress Ink old paper.  Bird, flowers and scripture are stamped with Archival Ink jet black.  An extra bird and extra flowers stamped onto scraps of Specialty Stamping Paper for cutting out and layering over images for dimension.  Coloring done with ink and a water brush.  Tiny holeless gold beads added tot he centers of the flowers.   


Distress Paint used on the back of the frame and also Inka Gold platinum.  Center is Specialty Stamping Paper colored with Dylusions spray.  Scripture and flowers (Our Daily Bread Designs) stamped with Archival Ink jet black.  


Linking up to Artists in Blogland Show & Tell Saturday.