Tuesday, December 4, 2012

#2


I couldn't resist making another tag using this new Snowflakes are the butterflies stamp from Quietfire Design  and combining it with QFs large butterfly image.  I started with a #8 manila tag, layed on the 12x12 snowflake stencil from Crafter's Workshop, sprayed with Dylusions bubblegum pink and London blue, removed the stencil, blotted the ink and dried the tag.  Using a waterbrush and excess Dylusions ink on my craft sheet I added drips by getting the brush wet with ink and tapping it over my finger to make the ink fly off and onto the tag and dried it. Then I layed the stencil back on and went around the snowflakes with a black pen, removed the stencil and added dots around a couple of the snowflakes.  Distressed the edges of the tag with the Distrezz-it-All, sprayed the excess Dylusions ink on the craft sheet with water and dipped the edges of the tag in it and dried the edges.  I applied white acrylic paint using a sponge to an area large enough for the calligraphy stamp, dried it, and then stamped the image using Archival Ink jet black.  Decided I wanted more in the background and using sequin waste as a stencil/mask added spots of white acrylic paint.  Stamped the butterfly on a scrap of manila cardstock with Distress Ink salty ocean and cut it out.  Again using the sequin waste added a bit of white paint to the center area of the butterfly.  Added more details with both a black pen and a white gel pen and glued just the center of the butterfly to the tag.  Bent up and curved the wings.  Added doodled lines around the edge of the tag and tied some dyed ribbon to the top.


Snowflakes are Butterflies


This tag uses some images from Quietfire Design's newest stamp set, Snowflakes are the butterflies.  I started with a #8 tag and covered the front with picket fence stain, dried it, stamped the flourish snowflake with Versamark, sprayed on both colors of Dylusions, blotted the tag, dried it, stamped snowflakes with salty ocean and dried.  I love the soft, chalky look of the ink when you put down a layer of the picket fence stain first!!!!  Snowflakes are the butterflies is stamped and then embossed in black.  Since I had dried the tag and also heavily used an anti-static bag I thought I would be fine with the black embossing powder but some still stuck to the flourish snowflakes - grrr.  I tried my best using a very detailed paint brush to brush away the excess embossing powder from around the words and I got most of it without much disturbance to the quote but there is some stray pieces, so don't look too close (vbg).  The extra flourish snowflakes are stamped with salty ocean on a scrap of manila card that was first coated with the picket fence stain and then cut out.  A strip of tissue tape across the bottom.  Dylusions ink-dyed ribbon at the top.  The snowflake charm is colored white with the Adirondack mixative.  


Distress Stain - picket fence
Dylusions Ink Spray - London blue, crushed grape
Distress Ink pad - salty ocean
Tim Holtz tissue tape
Adirondack Alcohol Ink Mixative - snow cap
Seam Binding


Monday, December 3, 2012

3D Stars


These stars are inspired by Dyan Reaveley and her new Ranger video found HERE.  I worked on manila cardstock and used Dylusions sprays, Perfect Pearls mists, metallic Distress Stains, Distress Ink, seam binding, and glass glitter.  


Sunday, December 2, 2012

A Butterfly Christmas


Certainly not a traditional Christmas card except for the colors.  I recently bought some stamps from Chocolate Baroque; I totally could not resist some new butterflies, flowers, etc.  I purchased Tangled Garden, and Butterfly Flourish/Fantastic Florals Multi Set.  Soon after I received the stamps I got some of the new Distress Stains and so why not combine them.  I took a piece of manila cardstock large enough for the butterfly image (this butterfly is about 5" x 4") and scribbled some iced spruce down the center, added evergreen bough on either side, and finally festive berries on either side of that; and then stamped the butterfly with jet black Archival.  After I had it stamped I was wishing I had embossed it just to make it pop a bit more but after letting the butterfly sit a couple of days I had an idea - I took Microglaze and rubbed it over the whole thing deepening the colors and the stamping and then cut out the butterfly.  Then what to do.....   hmmm, the colors are good for Christmas, why not?  The background is done on manila cardstock with evergreen bough stain and brushed pewter stain onto the craft sheet; dip and dry, dip and dry.  Then I stamped the pine trees (Tim Holtz image), stamping 2 -3 times between inkings to get the look of closer and farther away trees.  Then to give it a hazy, snowy look I added brushed pewter drops and flicks.  I also edged the piece with brushed pewter.  Holly Jolly Christmas is from Quietfire Design.  


Saturday, November 24, 2012

Gelli Printing

Our daughter and her family have been here all week and we've fit in art time when we could.  Yesterday we spent the morning playing with my Gelli plates.  So much fun!!!!!!!!!!!!!!!!!!!! 

Here are some of my prints...


These next two prints were done over the cardstock we were cleaning the brayers on.


And here are some of my daughters prints.


Thursday, November 22, 2012

You!!

Happy Thanksgiving!!!!  
There is soooooooooo much to be thankful for but the short list is -- God's love, salvation through Jesus Christ, family, and friends including 
YOU!!!!!!!  My blog friends!!  
I appreciation each of you very much!!


This is a very quick journal page I threw together while the turkey was in the over and I had a break from cooking other things.  I decided to use mostly acrylic paints for this.  The background is a few blobs spread around with a junk credit card.  Stenciling on top of that.  The leaves at the bottom are a stamp.  Details added with either black or white pen.  The scripture (computer generated) was part of the sermon last Sunday at church and I just knew I had to use it on a page.  To finish off the page, I die cut a leaf from grungepaper and used Distress Ink, pen, and bit of metallic paint on it. 

Saturday, November 17, 2012

You are....


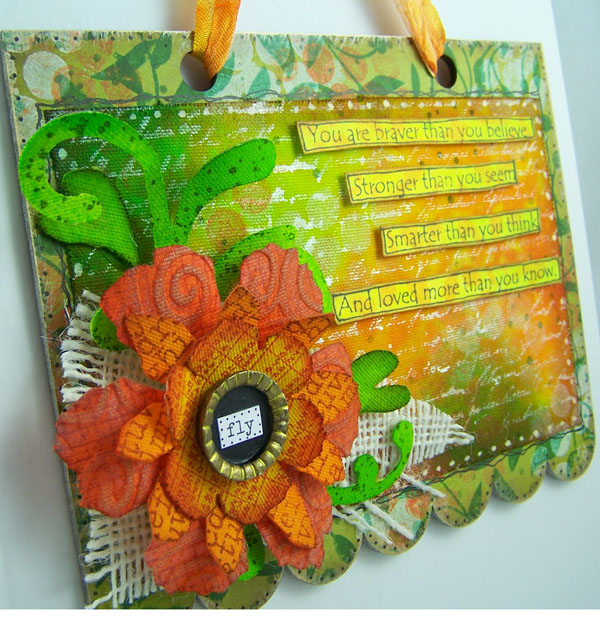
Lots of good stuff here!!!  I made this for my daughter and she loves it!  I've used Wendy Vecchi, Dylusions, Ranger, Sizzix, and Tim Hotlz products to create this wall hanging.  The base is an Art Parts large creative cover.  The center panel is sticky back canvas stamped first with paint using the Studio 490 text background image.  Then comes Dylusions sprays (the greens, yellow, and oranges) and water, dried, and then more stamping.  The base, flowers, flourish, and ribbon are all colored with Dylusions Sprays.  Stamping on everything with either Archival ink or Adirondack pigment inks using either backgrounds images from Studio 490 or Dylusions. The flourish and flowers are sticky back canvas attached to Wendy's Clearly For Art sprayed, dried, and stamped.  The large flower is also embossed with an embossing folder.  A couple scrap pieces of burlap.  Both white and black pen work.  The saying is a Dylusions stamp.  The center of the flower is a Wendy Blossom Bucket piece with an Idea-ology chit-chat sticker in it. The base is edged with tarnished brass Distress Stain.


I'm also sharing this on Artists in Blogland

Monday, November 12, 2012

A Perfect Day Journal Page

The beginning of this journal page is a paper towel that I used to blot ink off of a plastic fern leaf I was using as a mask while making a whole bunch of scripture note cards a while back.  The paper towel was so cool that I pulled the two layers apart and glued one to a blank page in my journal and there it sat for the last several weeks until yesterday when I decided to do something with it (and finished it tonight).


The current challenge (#54) on the Everything Wendy Vecchi Yahoo group is to use gesso plus you always need to use at least one of Wendy's stamps.  I started by using a Crafter's Workshop stencil of a fern leaf, applying gesso through it with a pallet knife and let it dry.  I first added some ink over the stencil with a blending tool and wasn't very happy so laid the stencil back on and sprayed it with Dylusions bubblegum pink and dried it... and then to define it more, especially since the gesso bled under the stencil some, I used a black pen.  Next I got out Wendy's heart stencil/mask and using the actual cut out heart, layed it so it overlapped the leaf  and sponged gesson around the outside pulling the sponge away from the heart so the gesso faded out and dried it.  Again used a black pen for more definition.  Stamped the saying (Studio 490) on a scrap of white cardstock, cut it out, glued it on, and went around each piece with the black pen.  I lightly brushed some gesso along the top and down the left side of the page, dried it, and using Wendy's line stencil added Archival Ink magenta hue.  At the time I used pink on the leaf and then for the lines I thought the pink was looking ok but now I'm not so sure especially after uploading the picture... if it bugs me too much I might go back over the leaf and the lines with a little bit of orange/red shading to help it match the page better.  The words are also from Wendy stencils and I just used a black pen in the stencil and then after removing the stencil added some white highlights.  Some dots in the lines and in the heart finish things up. 


time!


Again I started this atc with a scrap used to pick up excess color.  The clock background is stamped and embossed with sticky powder and then I used green foil on it.  The foil didn't stick everywhere... I think because of the fine lines some of the sticky powder was heated too much and wasn't sticky enough to hold the foil but it actually worked really well giving it a more distressed look.  The men (Tim Holtz image) are stamped on a scrap of white cardstock with Archival jet black and cut out.  The clock is a salvage sticker and Ideology spinners and alpha parts finish it off.


Sunday, November 11, 2012

Good-Bye to Summer


As with the last several atcs I've shared, I started with a piece of "scrap" card that had picked up excess color from another project.  I stamped the swirls and embossed them with sticky powder and then added leafing onto the sticky brushing the extra back into my container and burnishing the card well with an old sock.  The girl is an image from Dezinaworld and I colored her shirt with a waterbrush and Dylusions yellow spray ink.  The leaves are die cut, colored and stamped.  The words are hand written, cut out and edged with ink.


Friday, November 9, 2012

Distress Stains on a Tag

Over on the Ranger blog they've announced that the seasonal Distress colors will now be available as stains... yay!!!!  This is great!!!  I love those bright colors!!!  And if you've been to my blog lately you've probably noticed all the bright projects and I love them, but working on this tag reminded me of how much I love the not-so-bright colors too!!  I'm glad we can go with whatever we feel like that day.  

Ranger is giving away some of the new stains and to have a chance to win you can share any project using stains.  Instead of hunting through my blog to find one already posted, I decided to whip up a tag.  I started with Distress Stains on a craft sheet (dusty concord, old paper, and tarnished brass) along with a little water and smoosh, dry, dip, dry, dip dry... that looks good.  What to do next?  I had been looking for a certain embossing folder earlier that I was thinking about using for something else so with folders fresh on my mind I decided to use one.  I chose one of the book covers, embossed the tag, and then rubbed Distress stain brushed corduroy lightly over the embossing.  Stamped the quote and numbers (Tim Holtz) along the bottom with Archival Ink and added white pen around 'fears' and 'dreams'.  I had some Sticky Back Canvas already stuck to some Clearly For Art (left over from another project I'll be sharing soon) with enough space left to die cut the movers & shapers butterflies so did that; added stains to the canvas (dusty concord and old paper) spraying with water to help them blend a bit, added brushed corduroy stain around the edges, and stamped the script (Studio 490) over them with Archival jet black.  I first inked the edges with black then decided to distress them, rubbed brushed corduroy stain over the distressing and sprayed just the edges with water for a little bleeding.  Attached the butterflies with glossy accent.  Dyed the ribbon with the same colors of stain and finished.  


A couple of close-ups. 


Wednesday, November 7, 2012

Flowers, Flowers, Everywhere

Winter's too close for flowers to be everywhere outside but they can be in our art. Although it doesn't seem like November when it is suppose to be 70 degrees here on Saturday, but then the high on Monday is only suppose to be 34 - crazy, crazy weather.  

Here are 3 more atcs I made for the last swap.  I loved how they turned out!!!  All three backgrounds were cut from one oversized green tag that was printed using a gelli plate.  Back in September I believe, a friend came over and we played a bit with the gelli plates I had recently bought.  At that time I hadn't watched any videos and we just did whatever.  It was a lot of fun and I'm really ready to have another play time with them.  

After cutting the atc pieces from the tag I stenciled a different Wendy Vecchi flower onto each piece with modeling paste.  I love doing these flowers with the paste!!!!  After the paste was dry I added coloring with Dylusions spray ink or with markers.  I attached an Idea-ology piece to each atc after adding paint to the letters.  All the atcs were edged with the tarnished brass Distress stain.

On this first atc, the white dots on the flower are done with a white marker.  I just touched the marker and the spot bled a little which was very cool.  A threaded button for the center.


After coloring this flower I stamped it with Wendy's Studio 490 dot background and added more color with a Sharpie glitter paint marker - very cool!!  I used a white pen around the petals.  The center paper flower was on my work area.


For this 3rd atc I again stamped with Wendy's dot background and added extra details to the leaf.  The center piece on the flower is a Wendy Vecchi Blossom Bucket piece and I colored the flower with a yellow glitter Sharpie paint marker.  


Saturday, November 3, 2012

Unique


ATCs are a great way to use up left over pieces of inked, sprayed, dipped, whatever pieces of paper which is exactly what I used here.  I used the Dylusions leaves stencil with ink along the top.  The girl is a Paper Whimsy image found here. Added the German scrap around the edges - got mine from Collage Stuff. "unique" is stenciled on (Wendy Vecchi Studio 490 stencil) with modeling paste, colored on top and shadowed with a black pen.  


Friday, November 2, 2012

Take a risk


A fun and bright atc.  I started with a piece of left-over pick-up-extra-color cardstock, layed on a mask and sprayed it with dylusion pink.  Added stenciling and stamping with ink and stamping bubble wrap with paint. The flowers (Hero Arts) are stamped with black, outlined with a white pen, and darkened the dots and added lines inside the flowers with a black Glaze pen (can't really see that in the picture).  The words are a Dylusions stamp.