Saturday, June 2, 2012

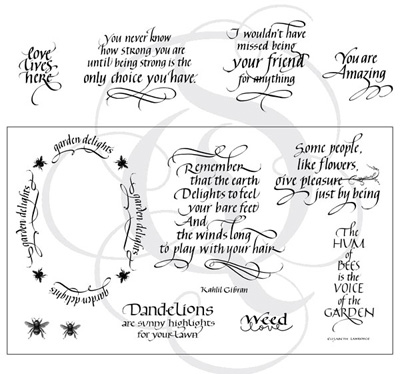
I Wouldn't Have Missed Being Your Friend


Isn't this quote just an awesome stamp!!!  It's part of the newest release from Quietfire Design that I hadn't used yet (there are still a few more to use).  I have several friends that are going to be getting this on a card sometime!!

The folded base here is Distress Core'dinations... sanded around the edges after it was folded.  The main piece is Ranger's Specialty stamping paper... first inked with all the newest colors (Spring Set) of Distress Inks (Totally LOVE these colors!!!)... then I stuck on some Heidi Swap leaf masks and inked again with the same colors... stamped with a Studio 490 text image (Live and Make Art set) in peacock feathers (I had started taking the masks off but not all of them, so some leaves are stamped over with the text and some not), removed the rest of the masks, dried it, flicked with water, blotted, dried, and the quote stamped with Archival Ink jet black.  It's layered on a piece of medium purple cardstock leaving a small border.  The Tim Holtz butterfly border die is cut from the Specialty stamping paper, inked with shaded lilac, doodled on with a black pen and a white pen and then yellow sharpie over the white pen, black gems on the bodies, and glued to the bottom of the card.  A scrap strip of the same Distress Core'dinations sanded and layered on top of the white edge.  Tim's Ideaology roses trim added on top... the roses are inked with squeezed lemonade, sprayed with water, dried, and the top rubbed over with peacock feathers.


Tuesday, May 29, 2012

A House on a Tag


The current Making Art Challenge on the Everything Wendy Vecchi yahoo group is to make a tag with a house on it.  I started with a #8 manila tag... actually an extra tag I had here that I'd used to pick up extra ink from another project. All stamps used are Wendy Vecchi Studio 490.  The background (Be Inspired...Make Art set) is stamped with Archival manganese blue.  The vine image (same set) at the top is stamped with Archival emerald green and also a couple times with russet.  The leafy image stamped along the bottom is actually the top part of the tree from the Mail Art set also stamped with emerald green.  Scallops around the edge are done with a white pen.  The house is Wendy's Art Parts... I'm using the medium sized house - just the part with the cut out, the roof line, and the door.  I colored all pieces first with snow cap Pigment ink and dried them.  The house is inked with Distress Ink barn door, rusty hinge, and fired brick and stamped with the background from the set Art Colors Life in russet.  The roof line and door are inked with picket fence Distress Stain, dried, stamped with the background from Celestial Art using russet, dried, inked with some tea dye and rusty hinge, dried, scallops and dashes made with a black pen.  Be inspired (Be Inspired...Make Art set) was inked with jet black separately and stamped on scraps of manila... Be is cut to fit behind the opening in the house... inspired torn out... inked around the edges of both with scattered straw and mustard seed with a little rusty hinge on the inspired piece.  A gold heart button with the shank cut off is colored with rust alcohol ink and attached to the door.  Hand is stamped on manila with jet black and inked with rusty hinge, fired brick and tea dye.  Die cut leaves (Sizzix branch w/leaves) from manila, inked with peeled paint stain and sprayed with Color Wash meadow, stamped with the background from Celestial Art using emerald green, cut apart and added as shown.

Thursday, May 24, 2012

CC2C #6


This weeks Compendium of Curiosities 2 Challenge is Tissue Wrap Collage found on page 38.  Get all the details on Linda's blog Studio L3.  The Funkie Junkie Boutique is this weeks sponsor and they are giving away a gift certificate for $25.

I don't have much time so I'm not going to include all the details of this tag.  If there is something about you'd like to know about the tag, just ask!!

Live The Moment


When I'm playing with inks or sprays (or even actually making something with a purpose) many times I get extra pieces because I blot up extra ink either from the craft sheet or from the paper I'm working on and I save these papers for future project... I know the beginning of this background is from that.  I stamped the leaves along the bottom.  Then thought I needed more "something" in the background and so I took a plastic canvas circle, layed it on and sprayed a corner and then sprayed another corner.  I love how that turned out... it's like movement radiating from the fish swimming through the water.  Now the fish... when Suzanne mailed me the new Quietfire Design stamps she put an outline fish sticker on the back of the envelope... I carefully peeled it off and then used it on this atc.  After sticking it down I colored in the fish using first Tombow marker and then either Glaze (red and orange) or Souffle pens (yellow).  I also added light grey marker around the outside edge of the fish.  I made air bubbles using Ranger's Glossy Accents and then decided I didn't want them to just be clear and so I used white Enamel Accents over each one.  Black pen squiggles and dots around the edges.  Live the moment words are cut from Tim's Words to Say.

I am also entering this in the current Frilly and Funky challenge which is Stencils and Masks.


Wednesday, May 23, 2012

A Mother's Love Grows


This atc starts with a background swap piece (for those who don't know... at our in-person atc swaps in Des Moines we have an on-going background swap... you put an atc background, or a few, into the bucket and take out however many you put in and then create with it to make a finished atc).  The background was two printed papers, one torn and layers over half of the other.  I stitched around the edge and inked.  I stitched a "stem" for the flower.  The leaves are a Wendy Vecchi image (the image is actually 3 leaves on a stem) stamped onto grungepaper that has music paper glued to it, cut out, colored, I cut off two leaves and sewed them onto the atc.  There is doodling/dots along the right side in both black and white pen.  The mother/daughter image is from dezinaworld... I punched it out and inked the edges.  I punched a second flower from cardstock... inked it and added details with a white pen.  A Mother's Love Grows is computer generated.  The "A Mother's Love" banner is left over from a swap (I haven't shared those atcs yet) and then I added the word Grows.

Tuesday, May 22, 2012

Our Heart Captures Memories


I have a box of atc sized backgrounds just filed away for use... some of these came are from left over pieces of playing that I cut to size and filed and some were given to me.  I started with a background pulled from that file.  I glued a piece of book page along the bottom.  Stamped one of Dyan Reaveley's leafy vine images three times along the top (once just on the atc a little, then a little more, and then a lot more) with Archival Ink jet black, colored in the leaves and added highlights with a white pen.  Glued a piece of burlap as shown.  Die cut some leaves (Sizzix Branch w/Leaves thin die) from cardstock, added color - probably sprayed, dried them, added details with a black pen and highlights with a white pen, attached them as shown.  Tied string and ribbon around the bottom.  The butterfly is die cut from Wendy Vecchi's Clearly for Art.  I glued a piece of book page to one side using Ranger's glue 'n seal matte.  After it was dry, I tore of the excess book page along the edges.  I have the butterfly so the paper is in the back... I inked the front with Alcohol ink also tapping the ink along the edges which caused it to bleed into the paper giving a darker edge... at first it was an accident but it looked very cool so I did it all around.  The butterfly was heated and shaped, glued to the atc, and a piece of string folded and glued to the center make the body and antenni.  Our heart captures memories are again words cut from my scraps of Tim's word stamp.


Monday, May 21, 2012

Birds That Imagine, Create, Live


I glued a piece of book page to a white atc blank.  Along each edge I pulled the book page back tearing it along the edge of the cardstock.  Sprayed the piece with Stamp Zia color wash.  Stamped a Dylusions border image along each side.  Added white pen marks in with the stamping.  Brushed white paint along the edges.  The bird image (Hampton Art) is stamped with Archival Ink jet black onto a leftover scrap of a piece of sprayed/stenciled paper.  After gluing it onto the atc I used a white pen around the edge so I'm actually writing onto the background and a black pen for stitching up on the bird piece.  A piece of yellow string tied around the bottom.  Glitter gems in the center of the flowers.  image, create, and live are all cut from the Tim's Words to Say.


Sunday, May 20, 2012

Award


This week I received the Liebster Blog award from Evethmoon Crafty Creations.  This reminded me that I had received this award before and not followed through so I went searching and back in February Art By Wendy also left me this award.  I am so sorry Wendy that I didn't follow through... it was a crazy time with my mom going into the hospital and then passing away.

Thank you to both of you for this award!!!  

The origins of the Liebster Award are somewhat unclear, but the general consensus is that it originated in Germany.  Liebster, meaning favorite or dearest, is to showcase bloggers with less then 200 followers. Upon accepting the award the recipient must then pass it on to five more blogs of their choice.

Here are the rules of the award...

1. Thank your Liebster Blog Award presenter on your blog.
2. Link back to the blogger who presented the award to you.
3. Copy and paste the blog award on your blog. 3 to choose from : )
4. Present the Liebster Blog Award to 5 blogs of 200 followers or less who you feel deserve.
5. Let them know they have been chosen by leaving a comment at their blogs.


Here are the 5 blogs I have chosen....

Julie at Julie Bagamary


Oops, that's 6 but I'll just leave them all.  Enjoy!!!


Create ATC


I made several atcs last month that I haven't blogged yet and am hoping to get them all shared this week.  It wasn't all that long ago but I'm having a little trouble remembering exactly what products I used on all of them.  I'm going to have to start making lists so I don't disappoint anyone!!!  I'll tell you what I do remember about this atc.  I stamped create (Quietfire Design) on a scrap of cardstock... placed an Idea-ology ornate plate over it for placement, cut it out and glued it into the plate.  I'm pretty sure the background is with Distress Color and I think it's on Ranger's Specialty stamping paper.  A Dyan Reavely image stamped along the right side.  There is a piece of Idea-ology tissue wrap glued to the bottom half with Ranger's Glue 'n Seal matte.  A scrap from a piece of border punched cardstock is along the bottom... colored with Distress... details added with a black pen... glitter gems added to the center of the flowers.  Trim colored with Distress, tied in a bow and glued on.


Saturday, May 19, 2012

Blog Buzz Winner

Thank you for all the wonderful comments on my blog buzz project!!!  

I had a great time making the tag!!!  I was asked how long it took to make and I really don't know.... it actually takes me longer to decide what to do as I work along then it does to do the work and I rarely have time to just make something start to finish in one sitting... honestly, if you were going to make a tag like this, already knowing what you were going to do, it wouldn't really take all that terribly long.  I was also asked if it took longer to make the blog post then to make the tag... it can sure feel that way - LOL.  I get enough people telling me how much they appreciate the directions and sometimes tips, etc., that I'm happy to include them, even if it takes a long time to make the post... a labor of love some might call it!!  Someone else asked about my die cutting machine... I have a Vagabond and love it!!!

Now on to the winner on my blog.....  which is Daphne!!!!!


Daphne said...
Oh Wanda, exquisite artwork, as always! your bow has such an antique feeling.

Thursday, May 17, 2012

a journey of creative dreams


This atc started with a background I got from our on going background swap at our in-person atc swap in Des Moines.  The background is cut from a real map and then had white crackle paint around the edges.  I used scraps to finish it up... you see, my pile of scrappy stuff is overtaking my work area, lol.  The piece laying across the bottom was torn from a tag a long time ago.. I stuck it on and then added stitching.  Stamped some flourishes (Wendy Vecchi Studio 490 stamp) and highlighted them with a white pen.  The circle with the eye is also a Wendy stamp that I had laying there, already colored, left over from a previous project... I attached it with foam tape.  The words are from the Tim Holtz stamp stuff to say... yes, I have several parts of this stamp laying there waiting to be used... I chose these words, cut them out, edged them with ink and added them.  It all made a very different for me atc but I quite like it!!!

Now a reminder... you have until midnight Friday (or really Saturday when I wake up) to leave a comment on the Blog Buzz post for your chance to win $50 worth of Quietfire Design Rubber.  

Wednesday, May 16, 2012

Blog Buzz


Welcome to the Quietfire Design Garden Delights Blog Buzz!

Quietfire Design would like to introduce you to their new Spring selection of rubber stamps!  Each day designers will be posting brand new artwork they have created using the new rubber stamps.  Visit each of their blogs on the day of their featured project, post a comment on their Blog Hop post and you will be eligible to win a grab bag of Quietfire Design rubber stamps valued at $50!   Each Designer will randomly choose a winner from the comments on their own Blog Hop post, so make sure you’ve commented by midnight Friday, May 18th.  Tell your friends!

All winners will be posted on the Quietfire Style blog on Sunday May 20th. If you are one of our lucky winners, please contact Suzanne privately with your snail mail address.  (Her email address is in the sidebar of the Quietfire Style blog)

Here is our schedule:

Monday, May 14th: Yogi , Holly
Tuesday, May 15th: Robyn, Dawn 
Wednesday, May 16th: Wanda (that's me), Sherry
Thursday, May 17th: Monica, Terre
Friday, May 18th: Suzanne

The complete set of new rubber stamps will remain on special at 20% off throughout the Blog Buzz!

Happy Buzzing and good luck!!

*********************************************************************************

Now for my project!!!!  


Supply List --

I'll start by explaining the flowers first.  If you search on YouTube you will find many videos on making your own roses so I won't explain all the details here.  I will show you pics of how the flowers were cut before making the roses.  The larger roses were each made from three 6-petal flowers.  The smaller rose was made from one 6-petal flower.  I used the smaller 6-petal flower from the tattered floral die and cut them from maroon book cloth.  I wasn't sure how the book cloth would work but it's fabulous for this - looks AND feels great!!!!  After cutting the flowers I lightly brushed white paint on the edges of the petals starting off the flower and brushing in over the edge.


The leaves were also die cut from book cloth using the tattered leaves die.  After cutting I folded down the center of the leaf, front out, and rubbed peeled paint on the fold... repeated folding and rubbing on ink to get all the lines on the leaf.  I then pinched and twisted the end of the leaf and trimmed off the stem.  


For the background of the tag I lightly sponged white paint on the tag and dried it.  Then working on a craft sheet I sprayed the tag well with water and then with both colors of Color Wash spray and dried the tag.  Next I rubbed the edges in the left over color on the craft sheet and if needed sprayed a little water along the edge of the tag for blending and dried the tag again.  (The white paint resists the color wash and peeks through adding wonderful texture to the background).  Stamped the flourish a few times with broken china and the word love with faded jeans.  Added squiggles around the edges first with a black pen and then with white.  The flourishes were pretty light and so I decided to add highlights with the white pen.  


The house with the heart die stuck inside was cut from manila cardstock and then embossed with the bricked folder.  Covered the front completely with victorian velvet using a blending tool... lightly went over it with dusty concord to pick up the pattern of the embossing and finally added a bit of walnut stain around the edges.  Stamped love lives here with jet black on a scrap of natural cardstock, attached it behind the house and used a black pen to add dots.  Cut the roof from the left over piece of manila cardstock that I cut the house from... just followed the roof line of the house on the left over piece.  Painted it white.  After it was dry I added a bit of walnut stain, dried it with a heat tool and added doodling with the black pen.  


The fence was cut from grungepaper.  I inked it with distress ink and embossed it with the tea dye powder.  After it was cool I rubbed it to remove all the release crystals and then painted it white.  This gave the fence great texture!!!  After it was dry (or use your heat tool) I very lightly rubbed the walnut stain over it (I used the blending foam without adding more ink), stamped a few flourishes along the bottom with peeled paint and dried it.  


For the "sign" I stamped love on a scrap of natural cardstock, cut it to size trimming the corners diagonal, inked the edges with victorian velvet, distressed the edges with the paper distresser, and inked them with dusty concord.  Put the sign in a memo pin and cut off the end so it wouldn't stick down past the bottom of the fence.  


The bee was stamped on a scrap of natural cardstock with saffron, dried, details added with the black pen, and then cut out.  


The silk ribbon was sprayed with water and then both colors of Color Wash spray, partly dried, and then scrunched as I finished drying it.  If you scrunch it up while it is very wet the colors blend together more and I wanted to be able to see both colors.


Everything was assembled as shown.  The bird has two layers of foam tape behind it for added dimension.


Here are some close up pics.


Tuesday, May 15, 2012

MAC #41


It's been a very long time since I participated in a challenge on the Everything Wendy Vecchi Yahoo Group and I've missed doing them.  This weeks challenge is to make an ATC.  I started with one of Wendy's atc Art Parts... covered one side with Distress Stain picket fence, dried it... using blending tools added the 3 new colors of Distress Ink, dried it... stamped the background from Wendy's set Sentimental Art with Adirondack pigment Snow Cap, dried it... Inked the flower from Wendy's set Art Is Therapeutic with Archival Ink deep purple and emerald green and stamped it 5 times on the atc without reinking between stampings... inked and stamped an additional flower (no stem) onto a scrap of white cardstock, cut it out and glued it over the first flower I stamped onto the atc... using I white pen I highlighted the dot areas of the other flowers (and even added additional dots)... stamped the quote with Archival Ink jet black... wrote over flowers and miracles with the white pen... added squiggles and dots around the edge with the white pen... tied fiber onto a button and added it as shown.


Thursday, May 10, 2012

CC2C #4


This weeks Compendium of Curiosities Book 2 Challenge (see Tim's Blog) is page 43, Faded Layers... go to Linda's blog to get all the details on the challenge. 

I decided to work smaller this week and started with a #5 manilla tag instead of a #8.  Used a couple of Tim's Idea-ology mini masks and Distress Ink mustard seed, wild honey, and festive berries.  Stamped part of Wendy's Studio 490 wire mesh background stamp with Archival Ink russet.  Stamped the Dylusions vine image along the left with Archival Ink olive and colored them in with DI peeled paint.  "You are Amazing" is one of the new Quietfire Design images - it is stamped with Archival Ink jet black.  The rolled flower is freehand cut from a piece of Distress Coredinations paper, rolled up, glued and Distress Stickles rock candy added to the top edges.  Die cut some leaves from white cardstock, inked & sprayed, stamped with Wendy's number background stamp in olive.  Used a white pen for the highlights and dots and a black pen for the black doodles.


The Quietfire Design Garden Delights Blog Buzz

Quietfire Design would like to introduce you tos their new Spring selection of rubber stamps!  Each day two  designers will be posting brand new artwork they have created using the new rubber stamps.  Visit their blog and post a comment on their Blog Hop post and you will be eligible to win a grab bag of Quietfire Design rubber stamps valued at $50!   There are a whopping *nine* designers sharing their creations with you, so that means nine grab bags available. You must have commented on the blog hop posts by midnight Friday, May 18th.  One name will be randomly drawn from each blog, so you have lots of time to enter!  Tell your friends!
The complete set of new rubber stamps will remain on special at 20% off throughout the Blog Buzz!

All winners will be posted on the Quietfire Style blog on Sunday May 20th. If you are one of our lucky winners, please contact Suzanne privately with your snail mail address.  (Her email address is in the sidebar of the Quietfire Style blog)

Here is our schedule and the awesome designers you will be visiting

Monday, May 14th: Yogi  , Holly
Tuesday, May 15th: Robyn, Dawn 
Wednesday, May 16th: Wanda, Sherry
Thursday, May 17th: Monica, Terre
Friday, May 18th: Suzanne

Happy Buzzing and good luck!!


Here is a peak at an art piece by Suzanne, owner of Quietfire Design.


Tuesday, April 24, 2012

CC2C #2


This weeks challenge from Tim's book Compendium of Curiosities 2 is faux patina from page 58.  You can get all the details (and see some fabulous art) on Linda's blog Studio L3.  This weeks challenge is sponsored by Angie!!  She is giving one lucky winner (I hope it's me :-) an autographed-by-Tim Tim Holtz Ideology messenger bag.  Angie also shares a beautiful mini canvas using this weeks technique on Linda's blog so go check it out!!!

For my tag I started with a Ranger's #8 black tag.  I wanted to see if alcohol inks when using the snow cap mixative would show up on the tag.  It took a few layers but it did show up, more muted because it is not glossy cardstock but I love the look and amazingly it did not bleed through to the back.  I did this all over the tag using snow cap, ginger, and butterscotch.  Next I tore a piece of old book page and glued it along the left side using Ranger's glue and seal... added Distress Ink wild honey with the blending tool.  Stamped Dyan Reaveley's vine image from the Dylusions Around the Edge set (I am in love with this stamp - this week anyway, who knows about next week) with Archival jet black... colored in the leaves using my Dove Blender and Distress Ink (haven't had my Dove Blender out in ages.. it sure makes coloring in quick!!)  Stamped Tim's butterflies along the right side with Archival coffee.  Used this weeks technique on Tim's Ideology ornate plate starting with snow cap, meadow, butterscotch and adding pesto and pitch black.  "Create" and the butterfly are Quietfire Design images.  Create was stamped with jet black, cut to fit the frame, glued in... oops, I forgot to add color... I meant to..  ok, I'll just add a bit to the center using Distress Ink scattered straw and attached it to the tag with black brads.  The butterfly was stamped on Ranger's specialty paper with Archival pale ochre, cut out, glued on the tag, and liquid pearls added to the body.  The butterfly strip along the bottom I've had laying on my work area for some time... had to test out the EK Success punch when I got it :-))  I colored it with scattered straw Distress Stain.. where the stain bled under the cardstock the color is darker which was perfect for this.  Glued on the strip and then went around the inside edges of the butterflies with a black pen to make them stand out more... added drops of liquid pearls to the centers of the bodies.  Added stitching around the edge with the black Glaze pen and finally tied green jute around the bottom and in the top.


Sunday, April 22, 2012

Whispers


This is a regular sized ATC - 2 1/2" x 3 1/2".  I started with Ranger's new Specialty Stamping Paper and stamped the girl (Stampland) onto it using Archival Ink coffee.  It was amazing how well this photo image stamp stamped onto the paper.  It used to be that to get a really crisp image when using photo image rubber stamps you needed to stamp onto glossy paper but this paper worked marvelously!!!  Dried the ink with my heat tool... ink does stay wet longer on this paper!!  Stamped the leaves (Posh Impressions) with Adirondack ink clover stamping twice sometimes for a lighter image.  Colored the lips and eyelids with Distress Ink (broken china, barn door) using Ranger's Inkssential pen nibs.  Added Distress Ink shabby shutters around the edges with a blending tool and then Archival coffee to the very edges.  The bird is cut (Tim's movers and shapers bird) from grungepaper, inked it with Adirondack snow cap, dried it, added color with Distress Inks (broken china, vintage photo, wild honey) and used a black pen for the eye.  The "twig" is made by twisting Tim's Ideology tissue tape and painting it brown with espresso Paint Dabber, let it dry.  Attached the bunched up green lace and "twig" to the bottom with Tim's Tiny Attacher.  The bird has a piece of foam tape under it for heighth.  "Whispers" was computer generated, cut out, inked with Shabby Shutters.


Thursday, April 19, 2012

CC2Challenge and Remembering CCC

I thought I'd show you where I have all my projects from the first Compendium of Curiosities Challenge (the tag on the far left - Simplify - is not from the challenge).  This is above the doorway between my arting area and the dining room.  I love having them where I can see them anytime!!  I've added other tags I made to the left of these since I took the pictures and will continue to add my tags from the new Compendium of Curiosities 2 Challenge.  I've also added a few flowers I've made to the mix... they look perfect in the blank areas too small for a tag.  Remember you can click on the pictures to get a closer view!!


Now on to my tag for the first CC2C challenge.  Tim's second book is just as awesome as his first book!!!  If you haven't gotten one yet you can order direct from him and even get it autographed... see HERE.  You can get all the information about the challenge on Linda's blog Studio L3.  This week we were directed to page 66 of the book and the technique is Custom Foam Stamps... way, way cool!!!  I tweaked mine just a bit... I embossed my die cut (Sizzix Alterations mini tattered floral movers and shapers) foam with an embossing folder (Sizzix Texture Fade damask).  I started with a Ranger #8 manilla tag, sprayed it with water, added Distress Stains old paper and spun sugar, dried it, stamped my flowers with Distress Ink festive berries, dried it, roughed up the edges with the Distezz-It-All, inked the edges with vintage photo, stamped the words (from Tim's set Words For Thought CMS132) using Archival Ink jet black and dried it.  Decided I wanted the stamping under the words more muted so added water to that area, blotted it up and dried it.  Glued on the lace with Ranger's Glue 'n Seal matte.  Cut 2 flowers from grungepaper, inked them with festive berries, embossed them with the damask folder, sanded the high spots a bit, inked the high spots with vintage photo, added just a touch of Ranger's Jenni Bowlin malted milk Paint Dabber to the tips and wiped it with my finger so it lighted it a smidge without harsh lines.  Cut the the leaf/vine (Sizzix Bigz Vine w/leaves) from grungepaper, cut it apart, colored with Distress Stain shabby shutters, stamped the background image (from Tim's set Mixed Media DMS125) with Archival Ink coffee. Glued on the pieces as shown.  Added an Ideology Accouturement (Classic set) to the center of the flower.  Used my finger to brush on a little Archival Ink coffee to the ridges of the button and dried it.  Finally I added black lines around some of the stamped flowers avoiding the words area.  This weeks challenge is sponsored by Simon Says Stamp and they will be randomly giving away a gift certificate to one lucky winner.  


Monday, April 16, 2012

Just By Being


I started the background on this #5 manilla tag when I was working on the dandelion atc.  I cleaned up left over Distress Stain by laying this tag in it.  I then used just one part of the new Garden Delights oval stamp to stamp all over the tag with Distress Ink peeled paint (ink, stamp, ink, stamp, etc. and sometimes stamping the second generation for some lighter stampings).  Stamped the saying with Versarmark ink and embossed with detail black powder.  Inked the edges of the tag with Distress Stain broken china and then added snow cap Paint Dabber, dried it, and then added a bit more snow cap right on the edges for a deeper white (the first time the paint takes on some color from the Distress ink).  Cut the flowers from Kraft Core Distress Core'dinations using Tim's Sizzix Alterations die tattered florals, embossed them with the damask embossing folder, sanded the high spots, added a little snow cap paint around the edges, stacked them, pierced them with an awl, added the Ideology foliage flowers and brad and then dabbed some snow cap paint on them.  Cut the mini flourish (Tim's sizzix movers and shapers) from grungepaper, painted with snow cap dabber, dried, inked a bit with Distress peeled paint.  Ribbon (Tim's Ideology trimmings) is colored with Distress Stains.


Tuesday, April 10, 2012

Dandelions


A quick ATC using another of Quietfire's new stamps.  I started with glossy white cardstock... stamped the dandelion (Hero Arts) with Ranger's resist ink (one stamped just off from the green one and another in the lower left corner) and dried the resist ink.  Sprayed some water on a craft sheet and dabbed in some broken china and peeled paint Distress Stains and then pressed the ATC into the mix... lifted it out, placed it face up and then pressed another atc blank onto it and pulled it up (this pulled the extra ink from the atc and started a background for another one).  Dried it and decided the color needed to be a little darker and opted to use Distress Ink on a blending foam to add more color.  Next I flicked on some water drops, blotted them right away and dried the atc.  Stamped one dandelion again using Distress Ink peeled paint and dried it.  Stamped the quote using jet black Archival and dried it.  Roughed up the edges using Tim's paper distresser and added stitching.

A Birthday card and New Bee Rubber


For the background I started with Ranger's new specialty stamping paper.  I had been hearing how wonderful it was and decided I needed to get a pack to try.  This was my first time playing with it and it really is wonderful!!!!  I sprayed the paper with Stamp Zia Chroma Sprays (sun, cherry, and lava), dried it, and then sprayed again with cherry using a Plaid Stencil (ditsy floral) and dried.  Randomly stamped a text image (Wendy Vecchi Studio 490) with Ranger's Archival Ink pale ochre.  Added a line of stitching with my sewing machine and distressed the edges with Zutter's Distrezz-it-all.  Stamped Happy Birthday (Art Impressions) with Ranger's jet black Archival. Stamped the leaves (larger leaves are Paper Inspirations, smaller are Posh Impressions) with Archival Ink pale ochre and viridian and Adirondack meadow.  The bird (Sizzix Tim Holtz Alterations) and leaves (small thin metal die and I can't remember which company it's from) are cut from grungepaper.  The bird was inked with Ranger's snow cap pigment, dried and then colored with Distress Ink.  The leaves were colored with Distress Stains.  Flowers are Primo.  The heart brads weren't a deep enough yellow so I dabbed them on Ranger's sunshine yellow pigment pad and heated... perfect!!


Yesterday I received new stamps from Quietfire Design (see all the new ones HERE) and had to play a little.  The background I had left over after making the above card... after I sprayed over the stencil onto the background I used for the card, I lifted the stencil off and laid it ink-side-down on another sprayed piece... nice, huh!!!!  I cut that down to atc size and used it here.  Stamped the quote and both sizes of bees using Ranger's jet black Archival Ink.  Drew the border with a black pen... also added some other doodling in an effort to hide a smear I made with my finger when I was stamping the bees... in person it worked well - in the picture the smear is more noticable.  Sprayed a scrap of roses from Tim's Ideology trimmings with Stamp Zia's Chroma spray lava, dried them and brushed the top with Distress Ink barn door.  Added a brass bee charm from my stash... rubbed on some jet black ink... nope, not quite right... added Ranger's snow cap Paint Dabber on top working it into the grooves, dried it, rubbed on jet black ink with my finger catching the high spots, dried it, dabbed it with mustard seed Distress Stain and dried it... looks good!!!   Edged the card with Distress Ink wild honey.


Thursday, April 5, 2012

Thank You Card


This is a thank you card I made for friends after my mom's funeral.  I used a piece of greenery that came from the casket spray... layed it on the white cardstock, sprayed with Ranger's color wash sprays and dried it.  Stamped the scripture (Our Daily Bread Designs) onto vellum using Ranger's jet black Archival Ink.  Attached the vellum to the paper using gold Class A Peel sticker strips.

Tuesday, April 3, 2012

A Kleenex Box


I have a wonderful friend and she gives me all their empty tissue boxes... that is what the background of this card is from.  It was such a pretty box... loved the flowers.  The edges are brushed with Ranger snow cap paint dabber.  The sentiment is stamped with Ranger Archival Ink deep purple... edges distress with the Distrezz-it-All.  The flourish is cut from grungeboard with a Sizzix die.. painted, inked, blinged with Distress Stickles rock candy and dotted with Enamel Accents.  Paper flowers with brads in the center.  Butterflies punched from cardstock and gems added to the center.


Monday, April 2, 2012

A Dress


Back on THIS post I used a heart cut from a large sheet of watercolor paper that had been painted, stenciled, stamped... this dress was cut from that same paper.  After cutting it out I stamped flowers on the bottom using Ranger's snow cap paint dabber, dried it, and then stamped the saying (Verses rubber stamps) with Ranger's jet black Archival ink.  Added the lace and heart button (shank cut off and rose highlighted with Ranger pigment ink).  Stamped small hearts (Stamps by Judith) along the bottom and around the neckline... they didn't show up as well as I thought they would so I outlined them with a black pen and then added Stickles.  The hanger is made from 20g wire.  This was sent as a Valentine to my good friend who was over for a play day when we made the large sheets of painted, stenciled, stamped papers.