Tuesday, September 13, 2016

Trust


A bible journaling page.  I've used Dylusions paint in the background and created some waves or white caps with a heavy bodied white paint.  There is writing with a black pen and gel pens.  Trust is a Prima Christine Adolf adhesive rub-on with purple foil on top.  

Life can throw lots of stuff at us!!  It can be easy to focus on the "storms" and think they will never end but Jesus can calm the storm or he can calm our hearts in the midst of a storm.  He is always available, all we have to do is reach out!!  Nothing is too big or too hard for God.  He loves us so much and knows so much more than we do.  We can always trust Him!!!!


Saturday, September 10, 2016

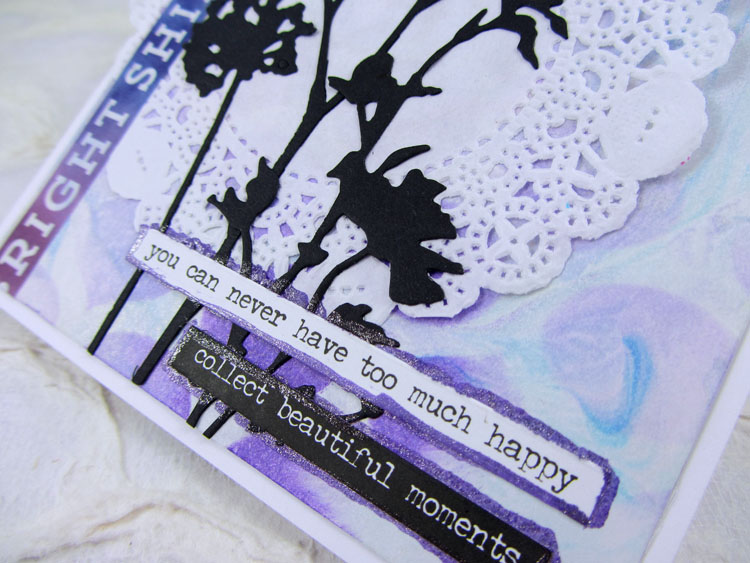
Collect Beautiful Moments


Hi There!!!  This is a birthday card for our granddaughter.  The background started with a piece of shaving cream technique paper done a long time ago.  I added some stenciling with ink, a paper doily, washi tape, Tim Holtz die cut flowers and some Tim Holtz stickers.  A bit of glitz around the words with a Wink of Stella pen.  


Saturday, September 3, 2016

Thinking Warm Thoughts Card


Happy Saturday to you!!!!!!!!!  

It's my turn over on the Elizabeth Craft Designs' Blog today.  I hope you have time to go check it out HERE.

Wednesday, August 31, 2016

Circle Journal #5


Hello!!!  I'm so sorry not to be blogging much.  Life is very busy right now and my blogging will probably be sporadic.  I do have some things done, but not blogged, to help fill in a little but I'm not getting a lot of creating time at the moment.  

Today I'm sharing my pages in Julie's circle journal that was sent on earlier this month.  All of Julie's pages have "wave" edges and they were varying widths.  Very cool journal!!!  

I started by scraping on Fresco Finish Paints in lots of colors.  The order of bottles is the order I scraped on the paint.  


Next I have a variety of stenciling with various colors and some stamping with paint.  The large flowers (top left, bottom right) were also stenciled plus I did some stamping of script through the stencil and added dots of paint in the centers.  The words are a The Crafter's Workshop stencil and they were stenciled with black embossing paste.


The large, whitish flowers (Lin Brown stamp) were stamped on the page and then the matching stencil used to make them easier to paint.  The greenery along the bottom and in the top right corner were stamped with Archival ink.  


The inside front of the book had a page that we were to put a word on.


I chose to do the word BRAVE.


Friday, August 26, 2016

Shrink Plastic Jewelry


Hello and Happy Friday!!!  I hope your week has been good and that your weekend is filled with wonderful people and activities!!!  

I'm over on the PaperArtsy Blog today sharing how I made these shrink plastic pieces for their 16th topic of the year Jewelry, Beads, Charms Dangles.  I hope you have time to pop on over and check it out.  Let me know what you think!!!

((Hugs)) and Blessings to you!!!  

Wanda

Tuesday, August 23, 2016

Forever Love Wedding Card


This week on the Quietfire Creations Blog we are celebrating a wedding.  Our design team sister, Yvonne, is marrying her love, Harrie!!!  

Congratulations Yvonne and Harrie!!!!!!!!

You can get the info on my card Here and, if you haven't been following along, be sure and check out all the wedding projects being posted this week!!! 


Wednesday, August 17, 2016

Noel Card


Hey!!!  I'm up on the Quietfire Creations Blog today with this card using the brand new A Way With Words die, Noel.  I hope you can pop on over and have a look. 

Monday, August 15, 2016

Peace Card


Hello!!!  I hope you are doing well today!!!  I'm sharing a card using some new things from Elizabeth Craft Designs.  I'm using the brand new Peace by designer Suzanne Cannon (also available on the Quietfire site) and some new stencils (Earth & Sky, Evergreen Grove, Snowstorm & Mound) by Susan Tierney-Cockburn. 

In the background I have Distress Collage Medium Crazing.  Once dry, it's sprayed with Distress Spray Stain.  Next, across the top half, is Texture Paste through the Snowstorm & Mounds stencil.  The trees trunks are stenciled onto white cardstock with Distress Ink, then the branches are done with white embossing paste, left to dry, the stencil put back on and color added with Distress Ink.  Once that was dry I used a white paint marker to add "snow".  Once dry it was trimmed around the the trees, cut across the bottom and silver glitter paste added.  Silver glitter paste was also added around the edges of the background.  The birds (earth & sky stencil) are added with black embossing paste.  Peace was cut from both white and green cardstock, adhered together and glued to the card as shown.  


Saturday, August 13, 2016

Brand New A Way With Words Merry Christmas on a Card


Hello and Happy Saturday to You!!!  I have all the info on this Christmas card using the brand new A Way With Words Merry Christmas over on the Elizabeth Craft Designs' Blog today.  I hope you have time to skip on over there and check it out!!!

Thursday, August 11, 2016

A Way With Words - New Die Release


It's an exciting day!!!!  The brand new A Way With Words dies have been announced.  The above picture shows all the new dies.  You can find them on the Quietfire Design website HERE as a pre-order or in the coming soon category on the Elizabeth Craft Designs website HERE.  

There is a short video showcasing lots of beautiful projects made with these new dies.


Friday, August 5, 2016

I Dwell In Possibility Tag - Creative Chemistry 103


Hi!!  I hope you are having a good week!!! It should be nice today, not nearly as hot as the rest of the week was.  I'll be out painting siding as there is no rain in the forecast today or tomorrow.  

I got to play a bit last night and tried two of the CC103 techniques and finished one tag which is what I'm sharing today.  The technique is from Day 3 and is called Texture Paste Embossing.  I used Grit Paste instead of Texture Paste and while the paste was drying suddenly remembered that Tim had mentioned in a video that we are not supposed to heat grit paste.  I'm not sure if that was just for drying or if it's not recommended at all.  I went ahead and melted the powder after the paste was dry and all was ok (except where I bumped a spot with my finger before it cooled, lol).  I LOVE how textured it is!!!!  The quote stamp I used is from Quietfire Design.  Tim's butterfly duo for the butterfly, Idea-ology spinner, trim, mirrored heart for the embellishments.  Distress ink on the tag and butterfly.  Alcohol ink on the heart. 


Wednesday, August 3, 2016

Life Doesn't Have To Be Perfect Tag - Creative Chemistry 103


LOTS of great information and techniques in Creative Chemistry 103 and I would totally recommend the class.  

For this tag I've had a little play with the Distress Highlight Stamping Technique and I've used Tim's doily stamps for the technique.  There is also some stenciling on here (little dots), wildflower die cuts from black cardstock, Idea-ology chit chat stickers and paper string, inking around the edges, black soot Distress marker for the marks at the bottom of the tag and to finish it off a light spritz of the Tarnished Brass Mica Spray from a good distance.  I LOVE how this has made it look like the tag has little flecks of gold all over it!!!  Hopefully you can see a bit of that in the next two pictures.  


Tuesday, August 2, 2016

Autumn Tag - Creative Chemistry 103


Tim Holtz's Creative Chemistry 103 at Online Card Classes is this week.  Yesterday was Day 1.  For this tag I've used the Distress DIY Ombre Technique.  The colors of Distress Ink that I've used is Wild Honey, Spiced Marmalade, Ripe Persimmon, and Carved Pumpkin.  I've had a few of the Distress Custom Blend pads since they came out and I'm happy to have finally used one.  I'll be making more!!!!  The leaf on this tag is an old Embossing Arts Co stamp.  The quote is from Quietfire Design and can be found HERE.  The edges are inked with Brushed Corduroy and then I've some some random stamping with part of the Crackle Background image also with Brushed Corduroy.  Some Idea-ology Linen Ribbon and a Trinket Pin altered with a bit of alcohol ink and Distress Crayon,  along with a metal leaf from my stash also altered with some Alcohol Ink finish things up.  


Friday, July 29, 2016

RubberStampMadness Magazine - Fall 2016


My issue of this magazine arrived in my mailbox yesterday and I'm thrilled to have 4 pieces included in a wonderful article titled "50 Fabulous Tips" by Christina Hecht.  There is lots of good information in the article and I've added an item to my shopping list that I must get and try on die cuts.  


Thursday, July 28, 2016

You are my Sunshine!!


It's my turn over on the Quietfire Creations Blog today and I'm sharing this piece complete with a matching display stand.

Wednesday, July 27, 2016

Bible Journaling - Be Brave


Hi!!  Thanks for checking in on this wonderful Wednesday.  I'm sharing a Bible journaling page I did a few months ago.  A reminder to stand firm and not be swayed by people, to be brave for Christ.  I kept the journaling very simple and only used about half the page allowing something else to possibly be added later.  I have swipes of paint (Dylusions) in the background and a little stenciling with a flower stencil.  "Brave" is a Christine Adolph adhesive rub-on with blue foil adhered to the top.  "Be" was written with a white paint pen and then outlined with a black pen.  "for Christ" was written with a black pen.  "Teach my heart to" is part of an Idea-ology chit chat sticker.  

Tuesday, July 26, 2016

Circle Journal #4


Hello!!!!  Today I'm sharing my 4th Circle Journal post.  This is the journal I worked on in June and it belongs to Jo.  It's a very cool idea and I loved creating for it.  We were told to make a masterboard, cut 4 atc blanks, finish one to be placed on the outside of a pocket (the whole journal is pocket pages that she made) and put the other 3 blanks in the pocket.  Fun!!!!!!!!  I guess I was picture happy while working and took step-outs while creating the masterboard.  

I used Fresco Finish Paints onto a piece of Heavy Smoothy Cardstock.  I began with Bubble Gun, Tango, and Banana.  I put the colors on my craft sheet, sprayed them with water, used my finger to work the water into each color of paint and then pressed my paper into it all, lifted and repeated pressing until the whole sheet was full being careful not to over-mix the colors. 


The next layer is stenciling with a mix of Cheesecake and Banana.  


The leaves are stenciled with a mix of Granny Smith and Hyde Park. 


Once dry I stenciled the leaves again with a mix of Cheesecake and Limelight to give shading/highlights to the leaves.  


Next is lots of splattering with Snowflake and Little Black Dress.


A DIY stamp using the black rings that you remove from Wink of Stella pens to start using them.  They are glued onto a piece of corrugated plastic.  I stamped them with Snowflake.


And finally stamping the script image with White Fire.


Here's a pic of the sheet taken in the light tent.


And here it is cut up and the extra pieces.  


To finish the atc I used used tinted embossing paste through a stencil, leafy die cuts, Idea-ology photo booth pic in a frame, hearts colored with alcohol ink, chit chat stickers, twine and a ladybug dimensional sticker.


This picture shows the front of the pocket.  I used washi tape along the top and bottom of where I put the atc, added white dots to that washi tape and included more leaves tucked behind the atc.


I didn't want to leave the back of the pocket without any decoration.  I used scraps from my scrap box stamping a quote on one of them and also used more chit chat stickers. 


I took the picture but I just kept thinking it wasn't really done and finally decided to add a wood leaf.  I used ink and embossing powder on the top of the leaf.