I took a little time to just play and made this journal page!! Our daughter and her family are here for the holiday weekend and she loves to stamp and get painty too. I've used PaperArtsy Fresco Finish paints in my background. I started with yellow submarine, bora bora, candy floss, and guacamole. I also scooped up a few colors that my daughter had left over from some canvases she's been working on. All the stamps I've used are from the PaperArtsy Sara Naumann set #ESN09. I used some of the stamps in the background with paint (yellow submarine or snowflake). I used the ray stamp along the right side stamped with Archival ink jet black. A leaf image from the Lin Brown stencil #PS002 is stenciled in the background with paint (guacamole and hey pesto). The quote is stamped with jet black. I used a gel medium jar lid and little black dress paint to stamp the large circles. I then stenciled the leaf stem with a mix of Grunge Paste with hey pesto and hyde park paint. Once the paste dried I added some white paint marker along the stem and used my finger to add Archival Ink emerald green over the paste. I also added white marker to some of the letters in the quote and made dots around the quote.
Saturday, November 29, 2014
Friday, November 28, 2014
Peace
This is a regular sized card. "PEACE" is a Quietfire Design stamp from the set Celtic Christmas. I stamped the word on a scrap and embossed it Queen's Gold powder. I added color with a marker, trimmed the paper and edged the piece with fired brick Distress Ink. My plan was to leave the white all white but then I got a couple of small smears I think from touching marker that hadn't dried so I decided to speckle it. For the background, I started with manila card, embossed it with an embossing folder, lightly sprayed on some Spray Distress Stain (bundled sage, old paper, peeled paint), dried it, lightly rubbed Treasure Gold (ruby) over the high spots. Some stacked Prima poinsettias, leaves, gold ribbon, and gold gems finishes it off.
Sunday, November 9, 2014
Christmas is coming
Quietfire Design just released 3 new sets of Christmas/Winter stamps. You can find them in the new stamps category on their website.
For this card I used stamps from the It's beginning to look a lot like Christmas set.
I cut a white panel to size for the quote, stenciled the flowers (Studio 490 Wendy Vecchi 2 fancy flowers) with Distress Ink festive berries, splattered on Distress spray ink evergreen bough (I held the spray bottle high and sprayed slowly), dried the inks, lightly brushed over the top with the Distress Paint picket fence first horizontally and then vertically. Yes, it made the inks smear some giving them a softer look that looks better in person than in the photo. I went over the panel well with an anti-static bag, stamped the quote with Archival Ink jet black, and embossed with black powder. When I was going to add the evergreen bough, I first sprayed on a scrap of paper to see if I'd get the results I wanted. I used this scrap and stamped the tree with Archival Ink library green, circle punched it and was going to add gold gel pen just to the open areas of the "ribbon" but the ink came out too fast and, instead of starting over, I decided to just go over the whole ribbon. It was looking pretty good until later when I noticed I had a couple of small smears. I went with anyway edging the circle with festive berry. I added some of the gold gel pen around the quote panel. I took the rest of the scrap that I had sprayed with evergreen bough and stapled (Idea-ology tiny attacher) on some ribbon. I layered everything as shown and at the end decided to stencil on the holly (Tim Holtz Hollybough) with Archival Ink emerald green and then added red stickles over the berries.
Wednesday, November 5, 2014
November PaperArtsy Project #3
My final project for November, a box canvas!!! Head on over to the PaperArtsy blog to get all the details.
Tuesday, November 4, 2014
November PaperArtsy Project #2
Today's project is a set of gift tags (or they could be Christmas ornaments)!! Click HERE to pop on over to the PaperArtsy blog.
Monday, November 3, 2014
November PaperArtsy Project #1
I'm back on the PaperArtsy blog today with my first project for November, a journal page!!! I hope you'll pop on over to take a look!!
Saturday, November 1, 2014
ATCs, it's been awhile since I made any...
Our local atc group (local as in Des Moines, only an hour away) has an in-person swap every 3 months and I've missed all of them this year until October. The swap was 2 weeks ago and I attended and even managed to bring 7 atcs (it's been a busy year). I did 6 similar atcs... I started by adding Wendy Vecchi's white embossing paste through the TCW stencil mini pattern leaves (Balzer Designs) and then spraying with Dylusions, 3 with brighter colors and 3 with darker colors, and let them dry. Treasure Gold is added over the embossing. Then comes inking the edges and doodling, On the 3 brighter atcs I stapled (mini attacher) a piece of cork ribbon and glued on some dew drops. On 3 darker atcs I wrapped them with jute. Some chit chat stickers to finish.
I got those finished on Friday night and then managed to make one more Saturday morning before leaving for the swap. I got Wendy's new embossing powders for my birthday and hadn't used any yet. I took a black atc blank, added ink and cornflower blue embossing powder purposely leaving some areas near the edge or even brushing off some of the powder before heating. Wendy has been sharing her faux graniteware technique on her blog and I totally wanted to try that. I grabbed the splatter stamp, inked it up with snowcap and decided to lay the atc on the stamp instead of taking the stamp to the card.... I started to press and slid the card a bit. I thought "it's ruined!!!", picked up the card and went "that's really cool looking!!!" I grabbed 3 paper leaves from my stash (Prima I think but the label is gone), pressed them in embossing ink, added powder in fern green, red geranium, and orange blossom (just have 3 paper, one of each color, add a bit of one to a leaf, tap off the extra and move to the next color), and heated them. I used the splatter stamp and snow cap again this time I just laid the leaves on a paper and pressed the stamp over all 3 at the same time. The words are from a Wendy stamp, stamped with jet black and cut out. I distressed the edges and added some white dots down the sides. Finished.
Monday, October 27, 2014
Christmas waves....
I had fun playing around making this tag. I started with a Ranger #12 tag and cut it to be only 5 1/2" long. I sprayed Distress Spray Stains (fired brick, iced spruce, evergreen bough) onto the tag and dried it. I laid the Tim Holtz stencil hollybough onto one half of the tag, covered the rest of the tag with a piece of paper and sprayed on Distress Stain Spray picket fence... I repeated for the other half of the tag and dried it. Next I used the same stencil along the left and top to add embossing ink and embossed the holly with Wendy Vecchi's fern green embossing powder and then added shading around the leaves with a charcoal pencil smudging it with a blending stump. The quote (Quietfire Design - Christmas waves a magic wand - now available cling mounted) is stamped with Ranger's Archival Ink jet black and embossed with detail black powder. Ranger's pigment ink snow cap is sponged around the edges to give a soft or misty look. Finally I sprayed picket fence spray stain on my craft sheet, picked some up with a water brush and flicked it across the tag blocking off the stamped quote. I colored some crinkle ribbon with the same Spray Stains as used on the tag and added it to the top. Idea-ology tidings token and trinket pin, and some old Prima poinsettias finish it off.
Thursday, October 23, 2014
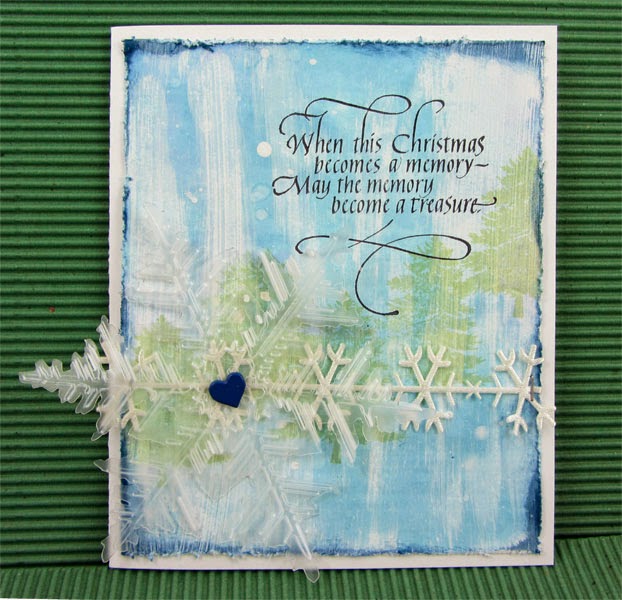
When this Christmas...
Suzanne at Quietfire Design has redone this Christmas quote and my card uses the new release which is now available as a cling stamp rather than naked rubber. I love that all these new releases are now cling and older stamps will be converted over time.
I used Distress paint picket fence and Distress stains (tumbled glass, broken china, shaded lilac) to begin my background. Loved doing this technique at Tammy's class this past weekend and I guess I'm not ready to stop. The trees (an old PSX stamp) are stamped with Archival Ink sap green. Distress ink faded jeans around the edges and then distressed the edges with a paper distresser. The quote is stamped with jet black Archival Ink. White paint is spattered on. The snowflake is the Tim Holtz new die and embossing folder combo release Layered Snowflake and it is cut from an Idea-ology frosted sheet. The trim across the card is a satin cutout snowflake ribbon and I've used Tim Holtz's tiny attacher to attach it. A heart brad to hold on the big snowflake with the panel glued to a folded white card and we are done.
Wednesday, October 22, 2014
Tammy Tutterow Fun
This past weekend Tammy Tutterow spent the weekend in Ankeny, Iowa teaching 4 different classes at Memory Bound. I took 2 of the classes and had a wonderful time. Tammy is super sweet and a very good teacher.
Sweet.....except when it comes to taking pictures, then you might get her other side....

The
Two
Sides
Of
Tammy
JUST KIDDING!!!!!! There is only a sweet side but don't ya just love her self-proclaimed Amish face, lol.
Here's a picture of us together.
I took Friday night's class called Technique Time with Tammy. We made 3 card fronts using a variety of paint and ink techniques.
Saturday afternoon's class was the nature shadowbox class but with a twist. The boxes never came in so we did a canvas instead. LOVE my canvas!!! Even though we were all using the same basic supplies everyone's canvas came out different and beautiful.
Monday, October 20, 2014
Friends Tag
My birthday was a couple of weeks ago and my very good friend that took a trip to Japan with 2 of her children to see the sights and visit exchange students they had had over the years gave me this set of Japanese watercolors, a brush, and a black pen and, well, I just had to use them on something for her and I decided to make a tag.
I had mop up piece of cardstock just sitting there and decided I would cut the tag from that. I used Tim Holtz's Tag and Bookplate die along with the Friends movers and shapers. I had already cut out the tag and stamped on the flower (an image from a new PaperArtsy Ellen Vargo set #EEV10) when I thought "oh, I should have taken a picture so you could see how it started", so I laid the pieces back together and took one. After cutting the tag out (and before stamping the flower) I did add a small spray of Dylusions down in the bottom left corner. There was a white line right through the "F" (you can see some of it on the page to the right) that I didn't like.
I used the watercolors to paint in the flower!! I don't have a background in watercoloring - I just fake it :-) but just comparing with what I have done or even when using watercolors for making backgrounds, these paints seem more opaque... kind of cool actually. I stamped one of the quote from the same set as the flower onto a scrap, tore it out and added paint to the edges. I cut another tag from solid cardstock to put behind, added some black squiggles and a ribbon and it was done. A big thanks to Michelle for the paints!! Love ya lady!!
Friday, October 17, 2014
Piano Birthday
A card for sweet boy (young man) that loves to play piano. I determined the size of my card to allow for the stamped scripture (Roann Mathias) and the stamped piano (I Brake For Stamps), laid TCW stencil onto the white cardstock and sprayed with Dylusions. My intention was to just get some of the center design but quickly got over spray so went with it. I used some piano key washi tape along where the edges of the stencil were plus an extra piece in the lower left corner for fill. I couldn't have planned it better... I loved how it came out. The scripture is stamped with jet black Archival. The piano is stamped on a scrap with Versamark and embossed in black, circle punched, and edges inked.
Tuesday, October 14, 2014
thanks!
Background is Dylusion sprays, then flicked with water and blotted for light spots. Leaf (Embossing Arts Co.) stamped with Archival Ink. "thanks!" (Quietfire Design from the Thank You set of 4 stamps) stamped with Archival Ink jet black and the little hearts highlighted with a white gel pen plus I added a dot to the exclamation point. The edges of the panel are inked with Distress Ink. Some ribbon and 2 plastic leaves. The leaves have some Archival Ink on the edges. Finally some brown speckles done with a Distress marker and the Spritzer tool.
Saturday, October 11, 2014
Sprout Grow Bloom
In THIS POST on the PaperArtsy blog I mentioned a tile that I had done over the summer. Here is that tile. I used PaperArtsy Eclectica (how do you make that little 3 that goes at the top after Eclectica?) stamps by Darcy, #EDY05. I didn't keep track of the Fresco Finish colors.
Friday, October 10, 2014
The Strength I Need
A card for a friend in the hospital. I sprayed Dylusions spray onto white cardstock, stamped the leaf with Archival Ink and stamped it a few more times along the bottom. Stamped the scripture (Our Daily Bread Designs) with jet black. Inked the edges with Distress Ink and then distressed them with the Distress tool. Added doodling with a Pitt pen and finally added some stenciling to the background as it seemed too plain.
Wednesday, October 8, 2014
Tuesday, October 7, 2014
This Week - Day 2
Christmas Ornaments are the project today over on the PaperArtsy blog!!! Some words to describe... beautiful, easy, fabric, no-sew........ you won't want to stop making them!!!
Monday, October 6, 2014
This Week
The months sure like to fly by quickly!!! I'm back on the PaperArtsy blog this week with a project today, tomorrow and Wednesday. Today I'm making earrings and a card. I hope you'll go check it out!!!
Friday, October 3, 2014
A Reminder
There has been a combined blog hop going on all week sharing wonderful projects. There were 9 separate posts on the Quietfire Creations blog and 5 posts on the Walnut Hollow blog. To be in the draw for the fabulous prize shown below you must leave a comment on ALL 14 blog posts. Comments are excepted through Sunday night, Oct 5, midnight PST.
Subscribe to:
Posts (Atom)