Hello Friends!!!! I have a beautiful project today as a guest designer post for The Funkie Junkie Boutique Blog. It's for their current challenge "Purple, Orange, Green! Eek! It's Halloween". Sara Emily is the host for this challenge and she says,
"I love Halloween, and I would love to see your vintage or shabby chic Halloween creations, whether it be a card, tag, canvas, or any other make! If Halloween is not your cup of tea, simply use the colors purple, orange and green on your project to play along."
Halloween is not my cup of tea but I did have fun combining all three colors to create this piece. My base is a Mini Etcetera Tag. Don't let the word mini fool you. This tag measures 4 1/2" x 8".
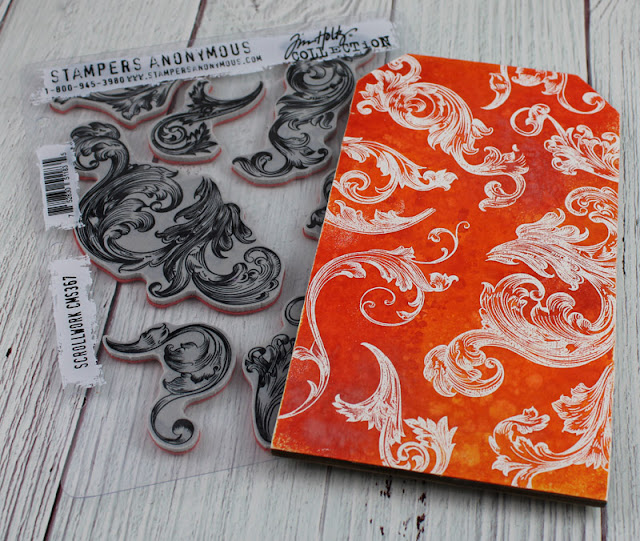
I cut a piece of Mixed Media Heavystock a little bigger then the tag. Using a large (12" x 12") stamping platform and all the stamps from the Stamper's Anonymous Tim Holtz set, Scrollwork CMS367), I stamped the images with Embossing Ink and embossed them with White Powder.
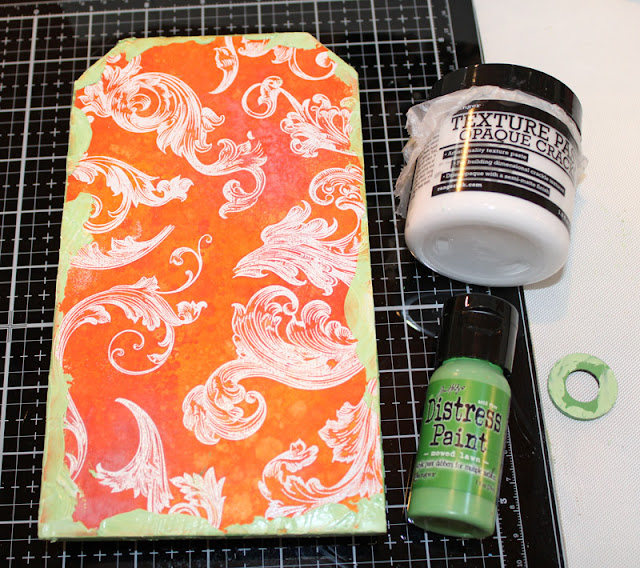
Using a variety of Distress Spray Stains and Distress Oxide Spray I added color to the paper. When the paper was fully dry I attached it to the Etcetera tag using Distress Collage Medium Matte putting some weight on top of it while it dried for a good bond. Once dry the excess was trimmed off and the last bits sanded off for a smooth edge.
I painted the very edge of the tag and the hole reinforcer with Distress Paint then mixed a bit of paint with Crackle Paste and added it as shown.
Etcetera trim was used to make a shelf, painting the pieces with Distress Paint and attaching them with Collage Medium.
To emphasize the cracks Distress Crayon was scribbled on, and then I used a combination of a water brush and my finger to spread the crayon allowing it to get into the cracks.
Idea-ology Baubles were colored with Alcohol Ink. The baubles were put into a container, a couple of drops of ink added, the lid put on and the baubles shook around. I wanted a bit more color so added a couple more drops of ink and shook again. After removing the cover, I left them in the cup to dry.
The girl is an Idea-ology Baseboard Doll. The baseboard dolls are a thick material that doesn't bend making them the perfect choice when you don't want to attach them close to your surface. She was colored with Distress Crayons and a damp waterbrush. A silver gel pen was used for the necklace.
Idea-ology Letterpress Blocks were painted with Distress Paint just on top of the letters and dots added using Media Gloss Spray and a stylus. I sprayed a little of the media on my Glass Matt, dipped the ball of the stylus in and then on the letters. I really like the shiny dot against the paint.
I also added dots to the edge of the trim.
Using the Tim Holtz Sizzix set Wildflower Stems #1 I cut flowers and stems from watercolor card. They were colored using Distress sprays and inks. I added wire to the back of the flowers so that they would stand eaiser without bending.
Collage Medium Matte was rubbed on the outside of a glass vial to give it a frosted look, the colored baubles put inside and all the stems and flowers put in. I then added Glossy Accents to the vial. After several days it still wasn't completely dry and had taken on some color from the beads. A better choice would have been to put resin in the jar or to add the Glossy Accents just a little at a time.
All the open area on the trim was bothering me so I stamped on it using an image from the Tim Holtz Stamper's Anonymous set, Ornate Trims CMS326. I lined up the stamp close to the edge of the acrylic block and held my breath while stamping, LOL.
Ribbon was colored with Distress Spray Stain, bunched up and allowed to air dry giving a wonderful crinkle.
All the butterflies, mushrooms, ephemera, words, etc are from various Idea-ology packs. Many of the edges were inked. The piece of ephemera behind the circle and little butterfly was stamped with the background image from Tapestry CMS414. The word "precious" is a rub on added to the circle. The Clippings stickers above the girl have a thin layer of Glossy Accents over them.
Behind the Baseboard Doll I have 2 Idea-ology game pieces (retired item) stacked and glued together (edges painted orange) along with a thin piece of foam tape. These are glued to the tag and the girl giving her plenty of support. Landscape mossy stuff looks fabulous glued to the shelf and the top of the Letter Blocks.
The clippings sticker below the shelf was attached to white cardstock, the edges distressed and inked.
For one of the flowers I cut an extra flower head and attached them together just in the center for a fuller flower. Flat backed pearls were glued to the center of the flowers.
I really had fun creating this!!! The combination of colors is not in my comfort zone but I think it came together well. I hope you think so too.
Thank you for following along and I hope you are inspired to play along with the challenge even if Halloween isn't your cup of tea.
Hugs, Wanda


1 comment:
Wow, wow, WOW! Wanda, you have gone and outdone yourself with this bright and cheerful (and dare I say it, just a bit Halloween-y) masterpiece! I love all of the details and that amazing background! Your use of color is masterful and the details of the dots, the spotted dress on the girl and the gooey looking beads just tickle me pink! Love, love, LOVE this (and everything you make!). Thanks so much for running with my challenge and being such a great example of how to work this challenge EVEN if you are NOT into Halloween! Perfect in every way!
Post a Comment