Thursday, May 31, 2018

Circle Journal 2 - Month 4


Hello Again!!!  I'm back with another circle journal post.  This is my page in Linda's book.  I even have a few process pics to share with you.

The pages of her book are heavy cardboard mailers and we were to do one side.  I began with a coat of Fresco Finish paint and then scraped Crackle Glaze over it.


I let that partially dry, brushed Chalk Fresco Finish Paint over it and left it to get those fabulous cracks.  Once it was completely dry I added translucent colors.


Stenciling and stamping over the page.  See that small square with the circles.... those are the plastic spacers taken out of Wink of Stella pens before you start using them.  I glued them to a piece of corrugated plastic and they make a wonderful stamp.


The leaves are stenciled with Grunge Paste and then inked.  Doodling along two edges.  Blue solid circles done with paint and a pencil eraser.  Highlights added to the dark blue circles.


I'm pretty sure this was a piece of cardstock with Distress Oxide inks on it.  I stenciled the leafy branch with gel medium, let it dry, and then foiled it using a heat laminator.


The small envelope was included with the book as something that could be used.  I added it to my page with a note tucked inside.  The quote is stamped onto, I think, tissue paper.  There some cheese cloth behind it.  Some chunky glitter (probably German glass glitter?).  A piece of gold mirror cardstock embossed with an embossing folder is behind the foil leaf piece.


Wednesday, May 30, 2018

Circle Journal 2 - Month 3


My work in another journal for My second round of the Circle Journal Swap.  "Circle" because our books go from person to person until they get "around the circle" and back to us.  I appears I only did a couple of process pictures for this book too.

This book belongs to Chris.  Her book was made with heavy mailer envelopes.  Inside each envelope she had decorated sticks with a prompt to use on our page.  The one I chose says "Create a border of leaves along one side of your page."

All paints and stencils are PaperArtsy.  All stamps are PaperArtsy except the quote in the center.  The quote in the center is from Taylored Expressions.  In the background beneath the first layers of paint is collaged hymnal pages and washi tape.  


The leafy branches along the right side are stenciled with Grunge Paste and once dry, I put the stencil back on and inked.   


Monday, May 28, 2018

He Lifted Me Out


Hello and Happy Memorial Day!!  I'm very thankful to those who gave so much!!

I'm sharing a canvas today that was created with the More Than Words May Challenge in mind.


I began with a 9" x 12" Wood Panel.  It is 1 1/2" deep.  The creative challenge for May is Frames.  I used an old metal frame.


I altered the frame by painting completely with PaperArtsy Fresco Finish Paint (Slate) and then lightly brushing Treasure Gold Over it.  First I used White Fire and then added some Brass just on the highest areas.


The word inspiration is Memories.  My greatest memory is how God spoke into my life and I accepted Jesus's sacrifice for us on the cross.  It truly is the best day anyone could have.  I cannot (or would not want to) image a life without Christ by my side.

I've used all Fresco Finish Paints on this except for the sides of the canvas.  There I used Golden Fluid Acrylic Bone Black.  I began the top by gluing (Distress Collage Medium Matte) down pieces of hymnal pages and printed tissue paper.  I added a light coat of Vanilla paint over the whole thing.  I mixed Slate paint with Distress Grit Paste and put it through a Tim Holtz stencil that made me think of a stone road.  Once dry I painted below the stenciled area with french Roast and above the stenciled area with Hey Pesto and Glass Blue and then sponged Magic Moss right along the top edge of the stenciling.  At the bottom of the canvas I added embossing ink and embossed using Emerald Creek (Seth Apter) Baked Texture Rocky Road.  I added a second layer of Rocky Road over part of the area mostly near the bottom and right side.  I sponged more French Roast Paint along the top edge of the Rocky Road onto the bottom edge of the stenciling.  I stenciled flower type images (TCW stencil) with Chalk paint over the top area of the canvas.  The "rays" were done with a Tim Holtz stencil.  I mixed Wendy Vecchi White Embossing Paste with Butter paint and just a drop of Banana paint.  The scripture (Our Daily Bread Designs) was stamped onto white cardstock with Archival Ink Jet Black.  The paper was cut to fit the frame.  I then embossed two layers of Baked Texture Vintage Beeswax onto the paper.  Over the embossing I brushed one coat of Distress Collage Medium Matte to take away the shine of the embossing.  After gluing the paper into the frame, I attached the frame to the canvas with Golden Extra Heavy Gel Medium Gloss.  Since you can see some of the Gel through the decorative part of the frame I added Distress Dry Glitter Rock Candy onto the gel while it was still wet.  Even though the gel dries to mostly clear I thought the glitter would just look better glittering around there.  Besides, a life with Christ should glitter and shine.  With my finger I added Treasure Gold Brass around the top and a smidge on the rays.  I dug through my stash of flowers and used/put together all the ones I put on the canvas.  Glued along with the flowers is some Prills, Seas The Day Mix.  Finally I've added some Idea-ology Small Talk stickers glued on with the Distress Collage Medium.  


Saturday, May 26, 2018

Circle Journal 2 - Month 2


Hello!!!  I hope you are doing well!!!

Way back last fall I shared Month 1 of the 2nd Circle Journal swap I'm participating in.  That post can be found HERE.  That post shows the book that I made for this swap.  Everyone incorporated, somehow, envelopes into their book.  There are 12 of us in the swap so it takes a year to get our books back.  We've been working along and have only a couple of months left.  I have been very remiss in not posting each time I work in a book.  Life has been busy and since posting doesn't have a deadline it keeps getting set aside.  I'm hoping to fix that, lol.  

These are my pages in Catherine's journal.  We must use at least one PaperArtsy product in each book.  I tend to use many more than one especially focusing on using Fresco Finish Chalk Paints and PaperArtsy stamps.  It seems I only took a couple of process pictures for this book.  I chose to keep the envelope opening on the left side  and then created a card to go inside besides arting up the spread.


Tuesday, May 22, 2018

Piggy Wonder


Hello!!  I needed a card for a pig lover and this is what I made.  My background uses the Tim Holtz 3D Botanical Embossing Folder.  I inked the flat side of the folder with Wendy's Archival Ink Pink Peony (Ranger), misted my paper (Ranger Mixed Media Paper) with water, put the paper in the folder and ran it through my Vagabond.  At that moment it was already beautiful, but I didn't stop.  After drying the paper I used Ranger's Liquid Platinum Embossing powder on the paper.  With my powder ready to go, I flicked my paper with water, immediately added the embossing powder tapping off the excess, and melted the powder.  Next I added the Liquid Platinum powder to edges using embossing ink.  The pig is an old stamp.  I stamped it on Ranger Water Color Paper with Archival Ink Jet Black, die cut the oval (Sizzix, Tim Holtz Stitched Ovals), embossed the edge with Liquid Platinum, and added color to the pig with Distress Ink and a Water Brush.  Color was added to the Tim Holtz Idea-ology metal piece with Distress Crayon.  


Monday, May 21, 2018

Destiny and Courage


Hello!!!  It's my turn on the Quietfire Creations Blog today and I'm sharing the details of this card.  You can find it HERE

Tuesday, May 15, 2018

Music Speaks


Hi There!!!  It is a very wet morning here in Southern Iowa.  The rain is done but it's supposed to be cloudy all day.  The sun is back out tomorrow and the grass, I'm sure, is going to shoot up quickly.

I have lots of various backgrounds sitting around - playing is fun!!  I'm pretty sure this piece of water color paper has Brushos on it.  Over the brushos I've glued a piece of Composer Tissue Wrap.  Once dry I added a thin layer of white paint to knock back the music.  Next I've stamped the Quietfire Design Dotted Harlequin background image (from QF or from Emerald Creek) using PaperArtsy Fresco paint Magic Moss (part of the Seth Apter Set #3) (Emerald Creek).  And I actually thought to take a picture at this point.


I added paint splatters with Fresco Finish Blue Lagoon (also in the #3 Seth Apter set).  I added more white paint in the area I wanted to stamp the quote - Quietfire Design, Where Words Fail stamp.  The quote is stamped and embossed in black.  Around the edges I've sponged on embossing ink and then embossed with Baked Texture Dirty Sand and while heating added spots of Patina Oxide.  After embossing those I then put embossing ink on the very edge and embossed with Patina Oxide.  I've attached the panel to a folded black card and finally added a die cut - Memory Box Party Music cut from black cardstock.


Monday, May 14, 2018

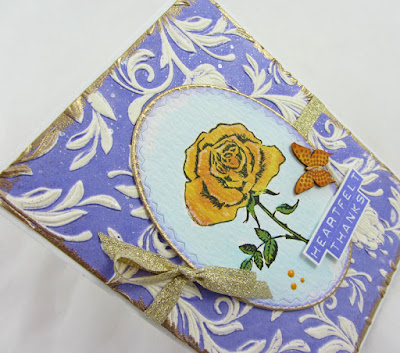
Heartfelt Thanks


Hello!!!  I hope you are doing well on this beautiful Monday!!!

Today I have a thank you card to share with you.  My background uses a new Sizzix/Tim Holtz 3D embossing folder.  Wendy Vecchi shared a short video where she inked the flat side of the embossing folder with Archival Ink, put her misted-with-water paper in the folder and ran it through her machine.  I HAD to try that and it works great.  Since the paper is slightly wet, using the Archival Ink means the ink isn't effected by the moisture.  I love it!!!  The hardest part is not moving your paper when you close the folder, etc.  LOL  For my card I used Ranger's Mixed Media Cardstock.  After it was embossed I gave it a couple spritzes with Pearls Mica Spray (Ranger from Wendy's set) and dried it.  Next I inked the edges with embossing ink and embossed them with Ranger's Queens Gold embossing powder.  

The rose is a Stamper's Anonymous/Wendy Vecchi Stamp-It, Stencil-It.  That means the rubber stamp comes with a matching stencil making it very easy to add multiple colors to the image.  It was stamped onto Ranger Water Color Card and die cut with a Sizzix/Tim Holtz Stitched Oval die.  I used the new Ranger/Wendy Vecchi Blendable Dye Inks to color the rose.  The flower uses Sunflower and then using the Detail Blending Tool Orange Blossom was added. With the stencil in place and everything covered except the flower are, I sprayed on some Buttercup Mica Spray and dried it. The stem and leaves are inked with Fern Green and a little bit of Garden Patina.  Around the rose I washed in the Bluebird Blendable Ink using a Water Brush.  I inked around the circle with Violet Blendable Ink and then embossed the edges with Queens Gold powder.  Heartfelt Thanks was stamped onto a scrap with Violet Archival Ink and cut out.  The butterfly is a Stamper's Anonymous/Wendy Vecchi Matt Mini.  It was inked with Blendable Inks and stamped with Archival Ink.  I used the dotted rays image from the new Wendy Vecchi set Spotlight Art.  I masked off one side of the butterfly, pressed the butterfly onto the inked stamp, dried it, masked the stamped side and stamped again with the goal to put the butterfly in the same spot.  I did pretty well :-)  I wrapped the background with a gold metallic ribbon, attached the oval with the new Wendy Vecchi Perfect Card Adhesive, attached the sentiment with foam tape and finished up with 3 drops of Wendy's Sunflower Enamel Accents.


Saturday, May 12, 2018

Cool Hipster Cat


Hi!!!  I made this card last month, a birthday card for a boy.  I thought the background came out really cool.  I put white embossing paste through a stencil, sprayed it with Distress Spray Stains, then removed the stencil.  I like the bits of white that show because I sprayed it before removing the stencil.  Since there was paste and spray left on the stencil I flipped it onto a page in a journal which also left a very cool design.  I haven't finished the page yet, but will one day.  The cat is one of the Hipsters (Stamper's Anonymous, Tim Holtz stamp and Sizzix dies).  It's cut from watercolor paper and colored using a water brush and Distress Inks.  The glasses were also cut from silver mirror card so I could give him cool mirror sunglasses.