Thursday, June 30, 2011
Tim Class #4.... and another blog candy!!!
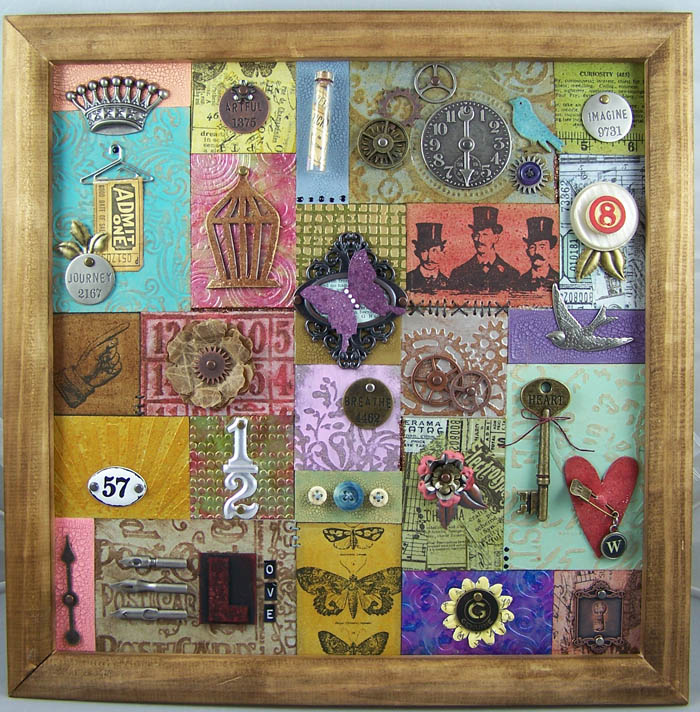
Configuration of your Imagination!! Another totally fabulous class!!!! And the last one of the weekend :-(( I have a couple of unopened configurations and I'd feel overwhelmed just thinking about doing something with them but now I have confidence :-)) I can't wait to make another one... and another... and another!!!!
See that foliage flower with the crystal in the middle... that piece was actually done in the Ideology Intrigue class... the metal piece behind the flower was a ring but I knew I probably wouldn't wear it so I spread out the ring part and used the whole piece on here... awesome!!!!
Don't forget you can click on the pictures and they will open up larger.
This wraps up the classes I was able to take. I've said it before but.... ALL the classes were awesome, very organized, everything went very smoothly. Tim is a great teacher!!!! Mario was totally on top of supplies!!! You would not believe the line of people before each class waiting to take their picture with Tim and he was so gracious!!! A totally Amazing weekend!!!!
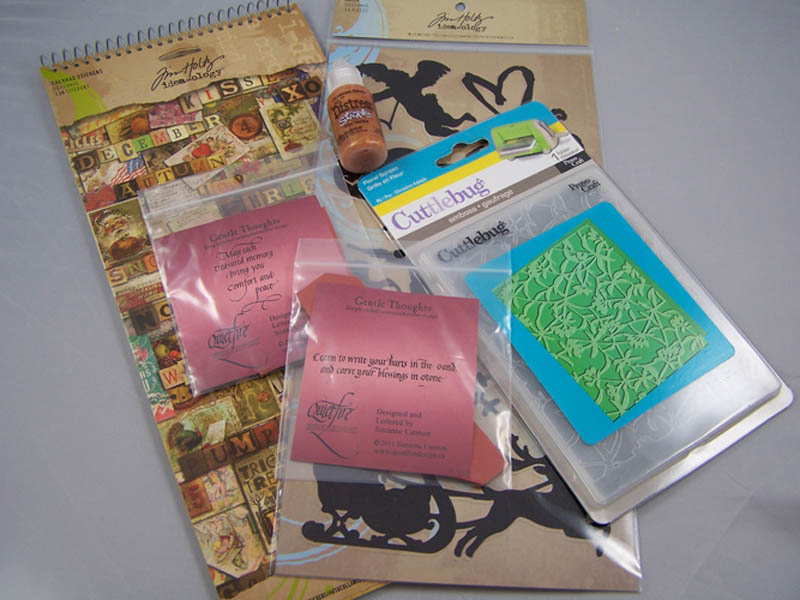
Here is the blog candy for this post... a seasonal paper stack, coffee Archival ink pad, 2 bottles of Color Wash. Everyone is welcome to leave a comment for a chance to win the candy!! I'll pick a winner on Sunday, July 3rd. Check back tomorrow for one more blog candy post to finish up the week :-))
Wednesday, June 29, 2011
Tim Class #3... and, yes, more candy!!!
Idea-ology Intrigue was the first class on Sunday!!! Lots of fun and then we could wear some of our pieces the rest of the day. It was fabulous to learn how easy it is to turn Idea-ology into jewelry. I have Tim's book and have looked at his jewelry pieces but hadn't yet tried anything. Now I'm ready to make more!!!!! My most favorite thing I learned in this class was the enameled roses..... Wow!!!! They were... are sooooooo cool... and so easy to do!! Paper flowers dipped in UTEE. You need wire attached to the back so they aren't easily dropped in the hot UTEE. The effect is amazing!!!!!!!!! I was at a store today and bought more bead chain and link chain... I'm thinking gifts - and maybe more pieces for me:-))
Today's blog candy includes a seasonal salvage stickers, seasonal masks, a Cuttlebug folder, Distress stickles, and two more Quietfire Design stamps. I do love my Quietfire Stamps (if I didn't I wouldn't have wanted to be on Suzanne's design team)... a quick reminder that they have an all new website.
Everyone is eligible to win the blog candy.... leave me one comment on this post and I will randomly choose a winner on Sunday, July 3rd.
Tuesday, June 28, 2011
Tim Class #2.... and more candy!!!
I am thoroughly enjoying everyone's comments!!! Thank you!!!! The finishes to "It's a bird... It's a plane... It's..." crack me up - I can't help but smile and sometimes even laugh out loud!!! Thank you for all the kind comments on my canvas piece!! Tim is an amazing teacher and inspiration overflowed in that classroom.
The second class - Patchwork Pandemonium - was just as exciting and fun as the first class!!! We used so many products and tried so many techniques it was amazing!!!! And once again we got to embellish our hearts out - I do love embellishments... I rarely ever make anything that doesn't have some kind on it.
Now on to more candy.... A blank book, wood mounted Studio 490 stamp (Art Chick), Cuttlebug embossing folder borders, Distress Stickles, and two Quietfire Design stamps.... Thanks again to Suzanne for the Quietfire stamps!!!!
Everyone is welcome to leave one comment for a chance to win the candy. I'll randomly pick a winner on Sunday, July 3rd.
Monday, June 27, 2011
Tim Class #1 and more Candy
The first class on Saturday was Creative Blocks... total Fun with canvas, paper, beeswax, Idea-ology, and stuff!!!! I LOVED working with the canvas and beeswax... I must do it again!!! All weekend long I kept telling myself... no thinking or don't over-think... I often think too much at home... so when we did the paper part, unless it was something I just didn't like, I just used pieces... lots of fun!!! When we did inking and then also when we got to the embellishing part I pulled my choice of colors from the piece of paper at the top left - the picture of pigments.... I was skeptical as I worked but when it was finished, I loved it!!!!! I'm not sure I would have ever "planned" to use the colors the way I did. Soooooooooo much fun!!!!!!!
Now onto some candy!!! I have for this give away what is pictured below. The 2 bags are Quietfire Design stamps that Suzanne gave me to give away (there will be more coming) - Thank you, Suzanne!!!! Oh, and I should tell you, Quietfire has a brand new website that is faster and has a whole new shopping cart... check it out if you have time.
Everyone is welcome to leave a comment for a chance to win the candy - one each, please. I'll randomly choose a winner Sunday, July 3rd.
Sunday, June 26, 2011
Blog Candy
Happy Sunday Everyone!!! I know you've been patiently waiting to see the projects I did at the Tim Classes last weekend. Between family, work, and company I have managed to finally finish things up and I just need to get the pictures taken and posts written (I'm going to post one class a day beginning tomorrow). In the meantime I thought it would be fun to give away some candy!!! I've missed some very important Blog-a-versaries... such as I've made over 500 posts, I have over 100 followers and I've had over 40,000 visits to my blog... all of which just totally blow me away!!!!!!!!!!!!
I am so thrilled and thankful for each one of you that visit my blog!!!!!!!!!!!!
For a chance to win the items you see below (and I'm going to also include some Ideology pieces), leave a comment on this blog post.... and to make it more fun take a look at the last picture of my last post (the one where Tim in pointing) and tell me how you'd finish the sentence.... It's a bird, It's a plane, It's.... Everyone can enter... one comment each please... I'll pick a winner next Sunday, July 3rd.
P.S. It's possible I will be posting additional blog candies throughout this week... just saying, you might want to be checking back.
Monday, June 20, 2011
Fabulous Time at Stamper's Ink
I attended 4 classes taught by Tim Holtz this past weekend at Stamper's Ink.
It was an amazing time!!!!!
I have a little work left to do on a couple of the projects and then I'll share. In the meantime here are a few pics.
Me and Tim
Mario and Me
And this is just a random pic I happen to take but I really like it...
It's a bird... It's a plane... It's ...........
Monday, June 13, 2011
CBC - Circles and Dots
The theme for this weeks Created Byhand Challenge (Blog or Forum) is circles and dots. I just had to use one of the newest stamps available from QF - A family is a circle of strength. I started with an Inkssential #8 manila tag and applied Distress Inks wild honey, barn door, and vintage photo using the wrinkle free distress technique (rub ink pads on craft sheet, spray with water, dip tag in colors, dry, dip again gently to just pick up droplets, dry, repeat until you like it). Edges inked with vintage photo. Stamped the quote with Archival Ink jet black and dried it. White circles and dots are made with gesso. 13mm white silk ribbon is colored with the same distress inks. Ideology mini pin, key and lock finish things off.
Monday, June 6, 2011
Oink, Oink.. Happy Birthday
I wanted to make a birthday card for a friend... she likes pigs so I went digging and found this old PSX pig stamp.. I'm so glad I didn't get rid of it!!! Happy Birthday is a Quietfire Design image. The printed paper is from Tim's Vintage Shabby Paper stack. A piece of plastic mesh colored with alcohol inks. Pearl flourishes.
Friday, June 3, 2011
Love does not....
My sister is getting married on Saturday and this is the card I've made for them. The quote is a Quietfire Design image (see it here) stamped with Archival Ink jet black. I've cut the quote out with Spellbinders Labels Seventeen and added Distress Ink around the edges. The flourishy background paper is old and not marked. The green strip is white cardstock torn, inked with bundled sage, and stamped with a script image using Archival Ink coffee. The lacy strip is a Martha Stewart punch... it's punched from white cardstock, colored with Distress Inks.. didn't totally like it so sponged Lumiere True Gold paint over it, dried it, and added some Archival Ink coffee along the edges. The leaves are a Sizzix die cut from green cardstock, sponged a bit with green ink and sprayed with Perfect Pearls mist. The flowers are Prima with a little extra color added using Distress Stains spun sugar and fired brick.
Wednesday, June 1, 2011
Simple 4x4 Morphed...
So I was wondering to myself what I was going to do with the 4x4 I shared a few days ago (original post here) and was thinking maybe I'd make it into a card but wasn't sure.... And then.... I was walking by the flower I made from packaging (see original flower post here) that had been patiently waiting for me to use it in a project and thought... that would go really nice with that 4x4 and, well, the rest is history :-))
This card measures 5 3/4" x 5 3/4". A white folded base with the edges of the front sponged with ink to match the 4x4. The next layer is white cardstock embossed with Tim's damask embossing folder and some wild honey ink sponged around the edges. The flourishes (Tim's die) are cut from Wendy Vecchi's Studio 490 Clearly For Art, colored with alcohol inks, heated and shaped.
Monday, May 30, 2011
CBC - White/Breathe
This weeks Created Byhand Challenge is Breathe and/or White. I immediately thought of this quote from Quietfire... which I really like!!!! The huge challenge for me was keeping my card mostly white... I could not believe how tough it was for me to do!!!! This is a regular size card 4 1/4" x 5 1/2"... a folded white base. The next layer is slightly smaller... I painted white cardstock with Lumiere super sparkle paint, let it dry and embossed it with the Tim Holtz embossing folder rays. The quote is stamped on white cardstock with Archival Ink sepia. The butterflies are stamped on white cardstock with Versamark ink and embossed with white embossing powder... to give the design a little definition I sponged Distress Ink antique linen over and around the butterflies, cleaned off the embossing powder with a damp cloth, and cut them out. White pearls added to the body of the butterflies. Roses ribbon is from Tim Holtz trimmings pack.
Challenge blog entry is Here. Challenge ning forum post is Here. Both include links to all the supplies for this card. We'd love to have you join along with the challenge if you have time!!!!
Simple 4x4
This 4x4 again shows one of Quietfire Design's new stamps along with a couple of older stamps. Suzanne has added this to the Designer Projects area of her website complete with directions... find it HERE.
Saturday, May 28, 2011
Trees to Speak
I'm using another new Quietfire stamp on this card - Trees are the earth's endless effort. You can see all the new stamps here (page 1) and here (page 2).
The base is cardstock from the Core'dinations Distress pad. The next layer is kraft glassine embossed using the patchwork embossing folder... the top of the embossing sanded so that it accepts ink better, Distress Ink fired brick, the actual inkpad is rubbed across and excess ink wiped up with a paper towel... This Was inspired by a post on Roni's blog Ink Stains here... she has some step out pics and lots of color examples. I've added gold paint to the edges. The tree is cut from grungepaper, the trunk inked with walnut stain and vintage photo, the tree inked with forest moss and then embossed with Distress Embossing Powder pine needles... some gold paint dabbed along the edges and a tiny bit inside. The quote is stamped on off white cardstock with Archival Ink jet black, the edges distressed with the paper distresser and inked with bundled sage, two corners rolled forward... a hitch fastener and mini paper clip hold it on the card.
Friday, May 27, 2011
Invisible tears
I'm again sharing one of Quietfire Design's new stamps on this tag... Invisible tears are the hardest to wipe away... now if you've noticed the blurry flourish at the bottom right... have no fear, the stamp stamps perfectly... I, however, brushed over it before I'd dried the jet black Archival Ink (20 lashes with a wet noodle)... I started with a #8 manila tag and applied Distress Inks chipped sapphire, pine needles, and dusty concord using the ink blending tool, dried the ink, sprayed over the tag with water and dried it - this caused the inks to have a mottled look. Brushed on gesso where I wanted to stamp the quote and dried it... also dabbed gesso around the edges of the tag. Stamped part of a flourish (top left flourish in the set) around the edges with dusty concord. The umbrella man is cut from grungepaper, inked with Distress Ink black soot and gesso dabbed around the edges to help it stand out... attached to the tag with foam mounting tape (you could also use scraps of grunge to elevate it). 7mm white silk ribbon tied at the top.
Thursday, May 26, 2011
How old would you be....
Quietfire Design has a whole bunch of brand new stamps... you can see them all Here. And there is a great deal if you want to buy them all... see it here... you save about 20% off the individual prices.
This card uses one of the new stamps and I'll be showing some of the others over the next days. The clock is grungepaper cut with Tim Holtz's Weathered Clock die... both sides sponged with gesso and after it was dry Archival Ink sepia added to the edges and heat set. The clock is attached to a piece of paper from the Core'dinations Distress paper pack that is embossed with Tim's burlap embossing folder, sanded, the edges distressed and inked lightly with walnut stain. The next layer is also paper from the Distress paper stack, the small butterfly stamped with Distress Ink pine needles (stamping off once on scrap paper and then onto the cardstock), edges distressed. The quote is stamped onto white cardstock with pine needles ink, cut and embossed with Spellbinders oval die and the edges inked with pine needles... a 1/8" hole punched on each side for the ribbon to run through. The ribbon is 13mm white silk ribbon inked with pine needles, spritzed with water, dried (scrunching as it was drying), and the small butterfly stamped along the length of the ribbon with pine needles and dried. Everything is attached to an off white folded card (finished size 5 1/2" x 8 1/2"). One small butterfly stamped on off white scrap with pine needles, cut out and pearls added to the body.
Tuesday, May 24, 2011
MAC #13
Making Art Challenge #13 on the Everything Wendy Vecchi Yahoo Group...
I've had this done since last week but am just getting it put on my blog. Lori was inspired by the project on page 22 of Wendy Vecchi's first Make Art, Studio 490 Style book when she posted challenge #13 with our challenge to show an image using the brushless water color technique. This is a fun technique that I hadn't done in a long time. I chose this fabulous flower image from the Studio 490 set Botanical Art and I needed a birthday card so that was my goal. I first inked the stamp with Distress Ink stormy sky and peeled paint, did the spritzing and stamped it onto watercolor paper.... Beautiful - except for those 2 tips I didn't press enough :-)) However I wanted the card to be brighter so I changed to Adirondack ink for the actual card... I used sail boat blue and meadow and stamped onto white cardstock (I was being lazy and didn't want to dig out the watercolor paper pad since I was out of handy scraps)... I also used the top of the flower to create a border along the left. All stamps are Studio 490.
Sunday, May 22, 2011
Grungy Monday #7
Linda chose an awesome technique for the challenge this time... get all the details on her blog.... and since I also need a birthday card I thought I'd work it into the technique. Distress Ink colors used were mustard seed, dried marigold, shabby shutters, stormy sky, and worn lipstick. The weeds (Tim Holtz) are stamped with coffee Archival. The sentiment (Wendy Vecchi) is stamped with jet black Archival. The edges of the background are done with gold Paint Dabber. The flourish (Tim Holtz die) is cut from grungeboard, inked with peeled paint Stain, embossed with dot matrix embossing folder (Tim Holtz), lightly inked over with forest moss DI, and sprayed with Perfect Pearls mist forever green. The flowers are cut (Tim Holtz tattered florals) from kraft glassine paper, well crumpled and spread back out, the larger flowers rubbed with fired brick Stain and the smaller flower with wild honey Stain (if you let the stain sit on the glassine for a bit before blotting off the extra and drying, it leaves on more color), stacked, a hole pierced in the center, brad added, and then the petals crumpled back up a bit. The bird (Tim's movers and shapers small bird) is cut from grungeboard, inked with fired brick DI and walnut stain DI. Tim's Ideology film strip ribbon attached with the Tiny Attacher. Dots made with black Glaze pen.
Saturday, May 21, 2011
Eyes Wide Open ATC
The dream stamp is from Quietfire Design, it's the mini size found in this set. The girl image is from Dezinaworld and can be found on this page. The background is Ranger's sticky back canvas, atc size... I sprayed it with Color Wash, dried it, stuck it to cardstock, trimmed it a little smaller than an atc, stamped it with a large map image (Stampin' Up), sewed it to a cardstock atc blank, and sponged some Distress ink around the edges. Cut out the girl image and glued it to the atc. Stamped Dream.. on a scrap of cardstock, cut it out with deckle scissors, sponged edges with Distress ink, and glued it on. Glued German Scrap along the bottom. The butterfly is rub-on that I had terrible trouble with.... I could not get it to stick down - it just kept pulling back up taking the top layer of the image with it... I finally gave up, pulled it up, cut out the butterfly and glued it down with matte medium.... tried to hide the mess I'd made by coloring around it with a glitter marker, lol. The flower is shrink plastic... I have several that I made years ago... added a glitter sticky back gem to the center. Glued the whole thing to another atc blank to sturdy it up and hide all the stitching on the back.
Subscribe to:
Posts (Atom)