Saturday, February 5, 2011

Live Your Dream ATC


We've just begun a series of challenges on the EverythingWendyVecchi Yahoo Group.  These challenges are based on Wendy's "Make Art Studio 490 Style" books and each challenge will run from 1-2 weeks usually depending on the type of challenge.  The first one is easy and is taken from book 1, page 16.  The idea is not to duplicate Wendy's projects but to be inspired by them!!  This first challenge required us to use a butterfly and a scallop in our piece and the project in the book is an atc so most people are also making an atc.  Since this is taking place in the EWV group we must use at least one Studio 490 stamp in each project.  My atc uses all Wendy stamps.  My base is a Ranger manila atc blank.  I've used color wash sprays and distress inks.  The butterfly is stamped onto grungepaper twice, cut out, colored and layered.  My scallop is a stamp and I created a frame by stamping all 4 sides.  The black dots were made with Ranger's enamel accents.

Thursday, February 3, 2011

More ATCs

These are some atcs I made last week to take to an in-person swap I attended this past Saturday in Des Moines.  I had a great time at the swap!!  and added some wonderful atcs to my collection!!!  


Wednesday, February 2, 2011

CCC #30 - Altered Metal with Paint...


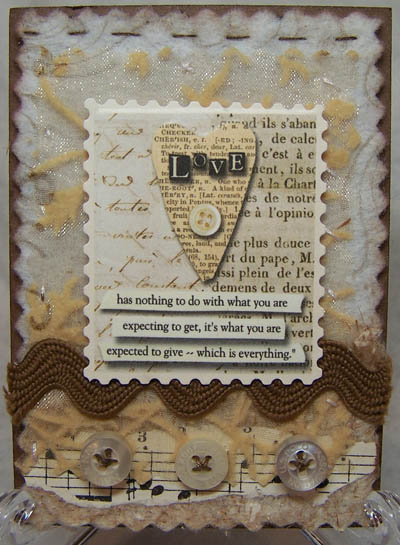
... and because I got behind AGAIN..   this tag also includes CCC #29 - Weathered Wood Grunge and CCC #28 - Colorful Layered Fragments.  I went a little crazy with the color this time... I'm thinking it must be because of the blizzard... ya, that's it :-))  The tag is cut from Grungeboard using Tim's tag die.  I used the woodgrain texture fade on it... the paint for the weathered wood technique was mixed using some Paint Dabbers (I need to get more colors of these), some reinker, and some Golden fluid acrylics... and then the ink used was dusty concord.  All stamps are Tim's except for the letters to spell "Love", those are Studio G.  The spots were made with bubble wrap and sunshine yellow paint dabber - also dabbed it around the edges of the tag.  The ribbon was colored with color wash butterscotch and wild plum.  Ideology film strip ribbon, trinket pin, and philosophy tag.

All details about the Compendium of Curiosities challenge can be found on Linda's wonderful blog.

Follow your dreams....


All stamps (flourish, butterfly, quote) are from Quietfire Design.  The technique used on the main panel is Neutral Shadows from the current (Feb/Mar 2011) Technique Junkie Newsletter.  The colored ink I used for the technique is Adirondack currant.  Border punched (EK Success) a piece of paper from the Fairy Flora collection.  Sticky back pearls on the butterflies and along the border.

This card works for the Created Byhand Challenge (ning group or blog), I have a dream.

Journey ATC


Lots of fun stuff with this atc.  The very textured paper in the background is wallpaper sprayed with Ranger's color wash sprays and some Perfect Pearls Mist.  There are some scraps of lace and paper (you know when you rip a piece of paper from a spiral bound notebook and you have all those holes along one edge.. I cut that edge off and saved it to use), some stitching, a left over rusted grunge flourish, white German scrap colored with Distress Inks, paper flowers, sticky back gold pearls, 'find joy in every journey' is a rubber stamp from Inky Antics, and the girl collage image is from Collage Stuff.

Wednesday, January 26, 2011

ATC - Dapper Dan


This is another atc made from elements found in a Memories in the Making A.T.C. Collection paper pad.  This pack is called Men.  The background paper (I added stamping - diamonds, text, flourish), man image (cut out with deckle scissors and layered onto black cardstock), Dapper Dan piece, and clock (I added Glossy Accents over the glass area) all came from the pad.  The key is from 7 Gypsies and the mini paper clip and mini brad are Tim Holtz Ideology.

Tuesday, January 25, 2011

CBC - 1st Anniversary or Paper Piecing


As you can tell I chose to focus on the 1st Anniversary choice of this weeks Created Byhand Challenge.  Some day I might try paper piecing but this is not it.  The printed paper I used on this card is from Prima's Fairy Flora Collection... Suzanne has added the 12 x 12 sized sheets to her website here.  These papers are gorgeous and double sided!!!  I cut all parts for this card from one sheet  - No, I didn't use the whole sheet - the darker piece is one side and the lighter pieces are from the other side.  All stamps are from Quietfire Design - heart, flourish, together forever. I stamped together forever on a very light area of the paper and die cut with Spellbinders 3rd from the largest Labels Four die and edged the piece with gold Krylon.  Next I die cut a piece using the largest Labels Four die with the flip side of the paper showing and also edged it with the gold Krylon pen.  I cut the background piece from an area that had lighter to medium shades in it, sponged on Distress aged mahogany ink using the ink blending tool,  stamped the flourishes with aged mahogany, distressed the edges of the piece with the Tonic paper distresser, again sponged aged mahogany on the edges and attached it to the folded card.  Layered on the die cut pieces using foam mounting tape.  Stamped the heart on a light area of the printed paper using aged mahogany, cut it out and attached it to the card with foam mounting tape.  Added an Ideology spinner to the center of the clock with a brad and attached them to the card doubling the foam mounting tape for more dimension.

Sunday, January 23, 2011

It was a cheap, plain, wood frame....


... and now it looks like this!!!  I am over-the-top thrilled with how this frame turned out!!!  A little gesso, a stencil, some paste, some paint and... wah-lah!!!  Use wonderful stamps from Quietfire design and some gorgeous paper for the inside.... add an Ideology ornate plate along with a QF word to finish it off.  

This is my newest project on the Quietfire Design website.... get all the how-tos  Here.  


Monday, January 17, 2011

Artful ATCs

A wonderful lady in our local ATC swap group sent envelopes stuffed full of papers and fun stuff to any of us that wanted one... our only requirement was to make one atc using at least one thing from the envelope and the word artful of which she included sheets of the word in many different fonts.  I couldn't stop with just one and so far have made 6 artful atcs.  All paper used in these atcs (except the collage images, bird, and extra words to go with artful) are from the envelope... I've used some of the papers as they came and others I've added stamping, inking, painting and also have torn pieces and layered things... even the corrugated cardboard came from the envelope, I sprayed it with color wash and perfect pearls mists.  All the collage images I used are from the Collage Stuff sheet Crazy for Kids.  Other things I've added are flowers, pearls, charms, Victorian scrap (bird and butterfly), German scrap, gems, etc.  


Sunday, January 16, 2011

CCC #27


I'm slightly late getting this in but I'm still happy to have it done!!  Linda's blog has all the information on this challenge...  CCC #27 Distress Misting Masks.  I used Tim's flourish mask, all Tim stamps and some Ideology.  The ribbon/lace is just some that I had... it was white before being sprayed and distress inked.

Tuesday, January 11, 2011

Postcard Swap


Lori is hosting a 4x6 postcard swap on the EverythingWendyVecchi Yahoo Group and this is my postcard.  The rules... use at least one Wendy Vecchi Studio 490 stamp (I used all Studio 490 images) and we couldn't do any layering of paper or use embellishments.  It is quite a challenge to not be able to layer up!!!!  But it was a LOT of fun!!!  I started with Ranger manila cardstock... stamped the text image with Archival ink olive, stamped the flower with Archival ink jet black, added color to the flower using a paint brush and Distress Inks barn red, fired brick, bundled sage, shabby shutters, wild honey (rub DI on the craft sheet, spritz some water next to the ink - not in the ink- and use your paintbrush to pick up color adding just a bit of water to the brush as necessary), added wild honey around edges using a blending tool. stamped the dots with jet black, stamped the scalloped border with jet black, added a rub of snow white Paint Dabber next to the flower using my finger to smooth it, let it dry, stamped Dare to be Unique over paint dabber with jet black, stamped Imagine and Celebrate today with jet black, added some Distress Ink tumbled glass over the dotted area but not over the wild honey ink on the edges, went over the end of the "stamens" with black Glaze pen.  On the reverse side I used the zig zag border image to make a line in the center just like a real postcard has a line to separate where you write from where you address the postcard.

Sunday, January 9, 2011

Challenges - CCC and SSSS


I have been behind on the Compendium of Curiosities Challenge and to catch up have included challenges #24, #25, and #26 all on this tag.  Our "hostess with the mostest", Linda, of the wonderful blog Studio L3 has all the deets on her blog.

CCC #24 - Distress Rock Candy Stickles, page 47
CCC #25 - Scribble Stain Distress, page 34
CCC #26 - Rusted Grunge, page 45

The Distress Ink colors I used in the background are bundled sage, weathered wood, and tea dye.

I'm also including this tag for the Simon Says Stamp and Show challenge which is to use a new stamp or any stamp you have never used before.  The Tim Holtz stamp "it's all perspective" is one I haven't used before.  I stamped it onto manila card, cut it apart, and inked the edges with weathered wood and then black.

Saturday, January 8, 2011

ATCs - Seeing Red


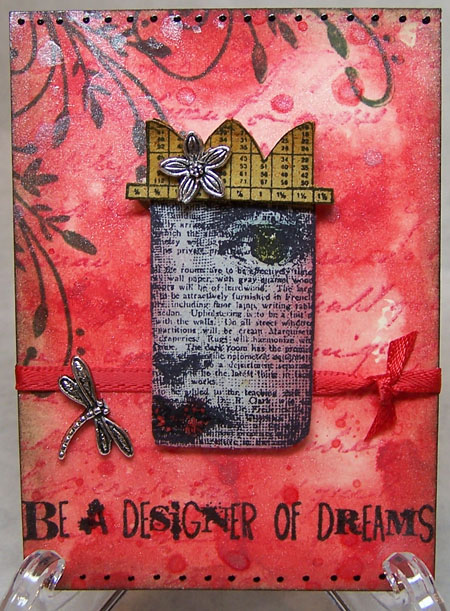
These atcs are for a swap on the EverythingWendyVecchi yahoo group.  The theme is "Seeing Red".  All the stamps I used are Wendy Vecchi's Studio 490 images.  The base is Ranger's manila atc blanks.  I smooshed barn red Distress ink onto the craft sheet, added a few squiggles of barn red reinker (not actually squeezing any onto the craft sheet but just squiggling what was on the end of the dropper), spritzed it all with Perfect Pearls Mist in the color perfect pearl, pressed my atc into it moving it around just a little, dried it, lightly tapped it into left over droplets and dried it again.  The text is stamped with Archival ink crimson.  The flourishy leaves were stamped with Archival olive.  The words stamped with Archival jet black.  The face is stamped onto grungepaper with jet black, cut out and inked with Distress ink.  An extra crown was stamped onto grungepaper, cut out, colored with Distress ink and layered over complete image with a scrap of grungeboard in-between for spacing.  Red 1/8" double faced satin ribbon, a couple of silver charms, and black dots made with a Glaze pen finish things off.  At the bottom of this post I have another picture, taken at an angle to show more of the Perfect Pearls shimmer you see as you tilt the atc.


ATCs


I received a wonderful rak last month from Cher on the AllThingsTim Yahoo group... an envelope full of lots of fun things to use in my art.   It was part of an ongoing RAK/PIF adventure on the group.  For those who might not know... RAK mean Random Act of Kindness and PIF mean Pay It Forward.  The idea is when you receive a rak/pif that you in turn rak 5 more people... no requirements, if you get something you do not have to continue if you choose not to... but I wanted to and have made these 5 atcs to send.  I'll be including some fun stuff with them and do hope they are enjoyed.

To make these atcs I started with Ranger's manila atc blanks and sprayed them with the new Color Wash sprays.  I used butterscotch, wild plum, and sailboat blue.  All stamps are Tim Holtz.  Stamped the black swirl along one side.  Coated each one with rock candy Distress Crackle paint.  After it was dry I stamped the weeds using gold Paint Dabber and also added gold on all the edges.  Stamped 5 tickets in black on manila cardstock, stamped the saying inside, cut them out, added distress ink, distressed the edges with Tim's edge distresser.  Embossed the foliage piece with Distress embossing powder.  Assembled everything as shown.

Birthday Card


I love this tiger stamp (Embossing Arts) and haven't used it for quite some time, but it is perfect when I need a birthday card for a boy.  It was stamped and embossed in black on white cardstock.  The tiger was colored with chalk pastels and the green around the edges is Distress ink crushed olive and forest moss.  To get more depth on the tiger I colored a layer with chalks, sprayed it with workable fixative, added more chalk and sprayed again.  This can be done a few times until you like what you have.

Monday, January 3, 2011

CBC - In with the new / Gold


This weeks Created Byhand Challenge (blog or ning forum) is In with the new and/or Gold.  All supplies (except gold floss) are available from Quietfire Design.  The background  of this card started as plain white cardstock.  I rubbed brushed corduroy distress ink on a craft sheet and sprayed it with Perfect Pearls perfect gold mix in a mini mister bottle with water... pressed the white cardstock into the mix, lifted it, dried it, pressed again... etc, until I liked the background.  The fun part is getting all the extra dots on your paper as the mixture is getting used up.  I then embossed it with a Cuttlebug embossing folder from the Heritage set.  Rubbed a Versamark ink pad gently over the high spots, sprinkled on gold embossing powder, tapped off the extra and heated to melt.  Added some extra brushed corduroy ink around the edges using an ink blending tool.  Every end is stamped on white cardstock with black ink, cut out with Spellbinders die labels 15, edges rubbed with brushed corduroy using the ink blending tool and sticky back gold pearls added.  Spellbinders Fleur de Lis is cut from black cardstock.  The ribbon is Quietfire's 13mm white silk colored using Distress Ink black soot and water.  Gold floss and a gold heart to finish things off.  

Thursday, December 30, 2010

Paper Snowflake


After seeing this tutorial over on Lisa Pace's website back in November, I knew I wanted to make one sometime.  Last week when a friend came over we each started one and I finished mine up this week.  I cut my squares from white cardstock using Spellbinders scalloped squares.  The square I used is about 1 3/4" and my finished snowflake has a diameter of 6 1/4".  After assembling the snowflake (minus the center area) I sprayed it first with silver glitter spray and then with Perfect Pearls Mists perfect pearl.  The center starts with a rosette (Tim Holtz die) I had made some time ago but hadn't used in a project yet.  The paper is from one of  the Tim Holtz paper stacks.  Layered on top of the rosette is two snowflakes I cut using Spellbinders Snowflake Wonder die set and to finish it off is a silver snowflake charm and glittery pink brad.  The center pieces were also sprayed with silver glitter and perfect pearls mist.  Since the rosette pink in color I added a little spun sugar Distress ink to the Spellbinder snowflakes and also the outside edges of the large snowflake.  I love how this turned out... it is soooooo pretty with its shimmer from the perfect pearls and just a touch of glitter from the glitter spray.


Friends ATC


Both the background and bird image on this atc come from a little book of papers called Winged Things A.T.C. Collection.  I received this cool little atc sized paper collection from my good friend, Tea in Norway (thanks, Tea!!).  I added a strip of text paper and then rock candy Distress Stickles onto the background.  The bird image was torn out and distress inks rubbed on the edges.  German scrap at the top and bottom.  The friends sticker (in a sheet also received from Tea) is layered on a piece of black cardstock... then I decided the black was too dark and rubbed on a little Adirondack snow cap pigment ink to tone it down.  Little dots around edge of bird image made with Glaze pen.  Glossy accents added to the center of the flowers.  After attaching the image to the card I went around it with a black sketch pencil rubbing to blend a little to give depth.  Red twine to finish it off.

Wednesday, December 29, 2010

Christmas ATC


This adorable image of the children is from Dezinaworld, specifically part of the first sheet on this page.  I cut it out with deckle scissors and edged it with gold Paint Dabber.  The background is printed paper inked over with Distress Ink fired brick and then rock candy Distress stickles spread just around the edges as you wouldn't see the center anyway.  Black dots made with Glaze pen.  German scrap at the bottom.  Paper holly leaves are punched from text paper, inked with peeled paint with forest moss on the edges and then crushed olive Distress stickles on top.  Attached over these leaves is a metal holly leaves and berries brad.  The button has a Christmas tree on it, I went over the star at the top with gold gel pen, tied some metallic red floss through the holes.  A row of little sticky back gems, light green, are along the bottom edge of the greeting.

Tuesday, December 28, 2010

Altered Tin

I recently participated in an altered tin mingle on the EverythingWendyVecchi Yahoo group and this is the tin I made.  All stamps are Studio 490.  The pattered paper is Tim Holtz.  The tin was inked with alcohol inks on the outside before adhering papers.  Maya Road chipboard frame on the top.  Lots of Distress Inks, some Archival inks, and gold Paint Dabber.    

This is the top.


The Inside.


Inside the top.


Inside the bottom.  I left it flat so something could be kept in the tin. 


The bottom.