Wednesday, November 29, 2017

And We Know....


Hi There!!!  

I'm sharing another card I made earlier this year.  The scripture is a stamp from Our Daily Bread Designs.  In the background we have Distress Oxide Inks with stenciling over them.  After stamping the scripture, I placed a mask over it and added more ink with a stipple brush to give a shadow frame.  


The torn music is from an old hymnal.  The butterflies are cut with Penny Black dies.  The pink is more Oxide ink.


Monday, November 27, 2017

Love


I have some things that I've created over the last six months that haven't yet made it to the blog.  I'm hoping to get caught up with this over the next few weeks.  

This card began with a background left from a fun "spraying" session using some cool fernish type weeds that I sometimes find out behind the shop.  You can see that pattern on the left.  I'm pretty sure I've used Distress Spray Stains for the color.  On the right I added a Christine Adolph Adhesive Rub-On and then put gold foil on it.  To help the heart pop more I added ink and wiped it off the foil.  The word is die cut using an A Way With Words cutting die (designer Suzanne Cannon) from Elizabeth Craft Designs.


Sunday, November 26, 2017

A Merry Little Flourished Christmas Tree


I've got another Christmas Tag for you using a brand new stamp from Quietfire Design - Have Yourself A Merry Little Flourished Tree.  I started with a #8 Mixed Media Tag.  The coloring in the background is done with PaperArtsy Infusions.  On top of the Infusions I sponged white paint through the Tim Holtz Plaid stencil.  I really love how it turned out!!  On it I stamped and embossed the Flourished Tree with White Embossing Powder but it got lost in the background so I repeated onto vellum, tore the top and bottom of the vellum and layered it over the first stamping wrapping the vellum to the back.  Gold brads were added to the tree where the larger "ornaments" are.  Gold Stickles was used on the smaller "ornaments" and also on top of the gold brads.  Along the bottom is a row of pine trees from the mini Tim Holtz stencil.  They are stenciled with Grit Paste and then colored.  A piece of Tim Holtz Craft Thread is tied around the bottom of the vellum.  In the corners are die cuts using the Sizzix/Tim Holtz Festive Greens set, colored with Distress Inks and red sticky back gems added.  Finally there is a small bow made with gold ribbon from the Tim Holtz Metallic Trimmings set.

I'm also entering this tag in the Simon Says Monday Challenge - Tear It Up.  


Friday, November 24, 2017

Christmas Tag


Hello!!!  If you're in the US, I hope you had a good Thanksgiving day!!!

I've used mostly Tim Holtz products (Sizzix, Stamper's Anonymous, Idea-ology, Ranger) on this tag.  I started with a #8 manila tag, took pieces of printed paper from Tim's Christmas Paper Stash pad, tore one edge of each strip of paper and adhered them to the tag with Distress Collage Medium Matte.  I glued more to the bottom of each strip so the torn edge could be pulled forward for more dimension.  The deer is from the Winter Wonderland set.  He is cut from heavy Mixed Media card, inked with Distress Oxide Vintage Photo and Antique Linen and attached to the tag with foam mounting tape behind the body of the deer and a little glue at the feet.  Next thinned white paint is splattered over the tag.    At the top of the tag is some of Tim's paper string and then a die cut bow (festive greens die set) cut from gold Metallic Kraft paper.  The center of the bow is white card colored with Festive Berried DI and then glittered with Dry Rock Candy.  The tag at the bottom uses a stamp from the Tattered Christmas CMS318 set and then die cut with a tag from the Gift Tags set.. inked around the edges with Festive Berried.. paper string through the hole and then Tim's Craft Thread tied on.  The Holly and Berry is from the Festive Greens die set colored with Distress Inks.  Finally I used Glossy Accents and Dry Rock Candy Glitter around the edges of the tag for icy sparkle.


#holtzfortheholidays


Monday, November 20, 2017

We Have Only This Moment


I'm sharing this project over on the Quietfire Creations Blog today.  You can find it HERE.  Have a wonderful Monday!!

Sunday, November 19, 2017

PaperArtsy Shades of White - Joy to the World


Hello!!!  I'm back on the PaperArtsy blog today sharing a project for their Shades of White theme and using Ellen Vargo stamps.  


Ellen has some wonderful stamps!!!  As I was flipping through them set EEV04 caught my eye and I decided I would create a poinsettia.  The basic shape was there for the petals, I just needed to cut them out to look more like a poinsettia.  However, I didn't trust myself to just freehand that so I stamped one on a scrap, drew around it, cut it out and then also cut out some of the center to make it easier to line this pattern up over the petals I would be using. 

I took a piece of Heavy Smoothy Card, painted it with Chalk, mixed Vanilla and Gold (about 1/2 and 1/2) on my craft sheet, spread it out and used it to stamp five petals.  After drying, I set the pattern over each petal, traced it with a pencil and then cut them out.  My original thought was to make a simple poinsettia with just the five petals.  I soon gave up on that idea and knew I needed more petals, dimension, and wow.


I also thought it'd be great to not have them all exactly the same color.  I painted more heavy smoothy with Chalk.  I decided I would mix with Gold for all the colors.  I love the hint of shimmer you get as you tilt the pieces and I thought it would help keep everything "matching".  I did a set of petals with a mix of Gold and Honey Dew and a set with a mix of Gold and Chalk.  When I put the poinsettia together I used Honey Dew at the bottom, then Vanilla and Chalk at the top.


To give further dimension and details to the poinsettia, I pulled out my flower shaping tool set (Susan's Garden Tools and Mats from Elizabeth Craft Designs).  I added veining to each petal with the leaf tool and pad and then shaped each petal by pinching with the tweezer and my fingers and using a ball tool on the back of the petal on the foam mat. 


I used a punch from my stash that had a 5-petal flower as a small base to build my poinsettia upon.


Golden's Heavy Gel Matte worked perfectly to build my flower.  It's heavy enough that the petals stay in place, with dimension, while drying.  Drying takes a long time.  I left it sit overnight.


I started this project thinking I would make a card but once I decided to wow the poinsettia then I needed to make more than a card.  I took a piece of corrugated cardboard that has a backing so the back is flat.  This came as filler in a package.  It's not stiff so I added a piece of chipboard to the back for stability.  I painted the front with Golden's White Gesso and while still wet wiped over the ridges with a baby wipe giving it a more distressed look.  


I had thought that I'd do some stamping either directly on this piece or maybe onto tissue and glue it to the piece so it got in the bottom of the ridges also, but finally decided I just needed to keep this simple and do another panel that would come between this and the poinsettia.

So I splattered White Fire over the whole front of the corrugated piece.  I love the White Fire paint and it was perfect for this theme because it adds a wonderful metallic but blends in perfectly for Shades of White.


I cut another piece of cardboard that was already white colored.  I stamped images from the set EEV02 using Archival Ink Potting Soil.  


Then stamped an image from set EEV06 with Archival Ink Leaf Green.


Then muted all the stamping by painting Snowflake over the panel.


Now for some texture and bling.  I used the Tim Holtz poinsettia stencil.  Since it wasn't large enough to cover the whole panel I decided to make a line down the center and then worked from  the center out.  I did one side lining up the pattern on the stencil with my center line, put Texture Paste through the stencil, removed the stencil and covered the paste with Distress Dry Glitter Rock Candy.  I set this aside to dry completely and then repeated with the paste and glitter on the other side of my line.  Once all the paste was dry I sprayed the panel with Mica Spray Pearl (Ranger Ink, Wendy Vecchi), blotted the spray from the glittered flowers and let it dry.


Another picture at an angle, in light, so you see all this yumminess.


I went digging through my stash to find a ribbon to cover the pencil line and found these fibers that I got years ago and thought they'd be perfect.  


To finish the poinsettia, I used White Mini Prills for the center building up a couple of layers of the Prills for more fullness.


I attached the stamped panel to the corrugate with foam tape and then the poinsettia to the stamped panel with Heavy Gel.  After allowing it to dry completely I added white brads, white wire, and a sticker from the Tim Holtz Holiday Talk Metallic pack.  Yep, I should have added the hanger before I glued everything together but I didn't know I was putting a hanger on then, lol. 


Following are several more pictures of the finished project.  I completely love how this turned out!!!!!!!!!!  I was actually quite nervous about putting something together in Shades of White but so glad I took the challenge!!!

Thanks so much for following along!!  I hope you love this as much as I do!!!

Hugs, Wanda


Saturday, November 18, 2017

May Your Heart Be Warm


Happy Saturday to You!!!!!!!!!!  Thank you for visiting or taking the time to read this post in an email!!!  YOU are appreciated!!!!

I know there haven't been too many posts lately... busy life.  I've been helping the hubs with setting up an Etsy shop for his beaded items.  His shop is called BeadsByChuck.  I'll give you a little background on this... if you're not interested, skip to the next paragraph :-)  Over 30 years ago we did beaded items together (Christmas ornaments, animals, decor, etc) besides having full time jobs and we did a lot of craft shows.  Then we started our family.  In fact, when our daughter, now 31, was born we were still doing shows and we'd take a play pen with and set it up so we could lay her in there to sleep.  We got asked, A Lot, how much we wanted for that, LOL.  All in good fun!!  But life got busier and we decided to put the beads aside.  Then about 15 years ago the hubs was having some health issues, couldn't be in the shop all the time and in his need to do something, pulled the beads back out and we even did a few craft shows then.  His health improved, he was back in the shop and the beads were put aside again.  Well now he is mostly retired.  Our youngest son is mostly running the shop with help and input from Chuck when it's needed.  Chuck still oversees but is slowly giving Tim more responsibility.  So you guessed it... time for beads again.  Chuck is doing most all of the beadwork.  I help with little detail stuff when needed and I'm helping with the Etsy shop as the hubs is technology challenged.  So there is a little history.  We are slowly putting more in the shop.  We've started with Christmas ornaments since next month is December and we'll add more things over time.

So now, back to your regularly (or not so regularly) scheduled program, lol. 


Quietfire Design has just released new stamps!!!  Woo-Hoo!!  You can find them at the beginning of the What's New category on their website - the first eight items.  I've used two of those new stamps on this card.
  
I've also added actual stitching to the card and I've used a Stitched Rectangle Die (Elizabeth Craft Designs) as the current challenge over on the Simon Says Stamp Monday Challenge is "It's A Stitch Up".

The main image is stamped with Ranger's Archival Ink.  Using the Tim Holtz Stamp Platform I masked off the greenery section of the stamp, inked the words up with Jet Black, removed the mask, stamped it, didn't bother to clean off the black ink, masked the words, inked the greenery with Fern Green (one of Wendy Vecchi's signature colors), removed the mask, stamped the image again.  This was much easier than trying to ink the stamp with both colors very carefully and get it stamped before the ink started drying!!!  After die cutting the rectangle I added red Stickles to the "berries" and set it aside to dry.
The next layer uses a piece of paper from the new Tim Holtz Christmas Paper Stash.  I stamped the Merry Christmas Background with Embossing Ink and embossed with white.  After trimming the paper to size, I added the zigzag stitching and then painted the very edge with Distress Paint Brushed Pewter.  I also used Brushed Pewter on the edge of the main panel.  The background is wrapped with a Tim Holtz Metallic Trimming, held on with Tim's tiny attached staples.  I then added a Tim Holtz Jingle Brad putting the prongs around the ribbon to pull it together in the center and then glued on two plastic holly leaves from my stash.  The main panel and background are attached with foam tape.  The green panel is edged with Distress Ink Peeled Paint.  


Thursday, November 9, 2017

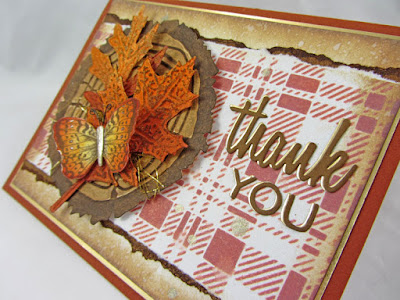
Autumnal Thank You


Taking a little play time to create a thank you card which also happens to fit this weeks theme at Simon Says Stamp's Monday Challenge.  

To begin with I used the Tim Holtz/Stampers Anonymous plaid stencil and Oxide ink Fired Brick on a piece of cardstock.. inked the edges with regular distress.. splashed on some water drops and dried it.  It needed something and I decided to tear the plaid section from the middle, layer it to a torn edged, distress inked piece and then layer that back to the pieces I tore off the starting panel.  I added a couple spritzes of Tarnished Brass Mica Spray and then splattered on some drops.  I layered this to a piece of Tim's Metallic Kraft Card Gold and then to a folded rust colored card. 


I die cut and embossed the Tim Holtz/Sizzix Tree Rings from Distress Mixed Media Heavy Stock, colored with Distress Inks and then with Archival Ink Potting Soil.  The Tim Holtz/Sizzix leaves were left from other creating... they already had ink on them and some frosted crystal embossing powder.  I used the matching embossing folder, embossed them and then inked over them.  I stamped the Tim Holtz/Stampers Anonymous Butterfly twice - once with Potting Soil and then once with embossing ink and embossed it with Ranger's Liquid Platinum powder... die cut it with the matching Sizzix dies cutting the entire brown butterfly and then just the body from the embossed butterfly.  Inked the butterfly with Distress Inks, shaped the body and glued it to the colored butterfly... added wire as antenna and just a touch of glitter with a Wink of Stella pen to the edges of the wings and on some of the dots.  I layered the tree rings, leaves, butterfly and also some thin gold thread on the left side of the card.  'thank you' used two different Tim Holtz/Sizzix die sets and I cut them both from a scrap of Metallic Kraft and from a scrap of Mixed Media Heavy Stock.  Colored the Heavy Stock with Distress Ink.  Glued the words together offsetting with the gold behind and then attached them to the card.  


Monday, November 6, 2017

Your Longest List


Hi There!!!!  I'm sharing the how to's of this card over on the Quietfire Creations Blog today - HERE.  I hope you have time to pop on over!!!  Have a good day!!

Hugs, Wanda

Wednesday, November 1, 2017

Christmas Love


In the background we have Ranger's Woodgrain Cardstock.  I sprayed it with Distress Spray Stain Antique Linen.  Distress Ink Fired Brick is sponged on the outer areas of the panel and also through the Heart Spray Stencil.  Finally there is Tarnished Brass Distress Paint on the edges and the background panel is sewn to black cardstock with torn edges using Tim Holtz Eclectic Element Sewing Thread.  The ornament and word love are from the Love Joy  Peace Christmas Ornament Cutting Die Set.  The ornament is cut from both white and black cardstock.  The white piece is painted with Tarnished Brass Distress Paint.  The Tim Holtz Idea-ology Found Relative was die cut using a Stitched Circle die from Elizabeth Craft Designs.  The circle was attached behind the painted ornament and then it was attached to the black ornament off-setting just a tiny bit to create a shadow.  The word Love, Christmas (from the Merry Christmas 2 set) and die cut hearts (from the Calligraphic Elements 3 set) were all cut from red cardstock and inked a little with Distress Ink Vintage Photo.  The boughs (from the Elizabeth Craft Designs set, Garden Notes Whitepine Boughs and Pinecone set) are cut from green cardstock and inked a bit with Distress Ink Pine Needles.

Have a wonderful day, friends!!!!

Hugs, Wanda