Monday, October 30, 2017

Simon Says: All Creatures Great and Small


This week on the Simon Says Monday Challenge the challenge is All Creatures Great And Small.

As always Simon Says Stamp will be giving away a $50 voucher to shop at their store.


It's been a blessing to be the Designer Spotlighter this month!!!  Thanks so much, Simon Says Stamp and Lols for this opportunity!!


Butterflies are a favorite of mine and so I've used them for this challenge!!


I created a card.  All the printed paper is from the Tim Holtz Paper Stash Cardstock Pack (Wallflower) except the very top panel which is Tim Holtz Paper Stash - Vellum (Wallflower).  Let's work from the bottom up.  The base is a white folded card measuring 6 1/2" x 5 1/4".  Next is a piece cut from the cardstock pack to measure 6 1/4" x 4 3/4".  This has a piece of Tim Holtz Design Tape from the Butterfly pack wrapped around it.  Next up is another piece cut from the cardstock pack to measure 5 3/4" x 4 1/2".  Next is white cardstock cut to 5 1/4" x 4" and embossed using the Tim Holtz Sheet Music Embossing Folder.  The top panel is cut from a piece in the Vellum pack and measures 5" x 3 3/4".  All the layers have their edges distressed and they are layered together using foam tape.  The foam tape holding the vellum layer on is only behind the butterflies.  

For the butterflies I've used the Tim Holtz/Sizzix Butterfly Duo cutting die and embossing folder set.  I cut the butterflies from paper from the Wallflower cardstock pack, embossed them and then inked over with Distress Ink Brushed Corduroy.


The string is Tim Holtz/Eclectic Elements Craft Thread.  The butterflies are attached just in the body area using foam tape.  After attaching them over the Craft Thread, I also added some further dots of glue to hold the craft thread keeping all the adhesive under the butterflies.  The wings are not attached at all and can be bent as much as a person would like. For the words I've used a couple of stickers from the Tim Holtz/Idea-ology Chit Chat pack and edged them with Brushed Corduroy.  To finish it up I've added dots of Liquid Pearls (White Opal).

I hope you like this card!!  It's not difficult and amazingly I haven't done any background techniques but it is beautiful!!  

Thanks so much for following along!!

Hugs, Wanda


Monday, October 23, 2017

Simon Says: Monochrome


This week on the Simon Says Monday Challenge the challenge is Monochrome.

As always Simon Says Stamp will be giving away a $50 voucher to shop at their store.


I've been having a great time being the Guest Designer for October.  It's hard to believe this is already the 4th week and there is only one left.


I chose the color brown and I've created a card this week.


On a 5" square piece of Distress Mixed Media Heavy Stock I created a background with layers of Distress Oxide Ink - Antique Linen, Frayed Burlap, and Vintage Photo.


Using the Tim Holtz Platform I stamped the Wendy Vecchi Circle Collage a few times with her Archival Ink Potting Soil....


...and then I stamped it with Embossing Ink, removed it from the Platform, and embossed it with Wendy's Potting Soil Embossing Powder.  The background was not as dry as I thought and some powder stuck in other places.  I used a small brush to remove most of what was outside the circle but left some areas inside the circle with powder.  It actually worked really well since it is a collage stamp. 


Using a paint brush, I applied water to the whole inside of the circle, blotted it with a paper towel, dried it, and then repeated again.  I wanted to lighten the inside of the circle as I was going to stamp a quote in there.

Using the Polka Dotty Stencil I added Texture Paste Transparent Gloss to the right side of the paper on the outside of the circle.  This picture shows the paste while it was still wet and white. 


After letting the paste dry completely, I used a Mini Ink Blending tool to apply Antique Linen Distress Ink to the inside of the circle.  Using the Ground Espresso Distress Marker I added shading around the circle.


Again using the Tim Holtz Platform I stamped the quote from Wendy's Forever Art set into the circle with Archival Ink Jet Black several times.  I decided to run the quote parallel with the lines in the the circle.  If I had thought about it I would have been more careful to stamp the Circle Collage so that those lines were parallel with the edges of the panel and even considered starting over but I came up with a different idea.


I decided I would add another layer offsetting it at an angle.  I inked the edges of both my main panel and another 5" square panel cut from cream cardstock with Distress Ink Walnut Stain and then I distressed the edges with the Tim Holtz/Tonic Paper Distresser.


I colored lace from Tim's Trimmings pack with Distress Ink and wrapped it and brown Craft Thread around the main panel.


After putting my layers together with Foam Tape and then attaching them flat to the folded brown card (5 1/2" square), I cut three flowers from the Wildflowers 2 set from the same dark brown cardstock as the card base and attached them to the card leaving the tops of the flowers and leaves curled up from the panel. 


I hope you've enjoyed today's card and are inspired to play along with this Monochrome theme!!!!

Hugs, Wanda


Thursday, October 19, 2017

Give Thanks and Find A Lot


Happy Thursday to you!!!  It's not long until the weekend!!  There has been a combined Quietfire Design and ScrapbookAdhesives by 3L® Blog Hop going on all week.  Today I'm sharing thankful, Autumn card.  To see all the other projects click on the company names above to go to their blogs. 


The Quietfire Design products I've used are the Leaf and Snowflake Sprays Stencil and one of the stamps from the Give Thanks set

My main, center panel has Ranger Ink Distress Oxide Re-inkers (Spiced Marmalade, Candied Apple) brayered onto a panel.... the quote stamped with Ranger Ink Archival Ink Jet Black ink using the Tim Holtz Platform so I could stamp it a few times for a nice dark image.... the panel was die cut with a Stitched Rectangle Die (Elizabeth Craft Designs).... and edges inked with Distress Ink Candied Apple.


The Scrapbook Adhesives by 3L® products used are 3D Foam Squares White Mix and E-Z Dots Permanent Adhesive.  

I put a smaller 3D Foam Square in each corner, on the front of the main panel... removed the liner from the top of the square... added Distress Glitter Dust Vintage Platinum to the exposed adhesive... and dumped off the excess glitter putting it back into its container.  The glitter sticks really, really well to the adhesive.  It doesn't brush off at all.  The main panel is attached to a red card stock panel using the larger 3D Foam Squares.  Tim Holtz Red Craft Thread was wrapped around the rectangle and a loopy bow made.


For the background panel I put Regular Distress Inks (Carved Pumpkin, Candied Apple) onto my craft sheet, added some water and smooshed my cardstock through the ink, dried it, splattered the panel with water, blotted it with a paper towel, and dried it.  Next I laid the stencil over the panel and sponged Distress Oxide Ink Candied Apple through the stencil.  Towards the bottom of the panel I went across the panel once with the E-Z Dots Adhesive and then applied foil (iCraft Deco Foil Amber Watercolor) to the exposed adhesive.  This is sooo cool!!!  The edges were distressed, the panel attached to a red panel with E-Z Dot Adhesive and then to a white folded card with the E-Z Dot Adhesive.  I curled up two of the corners of the background panel a bit.  I attached the center panel to the background with the larger 3D foam squares.  The finished card measures 5" x 6".


I hope you've enjoyed this project!!!

Hugs, Wanda


Monday, October 16, 2017

Simon Says: It's A Dogs Life


This week on the Simon Says Monday Challenge we've got - It's A Dogs Life.  

As always Simon Says Stamp will be giving away a $50 voucher to shop at their store.


I had a lot of fun (an some frustrating moments) creating this ornament using one of the crazy dogs from the Tim Holtz/Stamper's Anonymous set, Mini Cats & Dogs along with the matching die.  The trees inside the ornament are part of the Tim Holtz/Sizzix thinlits Tree Line cutting die. I first tried these items using card stock but I could not roll it up, get it inside, and unroll it without making lines and creases in the paper...  So I've used White Yupo Paper.  I stamped the dog with Archival Ink Jet Black, die cut it, and then used the Detailer Water Brush and Distress Inks to color it.  Nope, that wasn't easy either and it took quite a bit of time and using the heat tool a little at a time to get the coloring dry.  I used Tim Holtz Alcohol Inks to color trees.  So much easier :-)  For the "snow" inside the ornament I've used a few things - Scotch Create Permanent Tacky Glue, Sparkly Fluff, Glossy Accents, and Rock Candy Dry Glitter.  First I was using the Sparkly Fluff and it wouldn't keep it's "whiteness" with the clear glue but worked really well with the white glue except that static cling also caused it to stick everywhere inside the ornament, lol.  I still like it and was able to go in with a small piece of a Swiffer sheet using tweezers and clean much of it off the front area of the ornament so things were easier to see.  I left the back as I like that it looks like the snow blowing around.  When I decided I need more "snow" in the bottom partially for support for the dog and trees and also just for more "ground cover" I thought some glitter would also look nice and added that with the clear glue.  Over all I think it turned out well.  Finally I added some Tim Holtz Baubles to the inside for some added color and fun. They are colored with Alcohol Inks, Red Pepper and Mushroom.


On the top of the ornament I've used one of the dies from the Tim Holtz/Sizzix Holiday Greens Mini set.  I cut three of the pine branch pieces from green card stock, added shading with Distress Ink Pine Needles and splattered them with Distress Paint Tarnished Brass. Also used is Tim Holtz Crinkle Ribbon (dyed with Distress Ink Festive Berries), Metallic Ribbon, Jump Rings, and a Tidings Token (Tarnished Brass paint around edges and Picket Fence Distress Crayon in the letters).


It was also difficult getting good pictures so I've taken extra (many more than I'm sharing even) and hopefully you can see how great this turned out.  I'm pretty sure my daughter is going to claim it :-)

I hope you've enjoyed today's project!!!!

Hugs, Wanda


Thursday, October 12, 2017

Peace Christmas Card


Hi There!!!  I hope you are having a good week!!  

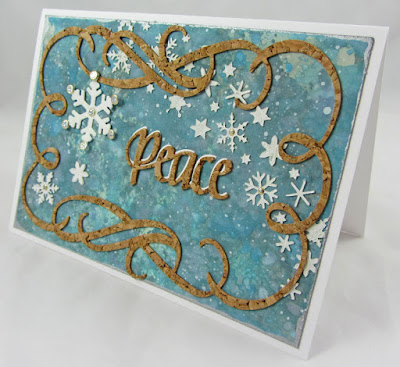
This card uses a couple of the newest cutting dies from the Elizabeth Craft Designs by Designer Suzanne Cannon, A Way With Words Collection.... the beautiful Flourished Frame die and the word Peace from the Christmas Ornament Set.  These are both cut from Adhesive backed cork.  There is also a Peace cut from white cardstock.  

In the background is Distress Oxide Ink, flicks of white paint, and then snowflakes stenciled with Opaque Texture Paste.  The panel is edged with silver paint.  The larger snowflake is die cut from white cardstock with double sided adhesive on the top.  Once cut the liner was peeled from the top and it was glittered with Elizabeth Craft Designs Warm Diamond Glitter.. accents added with glitter dots stickers.


Monday, October 9, 2017

Simon Says: Not A Card


This week on the Simon Says Monday Challenge we are challenged with making something other than a card.

As always Simon Says Stamp will be giving away a $50 voucher to shop at their store.


I've created a spread in my Small Dylusions Journal.


The first layer uses PaperArtsy Fresco Finish Paints (Amethyst, Cheesecake, Smurf, Captain Peacock) applied with my fingers.


Opaque Crackle Texture Paste was added through the TCW Mini Rosetta Stencil and left to dry.


Once dry more Fresco Finish Paints (Lilac, Turquoise, Antarctic) were used, this time applied with a brush to make it easier to paint over the crackle.


A close-up picture of a crackled area.


Stenciling through the PaperArtsy PS001 stencil with both Snowflake and Banana paint applying Snowflake first and then Banana.  I didn't wait for the white to get totally dry, just went in with white and then immediately the yellow over it.


Some stamping using a text image from PaperArtsy ESN11 and Archival Ink Garden Patina


Pieces of Composer Tissue Wrap torn and glued on with Distress Collage Medium Matte.


Then back in with some of the first colors of Fresco Finish Paints again using my fingers.


More stenciling using Antarctic paint through PS016 stencil this time adding the paint with a stencil brush to get a sharper image with no bleeding under the stencil.


Stamped an image from ETS11 using Amethyst paint.  Put some paint on your craft sheet, spread it thin with your finger, tap the stamp in the paint and then onto your page.  Be sure to clean your stamp before the paint dried on it.  Once the paint was dry, I used a White Gel Pen to add doodles and marks to the circle images.


Stenciling with Black Embossing Paste and PS045 stencil.  Once stenciled I used a heat tool to dry the paste.


Some PaperArtsy Treasure Gold brushed onto the center of the flower and rubbed around the edges of the spread.


Highlights added to the black stenciling with the White Gel Pen.  Idea-ology Stickers - "every" from the ChitChat pack and "day" from the Big Chat pack - were stuck on.  Distress Markers used a add a bit of color to them.  A black pen to add lines by the stickers and a border line around the spread.  The Distress Splatter Brush used to add splatter, first with Little Black Dress and then with Gold.  


I hope you've enjoyed the journal spread for this week.  I really enjoyed making it!!!  If you have any questions, don't hesitate to ask.

Hugs, Wanda