Sunday, February 21, 2010

A set of bird ATCs


I really like how these atcs came out. The background started with the wrinkle free distress technique using distress inks. Next is stamped a Studio 490 background image with distress ink.. then a strip of text patterned paper added.. white paint dabber through a piece of sequin waste in a few spots.. and a Studio 490 leaf image stamped with Adirondack meadow ink. The bird collage images are from Retro Cafe Art. Word stamp is from A Muse Artstamps... stamped on white cardstock with jet black Archival ink, cut out, edged with distress ink. Paper flowers with gold Stickles in the center.

Birthday Card


I made this square card (a little over 6 inches) for a very special friend... two things she likes are flowers and music. I layered a pink and yellow flower... both simple kirigami another friend and I were playing with one day... the center is a metal flower brad. It's attached over an old piece of music paper that I used distress ink and glimmer mists on... also distressed the edges. The base is folded cardstock and I did a little sanding around the edges. Light pink crystal flourishes in two corners. A tag hanging from the center of the flower. O, and faux stitching around the edges of the music paper with a black micron pen.

Saturday, February 6, 2010

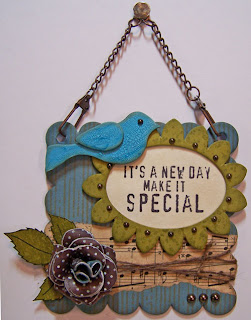
A New Day Chipboard Hanging

This is the project I made for the second part of the EverythingWendyVecchi Grungepaper Rose Swap. The rose on this hanging was made by Kim... isn't it beautiful!!!! Once again I've used all Studio 490 stamps, distress inks, Archival ink for the saying, Maya Road chipboard pieces (base, frame, bird), Distress Crackle Paint on the bird, old music paper colored with DIs, sticky backed pearls, twine, and Ideology swivel clasps for the hanger. The variation in color on the leaves was done by sponging on the ink, flicking it with water and blotting up.


Wednesday, February 3, 2010

Celebrate Today ATC


All stamps on this atc are from Studio 490. I used Wendy Vecchi's Pigment and Pearls technique here (this link is part 1, at the bottom click newer post for part 2 and then again on part 2 for part 3) for the background using Adirondack sail boat blue for the ink and gold perfect pearls. Flowers colored with Adirondack Pigment purple twilight. Green ink is Distress Ink pine needles. All black ink is Archival Ink jet black. Black dots are done using Glaze pen. Ideology snaps upside down for flower centers and film strip ribbon along bottom.

Thinking of You Card


It beautiful outside this morning in Southern Iowa with the sun shining and not much wind... we won't think about the temperature being only 6 degrees :-)
All stamps used on this are Studio 490. The background of this card began with a piece cut from the paper I had been working on top of for the past couple of weeks... mostly, if not all, distress inks. I then stamped the large alpha/numbers along the bottom and the small alphabet over not quite all of the rest of the piece using Archival ink jet black. Then I stamped the grid pattern over part of it "inking" my image with the white paint dabber... all be sure to clean your stamps right away when stamping with acrylics. Used a paper distresser along the edges and inked them with black soot. The flower and butterfly are stamped on grungepaper, cut out, and sponged (love the Ranger blending tools) with distress inks. White dots on the butterfly are done with the Inkssential pen. On the center of the flower I used a brad to attach an Ideology foliage flower that is embossed with Distress Embossing Powder mustard seed. The antenna of the butterfly are just two thin strips of black cardstock. "thinking of you" is also stamped on a piece of scrap of the "work on top of" paper, edges inked with black soot, layered on a piece of black cardstock. The printed twill is from Jillibean Soup. A piece of sequin waste along the left under the flower. Folded card is black cardstock.

Sunday, January 31, 2010

Chipboard Hanging

I am lovin' working on chipboard. I really hadn't done this before finding Wendy Vecchi's blog and then joining the Everything Wendy Vecchi Yahoo Group. This hanging was made for a Valentine's Swap on the group. All stamps are from Studio 490. For the hearts... I colored a scrap of grungepaper with worn lipstick distress ink - I just rubbed the ink pad directly on the grungepaper - then stamped the corner image from the Art By The Number set using white paint dabber onto the colored grungepaper and cut out the heart shape using the center scallops as the top of the heart. The chipboard heart (Maya Road) was inked with brushed corduroy distress ink and the background image stamped with the same ink. I added fired brick to the very edges of the heart. The flower stamp and saying were stamped with jet black Archival ink. The ideology token was colored with alcohol ink, dried, white paint dabber worked into the impression and the extra wiped off the disc. I then used my finger to rub Matte Accents over the piece so it wasn't quite so shiny. The white highlights on the stem and dots around the edge were done with the Inkssential pen. Holes for ribbon hanger were made with the Crop-a-dile.

Saturday, January 23, 2010

Metal Tin

I've been collecting Ten Seconds Studio products since taking the class with Linda Cain last summer. I placed a large order with them when they had a big sale the day before Thanksgiving so my wonderful hubby could give it to me for Christmas... yes, he was all for the idea. Finally I've used some for the top of this tin. The metal is dark chocolate and I used 3 different molds for the impressions kind of collaging them together. The tin was colored with Ranger Alcohol Inks. All stamps are Studio 490 except the little flower around the edge of the tin, that a Stamps by Judith stick image. Stamping was done with Archival ink jet black. Flowers, leaves, and butterfly were stamped onto grungepaper, cut out, and sponged with distress ink. For the large flower I cut out an extra center to layer on top for added dimension and after sponging with scattered straw added scattered straw distress Stickles. Large flower colored with fired brick. Small flowers colored with worn lipstick and stamped with speckled background. Buttons threaded with red metallic floss, tied on the back and tails left long to stick out. Just a little bit of scattered straw stickles added on top. Leaves colored with peeled paint, flicked with water and blotted up water - this created a natural looking variation in the leaves. Butterfly is sponged with mustard seed and white dots added to body with Inkssential pen... antenna made with craft wire. Saying is stamped onto polished stone background (done remember exact color of alcohol inks but also used some pearl mixative), "stitching" added with ultra fine sharpie. The tin has a diameter of about 5 inches.


Snow Day ATC


One more ATC for the Byhand Artists group swap. I've gone with the blue and orange combination color theme. The girl is an image from Paper Imagery Designs. She was sepia toned and I sponged on Distress Ink spiced marmalade... then to bring the muff and collar back out again I used the Inkssential white pen and Souffle orange pen. The background is wrinkle free distress done with Distress Inks broken china and dusty concord... spiced marmalade on edges. The snowflakes (Tim Holtz image) is stamped with faded jeans. Two layers of white cardstock torn for the bottom section coated with Distress Stickles picket fence. Small dots of picket fence stickles over background and also dots of white Inkssential pen. Three snowflake buttons added (shanks cut off). "Snow Day" hand written, cut out, edged with broken china.

Roses, Roses

These roses are made following the tutorial on Wendy Vecchi's blog here. The first 3 were made recently for a swap on the EverythingWendyVechhi Yahoo group. They all use grungepaper and distress inks. The blue has music paper glued to the grungepaper, broken china and black soot inks, rock candy Distress Stickles. The yellow is mustard seed ink, stamped with Studio 490 speckled background, and I used deckle scissors to cut the flowers out... Love the edge this made. The red flower is fired brick and stamped with a Studio 490 background.

Two of these next roses - the blue and orange - were made last year after Wendy posted her tutorial... distress inks and stamping on both and they were also both sprayed with perfect pearls gold. The pink one I just made recently. I painted the grungepaper with Distress crackle paint, after it was dry sponged on some distress ink and also used gold paint dabber on the edges, made the rose and then coated the petals with rock candy Distress Stickles.

Studio 490 Projects

I made both of these projects last month. This first one I did right after Christmas with some new Studio 490 stamps I got for Christmas. The base is a page from a Maya Road Chipboard book. I used Distress Inks and black Archival Ink. The background is colored with broken china and stamped with brushed corduroy. Stamped the floral border image along the bottom with black and then the larger flower image on the left side also with black. The flowers are stamped on grungepaper, cut out, colored with fired brick and spiced marmalade and the speckled background stamped onto the larger flowers in black. Flowers layered and an Ideology snap attached to the centers. I decided the large stem and leaves weren't separated from the border image enough and so went over them with black Glaze pen to darken them. The Maya Road chipboard frame was colored with brushed corduroy and also stamped with the speckle image. The quote is stamped onto white cardstock, sponged with broken china, and attached behind the frame. Black dots added around edges with Glaze pen. Ideology chain and mini paperclips for the hanger.


This second project was done for the Christmas Mod Challenge on the EverythingWendyVecchi Yahoo group. The challenge was to use Studio 490 stamps to make a Christmas project without actually using a Christmas stamp. Again I started with Maya Road Chipboard. The houses are Maya Road chipboard minis. The background is colored with Distress Ink broken china, flicked with water and the droplets blotted up with a paper towel. Alpha background stamped with broken china. Lightly pressed white paint dabber over bottom area of background. The "large snowflakes" - actually a Studio 490 flower image - were stamped with white paint dabber and then filled in with picket fence Distress Stickles... added dots of picket fence stickles between the large snowflakes. Houses colored and stamped with distress inks. Picket fence stickles added along roof and on window sills to simulate snow. "Home For Christmas" was computer generated, colored with distress ink, cut out, added behind Ideology filmstrip ribbon and attached to the chipboard using the Ideology mini attacher. Quote stamped on white cardstock, tore out, colored with distress ink and added as shown. Pine branches punched from green cardstock, pressed lightly with white paint dabber and attached as shown. Ribbon for the hanger.


Merry Christmas ATC


I made this atc last month when Tim Holtz was blogging his 2009 12 Tags of Christmas. It's based on one of the tags. He used his large car but I only had the small one so decided an ATC would be great.

Thursday, January 7, 2010

My Heart For You ATC

Another ATC for the Byhand Artists January swap. This one has a pocket. The background is crumpled tissue paper glued to white cardstock, pressed lightly with a Versamark pad and then gold embossing powder. The gold border is Peel Off stickers. The pocket is a scrap of printed paper. Collage image is from The Altered Abbey. Words are computer generated. Heart is punched from a stamped design.


Grungepaper Wallets w/ Encouraging Cards

I participated in a 12 Days of Christmas swap on the Byhand Artists Yahoo Group last month. There were a total of 18 of us in the swap so some days we opened 2 gifts instead of 1. Everyone did an amazing job with their gifts!! For my gift I decided to make little wallets from grungepaper. I first saw these on Eileen's Blog here and then on Linda's blog here and Linda actually has several posts related to wallets if you want to take time to look around. I colored mine with Distress Inks, embossed them in a Cuttlebug folder and then hit the high spots with Archival Ink. The backgrounds on the cards I made to go in them were done with Glimmer Mists and a variety of masks. All stamps used on the cards are from Quietfire Design.


Wedding Card


I love using this Stampsmith Image along with this quote from LennaLines when I make wedding cards. The photo image is stamped with Archival Ink jet black on white glossy cardstock. Coloring is done with chalk pastels in layers to build depth by spraying with Krylon workable fixative between layers. Background is done with a Cuttlebug folder. Silver edging done with the silver paint dabber.

Catching Up

Merry Christmas and Happy New Year!!!!

I know, it's January 7th already. It's been very busy for me... lots of extra time spent working out in the shop... lots of company... wonderful time spent with family. Life is such a blessing!!!! Our daughter and I did get to spend some time stamping together... woohoo!!!! And I did manage to get a few other things done. I'll share just a few now and will continue to work at getting caught up this week.


This first one is an atc. It will be included in January's ATC swap on the byhand artists group, there are two themes we can work with... one is a color theme - blue and orange in combination... and the other is pockets. This atc fits the colors. The base is corrugated cardboard with some of the top layer of cardboard pulled off. I colored it with Glimmer Mists terracotta. I used gold paint dabber along the edges and also added dots of blue with Smooch. I tore some music paper, colored it with distress ink broken china and also sprayed a little turquose Glimmer Mist on it. Added it along the side and stamped a flourish image (Inkadinkado) with Archival Ink jet black. The bird is stamped on white cardstock with Adirondack aqua ink, trimmed, the corners rounded, ink rubbed on the edges and then the edges dabbed with gold paint dabber. I then stamped another bird image on scrap cardstock with a green ink, cut out the leaves and attached them to the main image leaving the tips not attached so they could bend up. "sing your song" is done with a Dymo. Small flowers were punched from the paper I was working on top of and a dot of Smooch added to the centers.


This is a birthday card for a friend. The background was embossed with a Cuttlebug folder, sprayed with Glimmer Mists, sanded a little off the high spots and then added some Distress ink to the high spots. Bird image is stamped with Adirondack stream and the edges also sponged with ink.. layered to the same color cardstock as the folded base. "Happy Birthday" is computer generated and added to the center of the decorative brad.


This last card is a birthday card for our Son-in-Law. Pretty basic.. stamping, sponging of ink. dots added with a Glaze pen, "Happy Birthday" stamped onto a metal rimmed tag.

Thursday, December 31, 2009

Paperbag Studios Dec. Challenge

Just in the nick of time I'm entering a card in Paperbag Studio's December stamp challenge. Here is a link to the Paperbag Studios blog.

I haven't used any of my Paperbag Studio stamps in awhile and it was so much fun getting them out!!!!! I really do love the images!!!

I took a front pic and then also one at an angle so you could see the silver better (which looks grey in the front pic), and also a close-up of the hanging snowflake.


Supply list --
Paperbag Studio stamps - Peace flake; Joy block; Star scallop; Chere
Adirondack inks - Stream; Aqua
Ranger Paint Dabbers - Snow cap; Silver
Printed paper - Fancy Pants Designs, Silver Snow
Cardstock - white; Teal
Silver eyelet, jump rings, and Snowflake charm
Tim Holtz ruler and Awl
Inkssential white pen
Finished card size - 4 3/4" x 6 1/4"
Folded teal cardstock for base.

I cut a piece from a lighter area of the printed cardstock, stamped some star scallops (I thought they looked somewhat like snowflakes) randomly on the piece with aqua ink, dried it, "brushed" snow cap paint here and there using the dabber top, dried it and repeated with silver paint. Stamped star scallops along left edge with stream ink. Added stream ink to the edges with a sponge. Pierced holes around edges using the Tim Holtz ruler and an awl. Adhered to folded card with double stick tape.

Stamped Peace flake on white cardstock with stream ink and tore out. Rubber edges with silver dabber.

On another piece of white cardstock I rubbed stream ink direct-to-paper, dried it, flicked water on it, blotted up the extra water with a paper towel, dried it, tore it out, stamped star scallop with stream ink, rubbed edges with silver dabber.

Stamped Chere on white cardstock with aqua ink, stamped Joy block over it with stream ink, dried it, flicked it with water, blotted up the extra water, dried it again, cut it out leaving a small white border around Joy block, added white dots with Inkssential pen.

Determined placement of pieces on card, punched hole for eyelet, set eyelet, hung charm with jump rings, layered up Peace flake and small background with foam mounting tape, and adhered Joy block with double stick tape.

Wednesday, December 9, 2009

Day 8 Tag


My tag pretty much follows along with Tim's Day 8 tag except my holly leaves are punched from green cardstock (Martha Stewart Punch) and I put some peeled paint Distress stickles on them. Also I didn't put any bells on... I know I have some, just can't find them.

Day 3 of Tim Holtz's Tags


Here are my Tim's Day 3 inspired tags. Making the plaids using the alcohol inks is a LOT of fun!! All images used on these are Tim Holtz stamps. The "snow" on the tree branch was done using the inkssential pen.

A Great Find


I thought I'd share this picture of our youngest son, Tim. He's 13 and 6' tall. Even though the wind was whipping sending wind chills to 15 below zero, he couldn't wait to get out and ride the 4-wheeler in the new foot snow we got yesterday and last night. Then he had to come in and show us his "Great Find" of really big icicles.

Tuesday, December 8, 2009

Christmas Tag


It's a beautiful white day today... we'll probably have about 12" of snow by tomorrow and the winds are supposed to really kick up and give us a blizzard. This is on top of the 4-5" we got Sunday night. I'm dreaming of a white Christmas... but living in southern Iowa means there is a chance all this snow could be gone before it gets here. In the meantime I had a great time making this tag based on Tim's 7th day of the 12 Tags of Christmas. The main image I used is from Time to Stamp and once I got to the end of the tag it looked to me like the image was too small and didn't really stand out so I put some German Scrap around it. The flourish image I used is from Inkadinkado... other images are Tim Holtz.

Thursday, December 3, 2009

Thank You Card


If you are following along with Tim Holtz's 12 Tags of Christmas this year then this will look familiar... it's based on his Day 2 tag. The card is 4 1/4" x 5 1/2". I used the large frame image from the set Tattered Elements and the flourish from the set Sketch Elements (Tim Holtz, Stampers Anonymous). "Thank You" is from Quietfire Design. Distress Inks antique linen, dusty concord, faded jeans, and a little aged mahogany. Archival Ink jet black. The "stitching" is done with the Inkssential pen. Otherwise I did follow along with the directions on Tim's blog.

Sunday, November 29, 2009

Published

I've been published again in two different magazines. The thrill of being published just never dulls... it's always sooooo exciting.

This first card is published in the newest Somerset Studio Gallery issue. The girl is an image from Paper Imagery Designs and the bird is a stamp from Time to Stamp.


This next card is published in Take Ten Magazine. The tree is a Dreamweaver stencil and the rubber stamped flourishes and words are from Quietfire Design.


Christmas ATCs


I had a lot of fun making these atcs for a somewhat local mail in swap. Usually when I do mail-in swaps, I make all the atcs the same (or nearly) but this time I didn't. Last week I saw these awesome Christmas bird images used in some art projects on Audrey Hernandez's blog and knew I had to get them. They are from Retro Cafe Art and I bought the digital downloads so I could use them right away :) The music background images are from Paper Imagery Designs... I rubbed Rock Candy Distress Stickles on all the backgrounds, let it dry, cut them out, layered them onto cardstock atc blanks, and then sponged Distress Ink brushed corduroy around the edges. Next I layed out all the bird images I wanted to use (I'd cut them out while riding with dh to deliver some parts), a bunch of different embellishments, ribbons, stickers, decorative buttons, and flowers and just started putting them together. It was great fun!!!! and I had the hardest time trying to decide which atc to keep, LOLOL.

Birthday Card


A birthday card for our son-in-law. The tree stamp is from Rubber Stampede and "Happy Birthday" is an old Stampin' Up image. For the trees I started with a light blue paper, sponged some Brilliance moonlight ink, stamped the trees with Archival Ink jet black, tore them out, and then sponged around them with Distress Ink broken china, faded jeans, and black soot. The next layer is a greenish yellow textured paper... sponged the edges with broken china and faded jeans, then distressed the edges, and finished up by rubbed some black soot ink on them. Layered everything together, stamped "Happy Birthday" on the metal rimmed tag with jet black ink, sponged on some broken china and faded jeans... also rubbed some ink on the white string. Finished up by using a Sharpie marker to add the black dots.

Monday, November 23, 2009

News Flash

If you've been following the Quietfire Design blog hop then you know that to have a chance to win the grand prize you needed to keep track of the stamps used on each blog hop blog and then go to Suzanne's blog and leave a comment listing them all.

Well, Suzanne has decided to make it easy on everyone and all you have to do to be entered for the grand prize drawing is leave a comment. So quick, head over to Suzanne's blog to leave a comment for a chance to win.