Tuesday, May 31, 2016

In Summer


Happy Tuesday!!!  If you're in the US, I hope you had a good Memorial Day holiday.  It was beautiful here in Southern Iowa!!!  

Today I'm sharing a Summery project over on the Quietfire Creations Blog.  You can find it HERE.

Monday, May 30, 2016

Remember


I'm so very  thankful to those who have served and protected us!!!!

This is a quick piece I've done today.  I began with a Ranger #12 tag and cut if to be 5" long.  I then glued a piece of Tim Holtz paper over the tag with Collage Medium Matte, trimmed it even with the tag and punched the hole.  I used Distress Stain Picket Fence to the right and bottom of the paper to mute the pattern, inked around all the edges with Distress Ink Frayed Burlap, stenciled on the stars (Tim Holtz Stencil) with Texture Paste (white matte) and dried it.  On each star I used Wink of Stella Gl. White which put a light shimmer over them.  This is dried and then the edges of the tag distressed.  The photo is from the Idea-ology PhotoBooth pack.  I trimmed the picture and inked the edges with Pumice Stone.  After attaching the picture I went around the edges with an All-Stabilo pencil and then blended it with the Pumice Stone Distress Marker.  Once finished I clean the tip of the marker with a damp cloth.  Remember is one of the new A Way With Words dies and it is cut from red cardstock.  Idea-ology Paper String, Staples, and a Mirrored Star finish this off.  


Saturday, May 28, 2016

Winter Post on ECD


It's going to be warm here today but not hot enough to really make me think about winter.  I did have fun creating this winter themed card that is being shared today on the Elizabeth Craft Designs Blog.  I hope you have time to pop over and have a look.  


Friday, May 27, 2016

Thank You Card


Happy Friday to You!!!!!!  Our daughter and her family will be here tonight to spend this holiday weekend with us and we are looking forward to their visit!!!!

I have a thank you card to share today.  The thank you stamp is from Quietfire Design and is part of THIS set.  The flower is created using the Garden Notes Hydrangea from Elizabeth Craft Designs.  Onto the folded white card I have a peachy, could be called salmon, colored layer.. next is a piece of Through The Lens paper from the Stone set with the edges distressed... then it's my background layer.  For this I started with Distress Paints (Squeezed Lemonade, Dried Marigold, Victorian Velvet) on the craft sheet, sprayed with water and the paper dipped into it.  After drying that I stenciled (Tim Holtz Mini #019) with Distress Ink Victorian Velvet, distressed and then inked the edges with Abandoned Coral, stamped the sentiment and assembled the flower directly onto the card.

I hope you have a good weekend!!!!  I'm sure our daughter and I will be getting inky tomorrow!!


Thursday, May 26, 2016

Circle Journal #2

Hi There!!!  I hope I'm not sending anyone into shock having a post on my blog 5 days in a row!!  LOL

Today I'm sharing my second post for the Circle Journal swap I'm participating in.  The first post is HERE.  In that post I shared my journal that was sent on it's way to travel to the other 11 people in this round robin.  Today I'm sharing my pages in the first journal belonging to someone else.  It's quite scary!!!  I try really hard to set that fear aside and just have fun!!!  After all, they let me join the group.  This is Chris' journal and it is a mini ribbon holder.  I should have measured the size of the cardboard "spools" (not 3D round like a thread spool but these are for wrapping around).  They were probably not more than 4" high. 

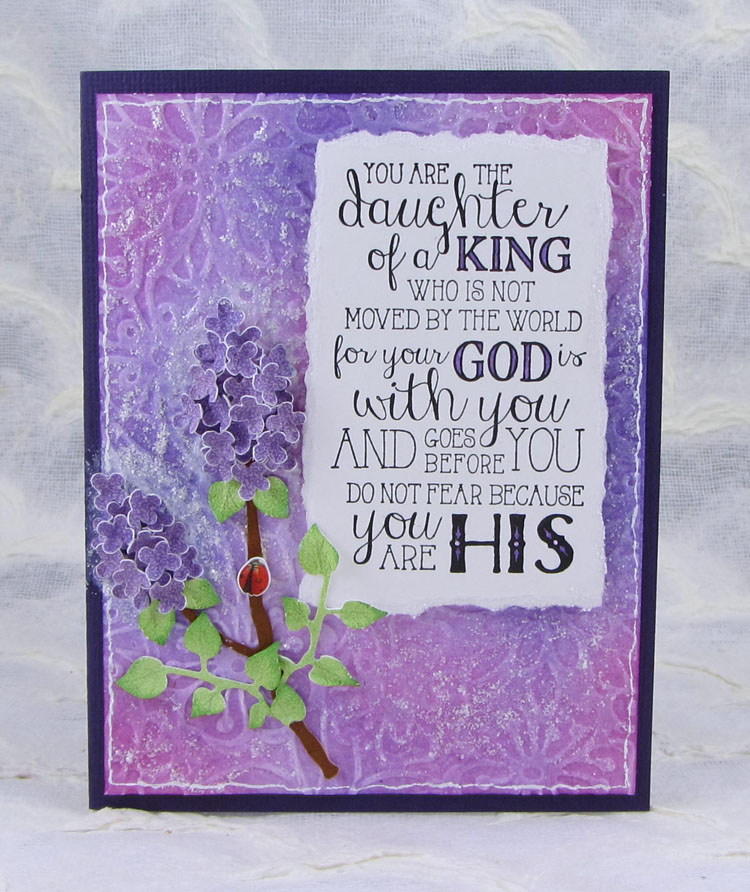
This first side started with a copy of a bible page.  I copied onto text weight parchment looking paper.  This was glued to the cardboard and the excess paper torn off.  I used Fresco Finish paint to add background color and stenciling.  There is a piece of music tissue tape towards the bottom, behind the flowers.  The flower are a PaperArtsy stamp.  I've used metallic and white gel pens to add color to the flowers and to highlight the flourish stenciling.  A black Pitt Pen was used for writing.  Yellow twine and bow to finish it off.


The flip side has stenciling with GrungePaste, painting with Fresco Finish Paints. stamping with Archival Ink, shimmer added to the flower petals with A Wink of Stella pen, and a white gel pen for some added details.  The words are stamped onto a scrap of some background, cut out, edged and glued on.  A flower was added over the twine. 

When this makes it home in another 11 months or so, I do hope Chris likes the pages!!!


Wednesday, May 25, 2016

Doodles and Scribbles


Happy Wednesday!!!  

This is just a bit of the project I have on the PaperArtsy Blog today for their current theme, Doodles.  I hope you have time to pop on over. 

Tuesday, May 24, 2016

Every Good Gift


It's a good mail day when you get all the new Quietfire Design stamps in a package!!!!  If you go to the WHAT'S NEW category on their website you can see them all.  

Of course I needed to create something!!  I hope you like this card.

I began with the Crackle Background image.  I sprayed the stamp with Distress Spray Stains (Picked Raspberry, Peacock Feathers, Squeezed Lemonade) and stamped it on white cardstock.... and stamped it again on another white cardstock....  and because I could tell there was still color to be used I stamped it several times on a blank journal page.  I've used one of the "stamped on white cardstock" pieces to begin this card.  I intended to stamp directly over the background but thought it was a bit too dark so went over the whole piece with Picket Fence Distress Stain and dried it.  I love how it muted the color.  I then stamped Every Good & Perfect Gift directly on the background and embossed it with black.  I decided that it was just too busy looking so I stamped the quote on white cardstock with Jet Black Archival Ink and cut it out with a Stitched Oval die (Elizabeth Craft Designs).  I then placed it directly over where I had stamped on the background matching up the top flourish where it went over the edge of the oval.  I distressed the edges of the background panel and inked them with Distress Ink Squeezed Lemonade.  Next I added the flowers and then thought it needed more...  I stamped two words from the Jewelry Words set with Jet Black and punched them out with a 3/4" circle punch and edged them with Squeezed Lemonade.  I added them as shown and added some yellow gems.  The next layer is white cardstock edged with Picked Raspberry.  I put some Picked Raspberry Distress Spray Stain on my craft sheet, added a little water and dipped the edges of the paper in the color.  Once dry I layered the panels and attached them to a folded white card.  Fun, fun, fun!!!  And as you can see, the Jewelry Words don't have to be used for jewelry - they make great embellishments.  


Monday, May 23, 2016

Make Today Amazing - Happy Birthday


Hello to You!!!  Last Monday I received an order I had placed for all the new PaperArtsy Infusions.  Woo-Hoo!!!!  And I needed to have a birthday card done for the next day so I had a little play.  I glued a hymnal page to cardstock using Distress Collage Medium.  I also brushed the medium over the music page and while it was still wet sprayed on some water and shook on some Infusions.  I didn't keep track of which colors I used - sorry.  Some areas got more water and some less.  I gave it a bit of time and dried it with the heat tool.  Infusions are dry crystals similar to Brushos but they also have crystals of walnut stain in them.  The color reacts with water immediately but the walnut stain takes a bit longer to react so if you don't want much brown, you just dry it right away... otherwise, allow a bit more time for the walnut to react also.  Way Cool!!!!  Once the Infusions were dry I stamp the star-flower image from Darcy's EDY14 (PaperArtsy) set of stamps with Versamark ink and embossed them with Copper Kettle powder (Powder Keg).  I used a white gel pen to bring out the image more.  The edges were distressed with the Distrezz-It-All.  On a scrap of Mixed Media Paper (Ranger) I stamped the flamingo from Darcy's EDY05 set using Archival Ink Jet Black (Ranger) and colored it in with Distress Markers and a Water Brush. I used a Silver Gel Pen to dot wherever there was a "rivet" and also in some other areas for highlights.  I cut the image out leaving a border.  "Happy Birthday" from the Jofy14 set (PaperArtsy) was stamped and then embossed with White Wow Puff Powder.  The words across the bottom are a piece of washi tape.  Once I stuck it down the letters faded too much so I scribbled white gel pen over them.  I recently got the new set of Tim Holtz gear dies so I cut some from cardstock, painted them with Fresco Finish Pewter (PaperArtsy) and attached them as shown. 


Sunday, May 22, 2016

You Are The Daughter


Hello!!  I made this card last month for a friend!!  For the background I colored White Soft finish Cardstock (Elizabeth Craft Designs) with PanPastels and embossed the piece with the Bouquet Embossing Folder (Elizabeth Craft Designs).  This was attached to the folded card.   I stamped the Daughter of the King Rubber Image (Taylored Expressions) with Jet Black Archival Ink (Ranger) onto white cardstock, tore it out, colored the open letters, and attached it to the card.  I cut the pieces for Susan's Garden Notes Lilac (Elizabeth Craft Designs) and assembled the flower on the card.  The flowers blended into the background more than I thought they would so to help them pop I added Stickles (Ranger) to the background, brushing it over the background with a paint brush and giving a heavy coat around the flowers.  It's finished with a white doodle around the edge and a ladybug sticker.  


Wednesday, May 18, 2016

Autumn Card


There is a whole week of posts happening on the Quietfire Creations Blog using dies from the brand new release.  I'm sharing a card today using the Autumn die.  You can find it HERE.  If you've missed the other posts this week, I hope you'll scroll back and check them out!!!


Monday, May 16, 2016

Friends and Cosmos


Hello!!!!!!  I have a card to share with you today!!!

I used Ranger's Mixed Media Cardstock for the background.  I inked an acrylic block with Distress Inks (Abandoned Coral, Fossilized Amber, Worn Lipstick), sprayed it with water and stamped it onto the paper.  I dried it some and then pressed on the block again as it still had dots of color on it and then dried it completely.  I stamped the quote (Quietfire Design - Always Be My Friend set) with Archival Ink Jet Black (Ranger) and embossed it with black powder.  I placed a square of release paper left after using a rub on over the quote and then used a Christine Adolph Adhesive Rub On (Prima) on the paper.  The square stopped the rub on from sticking over the quote.  I put a coppery colored foil over the adhesive.  The flowers are Cosmos and I used the Elizabeth Craft Designs Garden Notes die set.  The petals were cut from white cardstock and Abandoned Coral used to add color.  The center were cut from yellow cardstock and dipped in pollen powder.  The stems were cut from green cardstock. 


Saturday, May 14, 2016

Summer - Distressed and Foiled


Happy Saturday to you!!!!!!!  I hope your weekend is going well!!  We have our first Graduation Open House of the season to attend this evening.  

There are EXCITING things happening at Quietfire Design and Elizabeth Craft Designs... New Releases!!!!  There are brand new A Way With Word dies - a set with all four seasons and two singles, remember and memories.  Quietfire Design also has 11 new stamps/stamp sets.  The dies are wonderful and I can hardly wait to get the stamps, they are gorgeous!!!  See all the new QF items HERE

Elizabeth Craft Designs' has new releases across all their lines.  They have a blog post HERE

I'm sharing a card today using summer from the 4 Seasons die set.  I began with Ranger's Mixed Media paper and Distress Inks (Peacock Feathers, Salty Ocean, Shaded Lilac).  I did the wrinkle free distress technique to color the paper... dipping, drying, blotting, etc. until I liked the background.  I used a Prima Christine Adolf Adhesive Rub-On and purple foil for the collage flower image.  I LOVE these rub-ons!!!  They work great!!  I didn't use the whole image but let it run off the bottom of the background.  I trimmed the background paper so I had a strip to the right and stamped an old Inkadinkado image with Archival Ink Violet only using part of the image and stamping it at the top and bottom of the strip.  These are attached to white cardstock and then ECD's True Blue Soft Finish Cardstock (edges distressed) and then a folded white card.  Summer is die cut from Soft Finish Cardstock (White and True Blue), layered together and attached to the card.  


Friday, May 13, 2016

Spring Memories


Hi There!!!  I'm sharing a beautiful card on the Elizabeth Craft Designs' Blog today using a couple of the brand new A Way With Words cutting dies.  I hope you can pop on over HERE and have a look.

Tuesday, May 3, 2016

A Circle Journal


Well, I started this post a few weeks ago but today I'm finally finishing it.  I'm very excited to be part of a year long Circle Journal adventure.  There are 12 of us participating.  We each chose a shape for our journals and got them ready to send on their journey.  It will be about a year before I get mine back and it will be filled with artwork by each of the other 12 ladies!!  Sooooo Exciting!!!!  The only rule for this journey besides any individual things for each book is to use at least one PaperArtsy product on each page or tag as we are all part of a PA group. I did use all PaperArtsy stamps and there is Fresco Finish paint on the covers and the pages inside the back cover.
These are pictures of my journal before it was sent on.  I die cut scalloped circles a little over 5" across from 140# watercolor paper.  For the covers I glued two circles together and then cut it in half.  I bound the book, decorated the covers and the inside front and inside back pages. Above you can see the front and back covers.  Below is the spread just inside the front cover.  In that tied paper is any particulars regarding my journal .


This is the spread inside the back cover saying thank you to everyone contributing to my book.


And a few more pictures...


Stay tuned for more posts related to this journey as I'll be sharing the pages I create in each book I receive!!!  Soooooooooo Exciting!!!!!