The current topic over on the PaperArtsy Blog is Image Transfers. The Challenge Post, filled with great information, is HERE. I decided to try a small gel medium transfer and chose to use a picture of myself. It was a color picture but I printed it on a black only laser printer. I grabbed a large tag that already had layers of paint and maybe other things on it. I added some Fresco Finish Snowflake in the area I was going to do the transfer - it pulled up some yellow color from below it. I opted to leave that bleeding color and go ahead. I put down some soft gel medium, smoothed it with my finger, laid the picture face down and burnished it well. I tried to leave it to dry but did use a heat tool also and I think I didn't let it dry long enough as I did get a little rub off of the picture when I wet and rubbed off the paper. Overall it didn't do bad, which surprised me. I did wish once the transfer was done that I had done another layer of white paint so it wasn't so yellow looking but, oh well. The color already on the tag was quite bright which didn't seem to go with the pic to me so I rubbed on Fresco Finish Toffee with a baby wipe to tone it down. Then to get rid of the edges of the pic transfer and to kind of frame it, I put Snowflake paint around the pic using a Catalyst straight edge brush giving the look of lots of texture. Next I stenciled leaves (PaperArtsty Jofy PS012) using Grunge Paste mixed with a little Guacamole paint. Once the paste was dry I put the stencil back on and painted Fresco Finish Limelight and Hey Pesto on top, let that dry, put the stencil back on, stamped text (PaperArtsy Sara Naumann ESN11) with Archival Ink Leaf Green, dried it and added shading along the paste with a Faber-Castell Big Brush Pen blending it out with a small stencil brush. Next I stamped some more leaves (PaperArtsy Sara Naumann ESN17) between the paste leaves with Leaf Green and colored them in with a Big Brush Marker. More detail was added to all the leaves with a white pen. On top I've added lace, die cut leaves (cut from green paper, painted a bit with Limelight, and stamped with text), flowers made from die cutting either book paper or music paper - color added with Distress Ink and Perfect Pearls Mists. After everthing was glued on I used a silver pen to add more detail to the die cut leaves. "Joy" is a Christine Adolf sticky rub-on... I put it on and then added silver foil on top. To give it some dimension I went along one edge of each letter with a black pen. Because of the silver joy I thought I needed more silver and added a silver button to the center of the large flower and then mixed some silver glass glitter, both chunky and regular, with transparent embossing paste and put it on the edges. I added some Idea-ology rub-ons and an Idea-ology small talk sticker, yellow on the sticker done with a Big Brush Pen. Some ribbon at the top and it's done. This was just pure play for me and I had a fabulous time!!!!
Saturday, February 27, 2016
Friday, February 26, 2016
Make n' Take - Best Wishes

So this past Wednesday was my last Make n' Take (for now) at Memory Bound. I had so much fun!!! From designing the cards (way back in December) right through each weeks make, it was a total blast!! I loved meeting everyone that came each week and I even learned a couple of names (names are hard for me).
Each week we did a different technique for our backgrounds and then topped off the cards using A Way With Words Die Cuts (Elizabeth Craft Designs) and other things.
This weeks card finishes at 6" x 6". The background panel uses Ranger's Watermark Resist Ink. We stamped (Tim Holtz image) with the resist ink onto glossy cardstock, inked over it with Distress Inks, buffed it off, and then stamped again using Distress Ink. The edges of the background panel and white panel are distressed. The edges of the folded kraft card are inked. The flower is made from copy paper. Here we've used the largest flower from the Tim Holtz Tattered Floral die (many other flowers and sizes could be used). We stacked up 6 flowers, put a brad in the center. Crumpled the flowers to the center starting with the top flower and working down through all 6 flowers. You then pull the petals back out as much or as little as you like. To add just a bit of color we brushed the tips with Distress Ink. The leaves (Tim Holtz die) were cut from green cardstock. Best Wishes is cut from white cardstock.
This is a board I made to show the process for the flower.


Wednesday, February 24, 2016
Live - Just Living Is Not Enough

Hello!!! I'm sharing how to make this card on the Quietfire Creations Blog today. You can pop over HERE to see it.
Tuesday, February 23, 2016
The Greatest Strength

Hi!!! Here is a another card using a new Quietfire Design Stamp, The Greatest Strength. I've used a couple of the shaving cream technique backgrounds that I showed last week. I stamped the quote on one background with Archival Ink Jet Black, cut it out with a Stitched Oval die (Elizabeth Craft Designs), and dabbed around the edge with Distress Ink Black Soot. The next layer is another oval cut with the Stitched Oval Die Set from white cardstock. The background is a shaving cream technique paper. I've stenciled (ECD Stencil - Flower) along the right side with Distress Ink Abandoned Coral and the edges of the panel are distressed. The flowers are die cut (ECD die set - Bunch of Flowers 4) from music paper. I cut the set of 3 flowers three times from the paper, stacked up each size of flower together (that is, kept the same sizes together), put a brad through the center, crumpled up the petals, laid them back down, sprayed each flower with Perfect Pearls Mist Perfect Pearl, dried them and attached them to the card as shown.


Monday, February 22, 2016
Just Living Is Not Enough....

Hi To You!!!!! So glad you've had time to pop in (or read the email if that's how you get my posts)!!! Quietfire Design has released two new stamps that are wonderful. HERE is a post QF did to announce them.
This is a standard size card. I started with a piece of Ranger Glossy Paper, stamped the doily image (Tim Holtz) with Ranger Watermark Resist Ink, inked over the paper with Distress Inks (Mermaid Lagoon, Lucky Clover), flicked water onto the paper, blotted it with a paper towel, dried it, inked it again with Distress Inks (Mermaid Lagoon, Mowed Lawn) which darkened the color on the paper and added color to the spots left from flicking with water, flicked it again with water, blotted it, dried it, and finally stamped the quote (Just living is not enough) with Archival Ink Jet Black. This panel is mounted onto white cardstock and then the folded card. I've added Elizabeth Craft Designs die cuts - one of the Ribbons & Jewels cut from white cardstock backed with Clear Double Sided Adhesive, and one of the Bunch of Flowers 3 cut from Shimmer Sheetz. I've added Glitter Dots Stickers (Elizabeth Craft Designs) along the ribbon die cut in the flower centers.


Saturday, February 20, 2016
Bloom in Wax

The current topic on the PaperArtsy Blog is Wax. The challenge post is HERE. I did a super simple project. I started with a left over piece, cut to atc size, of a Fresco Paint brayered background. Over the background, I stenciled (Lin Brown Stencil 001) Bora Bora Fresco Finish Paint, stamped the script (Mini 61) with Archival Ink Leaf Green, and stamped the flower (Darcy Mini 03) with Jet Black. To add color and detail to the flower I used Faber-Castell Big Brush Pens and a small white Posca paint pen. I doodled around the edge of the atc with the white Posca and a Black Pitt pen and also added some dots to some of the stenciled circles with a Big Brush Pen. Bloom (from Darcy's EDY07) is stamped on a scrap with Jet Black, color added with a Big Brush Pen and glued onto the card. I heated beeswax in an old hot pot and when it was all liquid I dipped the atc in the wax, took it out, and sprinkled on some Beadazzles. The wax cools quickly so to be sure the Beadazzles stayed, I hit it a bit with a heat tool so they could sink more into the wax. I also heated where the word was and scraped off some of the wax as it was a bit heavy there. Oh, before dipping the card into wax, I also signed the back so it's all ready to trade!!!


Sea Dreams

Hello!!!
I'm sharing a dreamy card on the Elizabeth Craft Designs' Blog today. I'd love it if you popped on over there!!!
Friday, February 19, 2016
Make N' Take - Best Friends Forever

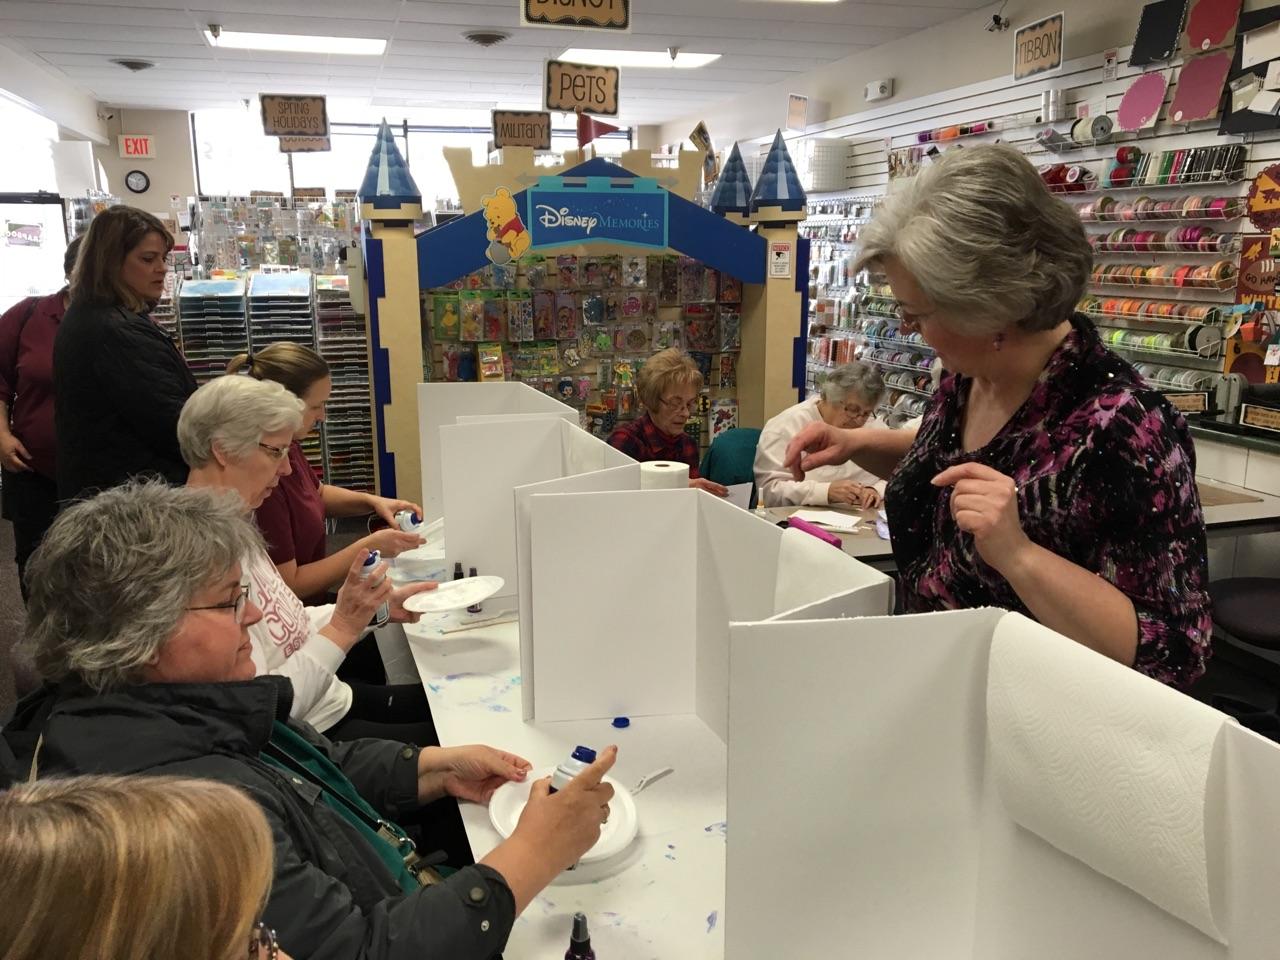
Happy Thursday to You!!!!!!!! I hope your week is going well. This was the card we did yesterday for the make n' take at Memory Bound in Ankeny, IA with one slight difference... we also put 3 purple gems along the body of the butterfly. Over on the Memory Bound Facebook Page Dawn has shared some pictures and she said I could share them here also.
Obviously something was funny in this picture!!!


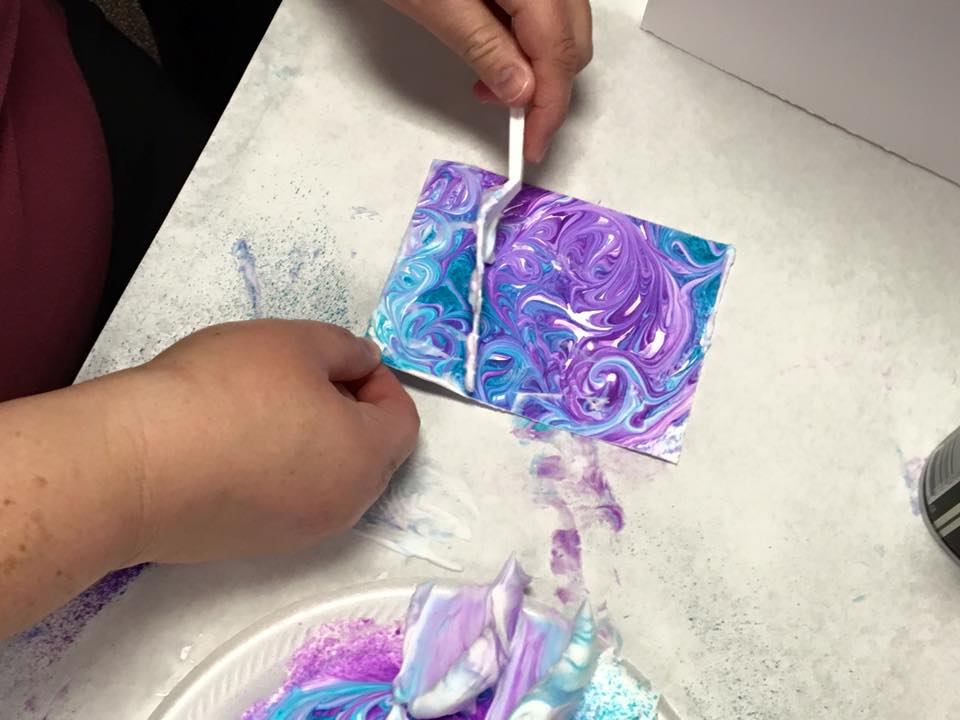
This shows shaving cream on a styrofoam plate and sprayed with Dylusions Inks, Calypso Teal and Crushed Grape.

Here a skewer has been used to swirl the colors.

Then you lay your cardstock into the shaving cream..... bend the paper so it is curved, press in the center of the shaving cream and then let the edges roll down in and press to be sure you have contact with all the paper. If you lay the paper down flat you are likely to have some air pockets between the paper and the colored cream not allowing the color to touch everywhere. Pull the paper up from the cream, scrape it off, put the extra back on the plate and buff up your paper with a paper towel. You can then swirl the ink and shaving cream again and continue making other prints. You can keep making prints as long as you like the prints your getting. You can add more color or even a new color. Once you don't like what your getting anymore then start over with fresh shaving cream.


You don't have to swirl in circles, you can do whatever you'd like.

To finish up, the edges of the card, butterfly, and word were inked with Distress Ink Squeezed Lemonade. The edges are doodled with a black pen. The butterfly also has Wink of Stella Gl. Clear on it. Best and Friends are Elizabeth Craft Designs dies from Suzanne Cannon's A Way With Words line. Best is part of the Best Wishes set and Friends is a die by itself. They are cut from Shimmer Sheetz (Purple Iridescent), white cardstock, and black cardstock and the pieces layered together.


This picture is a bunch of pieces of various colors all done with the shaving cream technique.

Saturday, February 13, 2016
He Will Cover You

Hi There!!!!!!!! Happy Saturday!!!! This is a 5" x 5" box canvas I made for a friend's birthday.
I began the background by adding texture paste through the Tim Holtz stencil, Crackle, in a few places, not covering the whole front. Once this was dry I painted the canvas with PaperArtsy Fresco Finish Paints (Blue Oyster, Beach Hut, South Pacific), top and sides. Next I've added stenciling with Blue Oyster and the Tim Holtz Flourish stencil... stamped a script image (PaperArtsy Sara Naumann stamp) with Archival Ink Watering Can, and splattered on white paint (PaperArtsy Fresco Finish Snowflake). Once dry I mixed South Pacific with PaperArtsy's Satin Glaze, painted it over the top of the canvas and wiped it back leaving the darker color in the cracks of the Texture Paste. Let it dry and then went over the whole canvas, top and sides, with the Satin Glaze.
The scripture and bird are from an Our Daily Bread Designs set of stamps. On a scrap of white cardstock, I applied a thin coat of Blue Oyster using a sponge, dried it, then stenciled (Flourish Stencil) with the same color, dried it, stamped the scripture with Archival Ink Jet Black, tore it out and coated it, front and back, with Satin Glaze. The bird was stamped onto water color paper with Jet Black, colored using a water brush and Distress Inks, dried, and coated, front and back, with Satin Glaze. Once the glaze was dry I added a drop of Glossy Accents over the eye. The leaves popping out of the flowers are an Elizabeth Craft Designs die (Leafy Branch), cut from Soft Finish Cardstock, cut apart into smaller pieces, and colored with Distress Ink. The flowers are a variety from my accumulation of flowers, sometimes stacked together and sometimes not all with a brad added to the center. I also have a piece of lace and some gems on here.


Thursday, February 11, 2016
Make n' Take - Hello

Yesterday was another Totally Fun afternoon leading the make n' take at Memory Bound in Ankeny, IA. Everyone that came in and made the card did a fabulous job and they were all so friendly and fun. What a joy!!!!!!!!!
This Hello card was the project yesterday. For the color in the background we used Distress Paints Salty Ocean, Squeezed Lemonade, and Lucky Clover. Put squiggles of each color on your craft sheet (craft mat, splat mat), spray water over the paint, dip and smoosh the cardstock in the puddle of paint and water, lift, re-dip any spots that need more color or you don't like the look of and then dry with a heat tool. Once the paint it dry the flowers were stenciled using the Tim Holtz Wildflower stencil and Texture Paste. The paste can be left to air dry or dried with the heat tool. Dab Squeezed Lemonade Paint around the edges and dry. Attach the panel to a folded white card. Hello is an Elizabeth Craft Designs, A Way With Words die. It's been die cut from yellow and dark blue cardstock, layered as shown and attached to the panel. For a bit of shimmer the Gl. Clear Wink of Stella pen was brushed over the yellow Hello.


Wednesday, February 10, 2016

Happy Wednesday!!!!! I have a post over on the Quietfire Creations Blog today sharing a Valentine's Day mixed media card. I've included all the directions and some step-out pictures.
Tuesday, February 9, 2016
Super Simple Thanks

So part of yesterdays card was tearing off the top and bottom of the main panel after it was dry. The red strip on this card is one of those torn pieces. For the background here I laid the Tim Holtz Hearts Stencil along the left side of the white cardstock (and put a piece of scrap paper along the right side of the stencil to catch any overspray) and sprayed Distress Spray Stain Twisted Citron through the stencil.. removed the stencil and then added splotches of Twisted Citron by removing the sprayer from the bottle and shaking ink off the end. The panel is dried and then the edges distressed. Attached the red strip, a piece of green washi tape and tied twine around the panel. Thanks (A Way With Words die) is cut from red cardstock with Clear Double Sided Adhesive (Elizabeth Craft Designs) on the back. Super quick and easy card and a way to use up a scrap. Have a great day!!!!

Monday, February 8, 2016
Make n' Take - Thinking of You

This past Wednesday (Feb. 3rd) I had a totally fabulous time leading the weekly make n' take at Memory Bound in Ankeny, IA. They have a make n' take every Wednesday afternoon and I was invited to design a months worth of cards and then, if I wanted, to lead those make n' takes. As you can tell, I said yes, and February was scheduled. You can get more information in their blog post about this month's takes HERE.
This is the card we made this past Wednesday. The background uses Ranger Texture Paste through the Tim Holtz Flourish Stencil across the center of a piece of white cardstock. While the paste is still wet it is sprayed with Distress Spray Stains (Spun Sugar, Worn Lipstick, Barn Door) and the paste blotted with a damp towel to remove some color and add extra texture to the top of the paste. It is then dried with a heat tool and, using a finger, a bit of Distress Paint Tarnished Brass is rubbed over the texture. The top and bottom of the paper is torn off leaving the white edge. The next layer uses white cardstock, the top and bottom torn off, and Distress Paint Tarnished Brass applied with the dabber top in vertical lines along the torn edges. The heart is cut from white cardstock and colored with the Tarnished Brass Paint. Attach the two layers together, wrap with twine, attach to the folded white card and put the heart on with foam tape. The Elizabeth Craft Designs die, Thinking of You, from the A Way With Words Collection designed by Suzanne Cannon of Quietfire Design, is cut from an Adhesive Backed Velvet Sheet, the backing removed and the words stuck to the card. Lastly, if you want, you can add some highlights along the letters with a white pen.
HERE is a post on Memory Bound's blog for this weeks Make n' Take. If you live close enough, I'd love for you to come and say hi!!!!


Subscribe to:
Posts (Atom)
